Basement waterproofing might sound like a chore tied to rainy days and old houses. Yet, the biggest shock is just how widespread hidden moisture actually is. More than 60 percent of South African homes with basements show some signs of water intrusion and many owners are not even aware until damage is done. This means a simple basement check could save you from costly repairs and health risks most people never even consider.
Table of Contents
- Step 1: Assess Your Current Situation
- Step 2: Identify Sources of Water Intrusion
- Step 3: Prepare The Basement For Waterproofing
- Step 4: Apply Waterproofing Solutions
- Step 5: Install Drainage Systems
- Step 6: Verify Effectiveness And Complete Final Checks
Quick Summary
| Key Point | Explanation |
|---|---|
| 1. Conduct a thorough visual inspection. | Assess your basement for water stains, mould, and dampness to identify current water intrusion issues. |
| 2. Document findings and vulnerabilities. | Keep a record of cracks, moisture locations, and drainage conditions to guide waterproofing strategies. |
| 3. Prepare surfaces meticulously for waterproofing. | Clean thoroughly, repair imperfections, and ensure surfaces are fully dry before applying treatments. |
| 4. Choose appropriate waterproofing solutions. | Select methods based on specific moisture issues, e.g., interior coatings for minor issues or external membranes for major protection. |
| 5. Verify the effectiveness after applying solutions. | Conduct water tests and check moisture levels to ensure waterproofing measures successfully prevent water intrusion. |
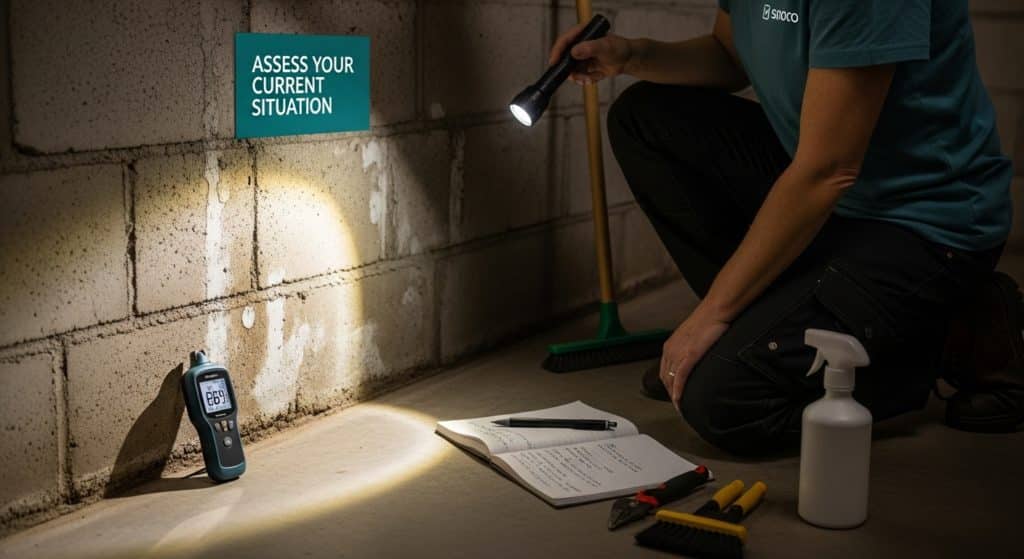
Step 1: Assess Your Current Situation
Before diving into basement waterproofing steps, understanding your current basement condition is critical. This initial assessment will determine the specific challenges and strategies required to protect your property from water damage. Start by conducting a thorough visual inspection, looking for telltale signs of moisture intrusion such as water stains, efflorescence, mould growth, or musty odours.
Careful examination involves checking multiple areas systematically.
Inspect wall surfaces for discolouration, white chalky deposits, or subtle dampness that indicates potential water penetration. Pay close attention to floor and wall junctions, looking for hairline cracks or areas where water might seep through. Dark or damp patches often signal underlying moisture problems that require immediate investigation.
To perform a comprehensive assessment, you will need some basic tools. Recommended equipment includes a bright flashlight, moisture metre, and notebook for documenting findings. According to SANS 10400 Building Standards, understanding structural integrity is paramount when evaluating potential water infiltration risks.
Consider the geological characteristics of your property. South African properties often have unique soil compositions and water table levels that influence basement moisture conditions. Areas with high clay content or regions experiencing significant rainfall might require more robust waterproofing strategies. Check exterior grading around your foundation to ensure water naturally flows away from the building.
Below is a table summarising the essential tools and their purposes when assessing your basement for water intrusion.
| Tool | Purpose | Recommended Use |
|---|---|---|
| Bright flashlight | Illuminates dark areas for thorough inspection | Check corners, junctions, and cracks |
| Moisture metre | Measures moisture levels in walls and floors | Identify hidden dampness |
| Notebook | Record findings and vulnerabilities | Document cracks and moisture patches |
| Protective gloves | Protect hands during inspection and cleaning | Handling rough surfaces and debris |
| Camera | Take photographs for documentation | Log identified entry points visually |
Verification is key to a successful assessment. By the end of this step, you should have a clear understanding of:
- Specific locations of moisture intrusion
- Potential entry points for water
- Extent of existing water damage
- Structural vulnerabilities
This detailed evaluation provides the foundation for developing a targeted waterproofing approach, ensuring you address precise moisture challenges rather than implementing generic solutions.
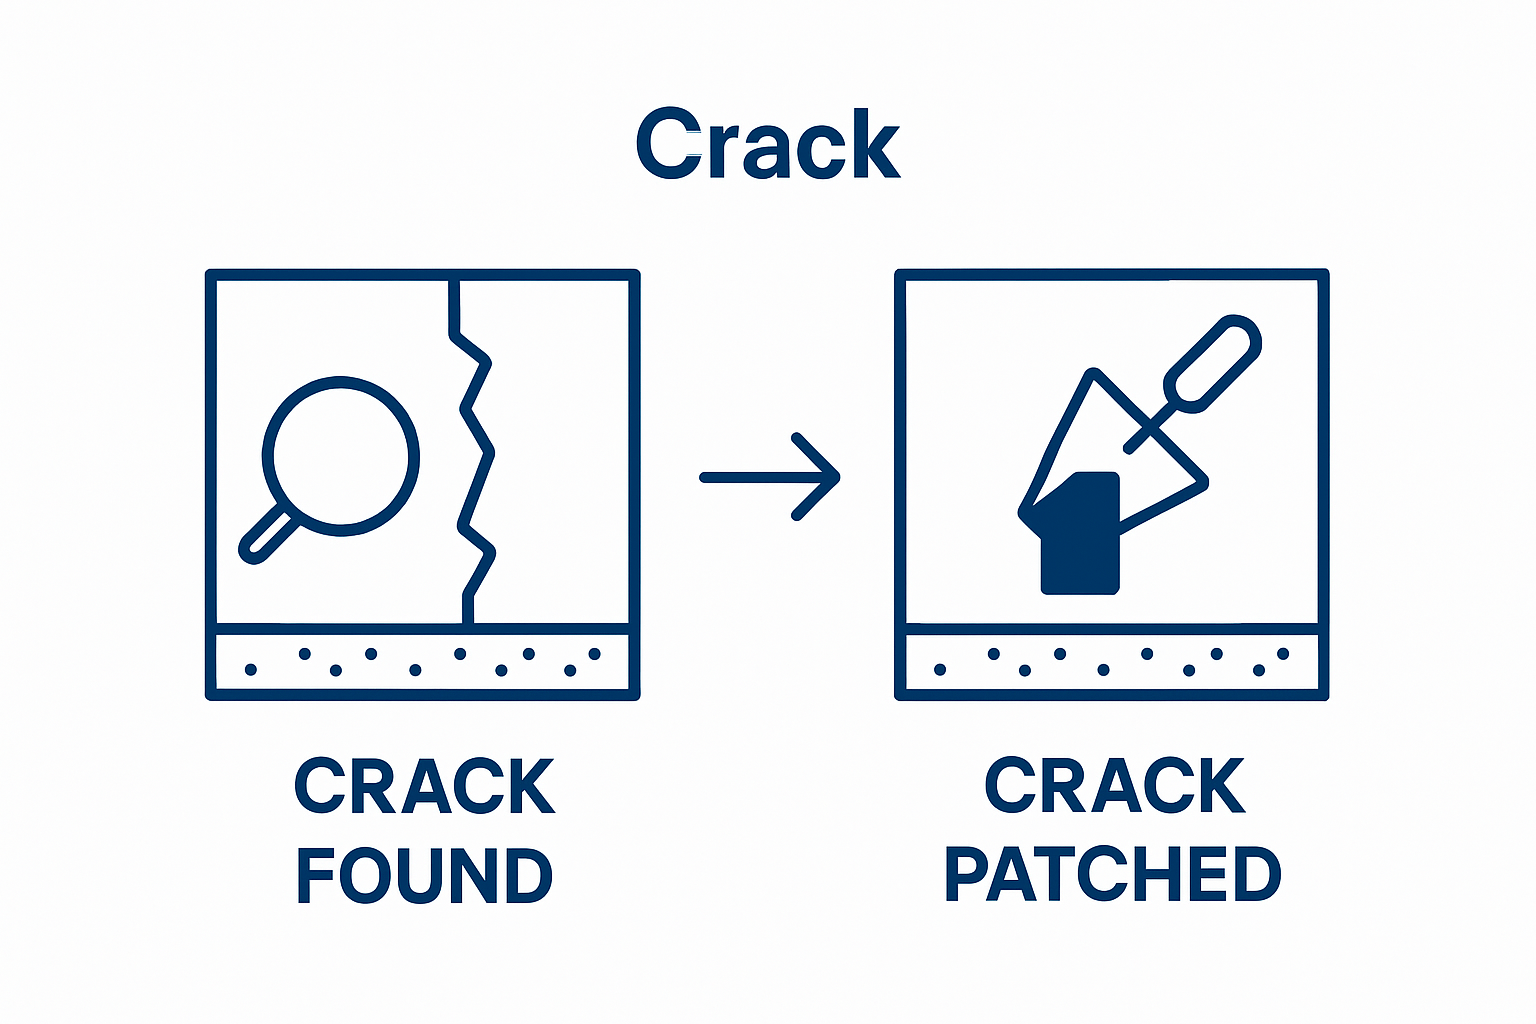
Step 2: Identify Sources of Water Intrusion
Identifying water intrusion sources is a critical step in your basement waterproofing journey. Water can enter through multiple pathways, and pinpointing these specific entry points requires a systematic and thorough approach. Understanding the exact mechanisms of moisture penetration will enable you to develop targeted solutions that effectively protect your basement from water damage.
Begin by examining your basement walls and floor comprehensively. Look for visible cracks, especially those running horizontally or diagonally, which often indicate significant structural stress. Hairline fractures might seem insignificant but can become major water entry points during heavy rainfall. Use a bright flashlight and run your hand along walls and floor surfaces to detect subtle irregularities that might not be immediately visible.
According to SANS 10400 Building Standards, understanding the structural integrity of your basement walls is paramount. Pay particular attention to areas where walls meet the floor, as these junctions are frequently vulnerable to water penetration. Check for signs of efflorescence a white, powdery substance that indicates water has previously passed through the concrete or masonry.
External factors play a significant role in water intrusion. Examine your property’s exterior grading and drainage systems. Ensure that ground surrounding your foundation slopes away from the building, preventing water from pooling near basement walls. Gutters and downspouts should direct water at least 1.5 metres away from the foundation to minimise potential moisture infiltration.
Verification of your water intrusion investigation should include documenting your findings:
- Precise location of each crack or potential entry point
- Measurement and photograph of identified vulnerabilities
- Assessment of surrounding soil and drainage conditions
- Notes on potential external water flow patterns
This detailed reconnaissance provides the foundation for your subsequent waterproofing strategy, transforming potential vulnerabilities into opportunities for comprehensive basement protection.
Step 3: Prepare the Basement for Waterproofing
Preparing your basement for waterproofing is a critical phase that demands meticulous attention to detail. Proper preparation can significantly enhance the effectiveness of your waterproofing efforts and prevent potential future moisture issues. This step involves creating an optimal environment for waterproofing interventions by thoroughly cleaning and repairing the existing surfaces.
Begin by completely clearing the basement space. Remove all furniture, stored items, and debris that might obstruct your waterproofing work. This comprehensive clearance allows for a detailed inspection and ensures unimpeded access to walls and floor surfaces. Protective sheeting and masking tape will be essential to safeguard areas not directly being treated during the waterproofing process.
According to SANS 10400 Building Standards, surface preparation is fundamental to successful waterproofing. Start by thoroughly cleaning all surfaces using a high-pressure water cleaner to remove dirt, loose paint, efflorescence, and any existing sealants. This process not only cleans but also helps identify additional cracks or structural weaknesses that might have been hidden under grime or previous coatings.
Addressing surface imperfections is your next priority. Use specialised concrete repair compounds to fill small cracks and smooth out uneven areas.
 For larger structural cracks, you might need professional intervention to ensure proper repair. Smooth, clean surfaces are crucial for optimal adhesion of waterproofing membranes or coatings. Allow sufficient drying time after repairs, ensuring the surface is completely dry before applying any waterproofing treatments.
Here is a checklist table to help you verify that your basement waterproofing preparation is complete and the surface is ready for further treatment.
| Preparation Step | Completion Criteria | Verified (Yes/No) |
|---|---|---|
| Remove all furniture and stored items | Basement space clear and accessible | |
| Clean all surfaces thoroughly | No dirt, dust, or efflorescence remaining | |
| Repair cracks and surface imperfections | All visible issues filled and smoothed | |
| Drying time allowed | Surfaces fully dry to the touch | |
| Protect unaffected areas with sheeting | Areas not to be treated fully covered | |
| Final inspection for readiness | No hidden structural weaknesses discovered |
Verification of your preparation should include:
- Complete removal of all movable items from the basement
- Thorough surface cleaning and inspection
- Repair of all visible cracks and surface irregularities
- Confirmation of a clean, dry surface ready for waterproofing treatment
This meticulous preparation sets the stage for a robust and effective waterproofing solution, transforming your basement into a dry, protected space.
Step 4: Apply Waterproofing Solutions
Applying waterproofing solutions represents the critical moment where your basement transformation truly begins. Selecting the right waterproofing method is paramount to creating a long lasting moisture barrier that protects your property from potential water damage. Different basement conditions require specific approaches, making careful product selection and application essential.
Start by choosing between interior and exterior waterproofing techniques. Interior solutions like crystalline waterproofing compounds or epoxy injections work well for minor moisture issues, creating a seamless barrier within concrete walls. Exterior waterproofing typically involves applying specialized membranes and drainage systems that prevent water from penetrating the foundation walls in the first place.
According to Agrment South Africa, selecting approved waterproofing materials is crucial for long term effectiveness. When applying liquid membranes, use rollers or sprayers to ensure uniform coverage. Work systematically from bottom to top, applying multiple thin layers rather than one thick coat. This approach ensures better penetration and more consistent protection against moisture intrusion.
For concrete surfaces, consider using penetrating sealers that chemically react with the concrete to create a permanent moisture barrier. These products fill microscopic pores and capillaries, preventing water molecules from passing through. Pay extra attention to corners, joints, and areas around pipes or utility penetrations where water can easily find entry points.
The following table provides a quick comparison of common basement waterproofing solution options and their suitable applications.
| Method | Typical Application | Pros | Cons |
|---|---|---|---|
| Interior crystalline coating | Minor internal seepage or damp | Easy application, cost-effective | May not stop heavy external leaks |
| Epoxy injections | Filling cracks and minor leaks | Seals cracks, permanent solution | Needs dry surfaces, limited reach |
| Exterior membrane | Severe or recurring external moisture | Strong barrier against water ingress | Higher cost, external excavation needed |
| Penetrating concrete sealer | General moisture proofing for basements | Long-lasting, penetrates deeply | Limited effectiveness on large cracks |
Verification of your waterproofing application should include:
- Complete and uniform coverage of all surfaces
- No visible gaps or missed spots in the membrane
- Proper thickness of applied waterproofing material
- Confirmation that all potential water entry points are sealed
This meticulous application transforms your basement from a vulnerable space to a protected environment, ready to withstand moisture challenges for years to come.
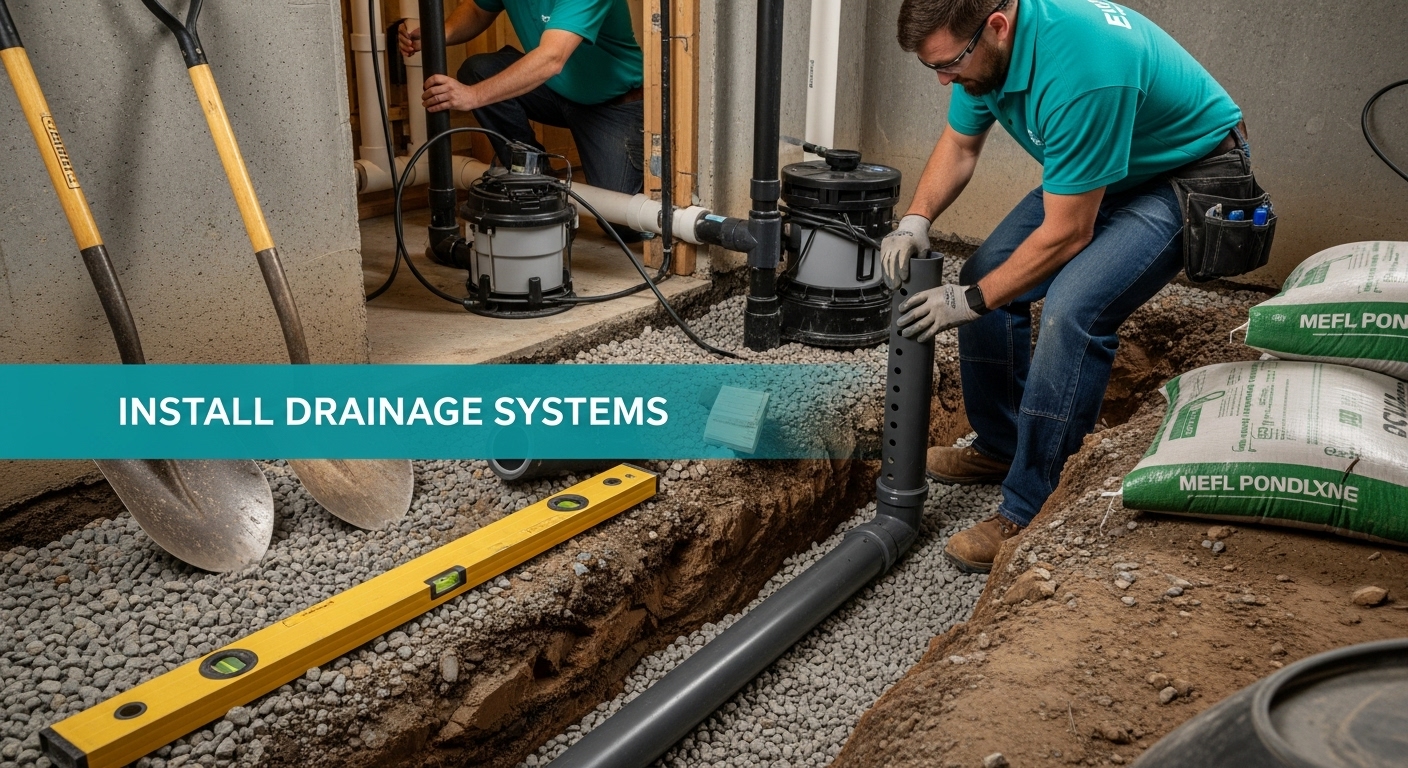
Step 5: Install Drainage Systems
Installing effective drainage systems is a crucial defence against basement water intrusion. Proper drainage redirects water away from your foundation, preventing moisture accumulation that could compromise your waterproofing efforts. This step transforms your basement from a potential water trap into a resilient, dry space.
Begin by focusing on exterior drainage solutions. Create a positive slope around your foundation, ensuring ground levels gradually descend away from the building. This natural gradient helps direct rainwater and surface runoff away from basement walls. Typically, you want a minimum slope of 15 centimetres over the first 3 metres from your foundation, which prevents water from pooling near critical structural points.
According to SANS 10400 Building Standards, implementing weep holes and adequate drainage channels is essential. Install a perimeter drainage system around your basement, using perforated pipes surrounded by gravel. These pipes capture groundwater and channel it away from the foundation, significantly reducing hydrostatic pressure that could force water through basement walls.
Interior drainage solutions complement exterior systems. Consider installing a French drain or interior perimeter drainage system along the basement floor. These systems collect water that might penetrate interior walls and redirect it to a sump pump, which then expels water away from the building. Ensure the drainage pipes have sufficient gradient and are positioned to capture water efficiently.
Verification of your drainage installation should include:
- Confirmed positive exterior ground slope
- Properly installed perimeter drainage pipes
- Functional sump pump system
- Clear water flow paths away from foundation
By meticulously implementing these drainage strategies, you create a comprehensive water management system that protects your basement from potential moisture challenges.
Step 6: Verify Effectiveness and Complete Final Checks
Verifying the effectiveness of your basement waterproofing is the final and most critical step in ensuring long term protection for your property. This comprehensive evaluation determines whether your waterproofing interventions will successfully prevent moisture intrusion. A meticulous final check transforms your technical work into a reliable defence against potential water damage.
Begin by conducting a controlled water test to simulate various moisture scenarios. Use a garden hose to systematically spray water against exterior foundation walls, observing how water flows and whether any moisture penetrates your newly installed waterproofing systems. Pay particular attention to previously identified vulnerable areas, checking for any signs of seepage or unexpected water migration through walls or floor surfaces.
According to Drainage and Water Supply Guidelines, comprehensive final inspections are crucial in confirming system integrity. Employ a moisture metre to measure humidity levels in basement walls and floor, ensuring that your waterproofing solutions have created a truly dry environment. Any readings above acceptable moisture thresholds might indicate areas requiring additional treatment or further investigation.
Carefully inspect all sealed areas, drainage channels, and waterproofing membranes for potential weaknesses. Look for subtle signs such as minor cracks, slight discolourations, or areas where sealants might not have bonded perfectly. Use a bright flashlight and run your hands along surfaces to detect any irregularities that visual inspection might miss. Remember that even microscopic imperfections can become significant water entry points during heavy rainfall or prolonged moisture exposure.
Verification of your waterproofing effectiveness should include:
- Successful water penetration test results
- Consistent low moisture readings across all surfaces
- No visible water seepage or dampness
- Confirmation of proper drainage system functionality
This final verification step ensures your basement remains a dry, protected space, safeguarding your property against potential water damage for years to come.
This table summarises key verification checks to confirm that your installed drainage system and waterproofing measures are effective.
| Verification Check | Desired Outcome | Status (Pass/Fail) |
|---|---|---|
| Exterior ground slope positive | Water directed away from the foundation | |
| Perimeter drainage pipes functioning | No visible blockages or pooling around pipes | |
| Sump pump operational | Water collected and expelled efficiently | |
| Water penetration test results | No leaks or dampness after controlled tests | |
| Moisture metre readings | Consistently low moisture across all surfaces | |
| All sealed and treated areas intact | No cracks, gaps, or peeling in membranes |
Ready to Secure Your Basement for 2025?
If moisture patches, hidden cracks, and drainage headaches are causing you concern, you are not alone. Many South African property owners struggle to achieve a truly dry, reliable basement, and the risk of expensive damage only grows if you miss a step in the process or use an incomplete solution. Our latest guide on essential waterproofing steps highlights the importance of careful assessments, targeted repairs, and robust drainage systems. But putting this advice into practice without expert help can be overwhelming. Explore more tips and insights on our Uncategorized – Pro Waterproofing page and discover the proven methods used by industry leaders.

Stop letting uncertainty and water intrusion threaten your home. Visit Pro Waterproofing to request a professional evaluation and get tailored solutions for every stage of your basement project. Act today to protect your property’s value and ensure lasting dryness with the help of South Africa’s trusted waterproofing specialists.
Frequently Asked Questions
What are the key steps in the basement waterproofing process?
The essential steps include assessing your current situation, identifying sources of water intrusion, preparing the basement, applying waterproofing solutions, installing drainage systems, and verifying the effectiveness of the waterproofing.
How can I identify sources of water intrusion in my basement?
Conduct a thorough visual inspection of walls and floors for cracks, damp patches, or signs of mould. Also, check external grading and drainage systems to ensure water runs away from the foundation.
What types of waterproofing solutions are available for basements?
Interior solutions include crystalline waterproofing compounds and epoxy injections, while exterior solutions involve applying specialised membranes and drainage systems that prevent water from entering through the foundation.
How do I ensure that my waterproofing efforts are effective?
Perform a controlled water test by spraying water against exterior walls, and use a moisture metre to measure humidity levels in the basement. Inspect all sealed areas and drainage systems for potential weaknesses to confirm system integrity.