Did you know that over 60 percent of homes with basements experience water intrusion at some point? Unchecked moisture can lead to mould, damage, and costly repairs. Before sealing a basement wall, understanding what causes leaks and how to spot early trouble can save you a lot of stress and money. This step-by-step approach will help you find sources of moisture, make repairs, and create a dry, healthy basement that lasts.
Table of Contents
- Step 1: Assess Wall Condition And Identify Moisture Sources
- Step 2: Prepare Basement Walls And Clear Surrounding Area
- Step 3: Repair Cracks And Address Surface Imperfections
- Step 4: Apply Waterproof Sealing Products Thoroughly
- Step 5: Inspect And Test Wall Sealing Effectiveness
Quick Summary
| Key Point | Explanation |
|---|---|
| 1. Inspect walls for damage and moisture | Thoroughly check walls for cracks, dampness, and signs of water intrusion to identify potential moisture sources before sealing. |
| 2. Prepare surfaces before waterproofing | Clean walls by removing debris, old coatings, and efflorescence to ensure optimal adhesion of waterproofing products. |
| 3. Repair cracks effectively | Use the right fillers for cracks, ensuring deep penetration and smooth finishes to prevent future water leaks. |
| 4. Apply waterproof sealing products properly | Use high-quality, flexible sealants applied in multiple thin coats for effective moisture barrier creation. |
| 5. Test sealing effectiveness after application | Perform a water spray test to check for leaks, focusing on problematic areas for assurance of complete water protection. |
![]() |
|
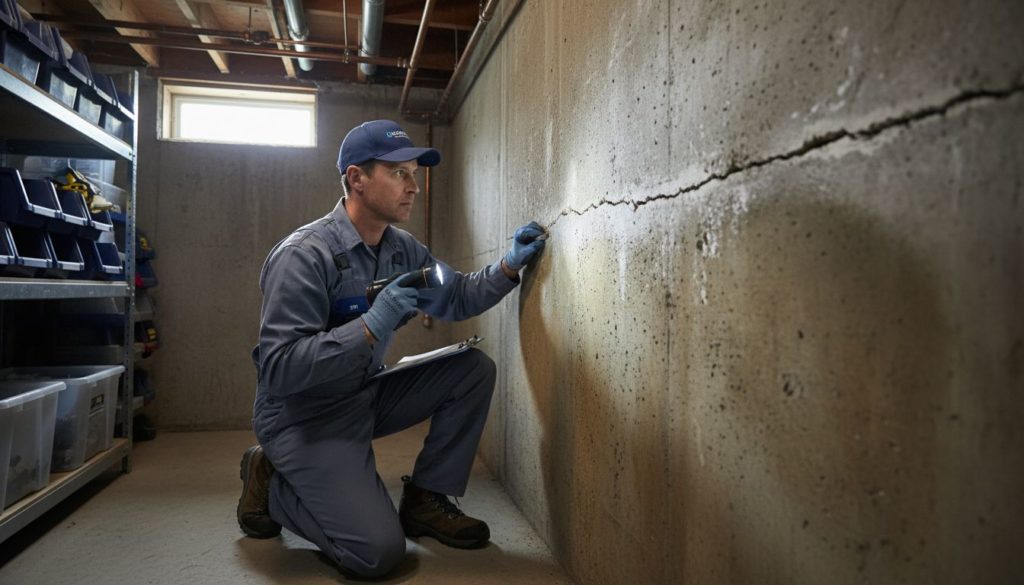
Step 1: Assess Wall Condition and Identify Moisture Sources
When preparing to seal basement walls, the first critical step is thoroughly examining your foundation for existing damage and potential moisture entry points. According to Msasa, professional evaluation requires carefully inspecting walls to close cracks, repair structural voids, and prepare surfaces for waterproofing.
To conduct a comprehensive wall assessment, start by performing a detailed visual inspection. Look for telltale signs of moisture intrusion such as discoloration, efflorescence (white powdery residue), dark spots, mould growth, or visible water stains. Run your hands along the walls to check for dampness or soft spots that might indicate ongoing water penetration. Pay special attention to wall corners, floor junctions, and areas near exterior ground level where water is most likely to seep through. Use natural light or a bright torch to highlight subtle changes in wall texture or potential hairline cracks.
As Euro Rubber suggests, identifying moisture sources is crucial before applying any waterproofing solution. Common moisture entry points include foundation cracks, improper drainage around the building, high groundwater levels, and insufficient exterior waterproofing. Make a detailed map or list of all identified issues to guide your subsequent repair and sealing strategies. By meticulously documenting these problem areas, you will create a targeted approach for effectively protecting your basement against water intrusion.
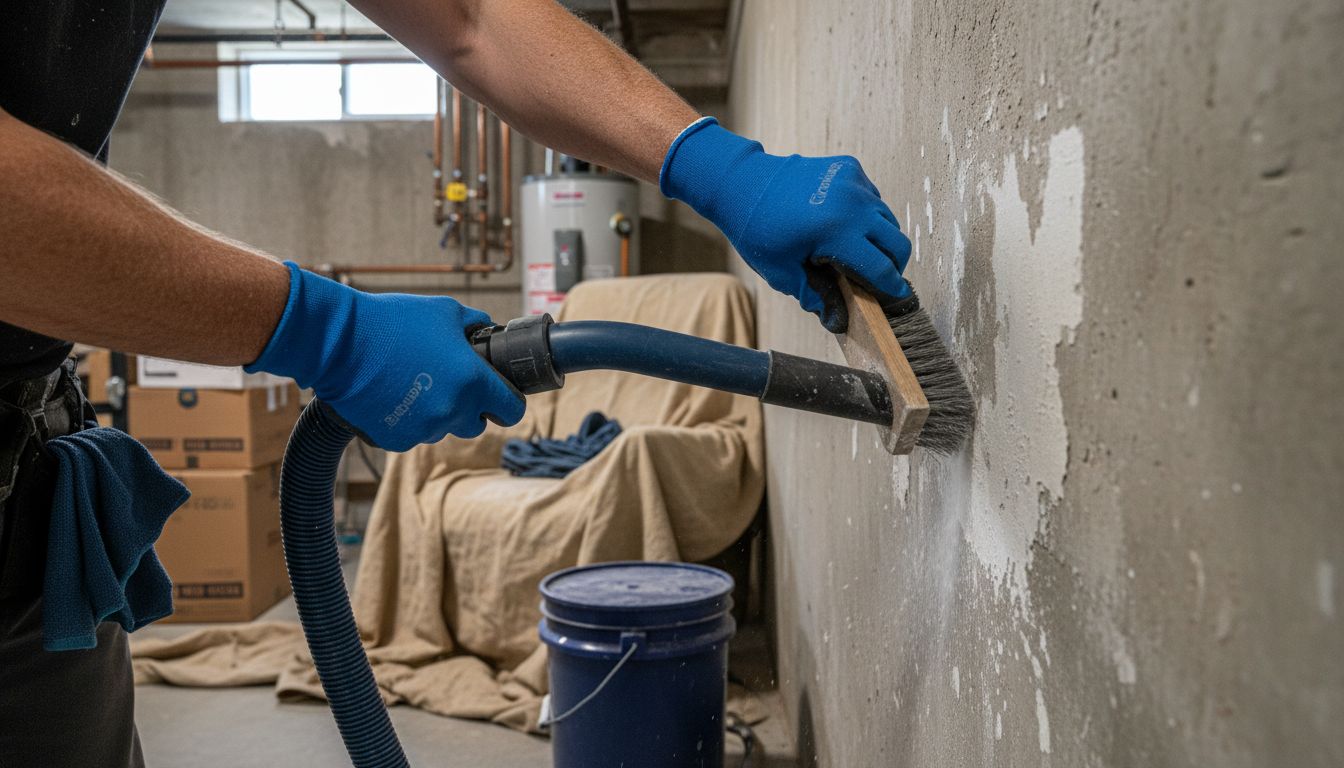
Step 2: Prepare Basement Walls and Clear Surrounding Area
Now that you have assessed the wall condition, the next crucial step is thoroughly preparing your basement walls for waterproofing. As recommended by Powafix, this preparation involves removing all loose or flaking material and old waterproof coatings to ensure a clean surface ready for new protective treatments.
Begin by clearing the surrounding area completely. Move all furniture, stored items, and equipment away from the walls to create a clear workspace. Use protective drop cloths to cover any remaining items and prevent dust or debris from settling on them. For the wall preparation, start with a robust cleaning process. Use a wire brush or scraper to remove any loose paint, old sealants, efflorescence, or crumbling concrete. Vacuum the walls thoroughly to eliminate dust and small particles.
 If you encounter significant mould or mildew, use a specialised cleaning solution to treat these areas before proceeding.
Spec Coats emphasises the importance of ensuring surfaces are completely clean and free from contaminants before applying waterproofing membranes. After initial cleaning, inspect the walls for any significant cracks or structural damage that might require professional repair. Small hairline cracks can typically be addressed with appropriate fillers, but larger structural issues may need expert intervention. By meticulously preparing your basement walls, you are creating the ideal foundation for an effective and long lasting waterproofing solution. For additional insights into preventing basement seepage, check out our guide on home maintenance tips that can complement your waterproofing efforts.
Step 3: Repair Cracks and Address Surface Imperfections
With your walls cleaned and prepared, the next critical phase is addressing any cracks or surface imperfections that could compromise your waterproofing efforts. According to Specifile, using a tough waterproof filler based on special thermoplastic resins is essential for effectively filling cracks in cement plaster, gypsum, and various surface types.
Start by carefully examining the walls and identifying all visible cracks. For small hairline cracks, use a flexible masonry crack filler that can accommodate slight structural movements. Apply the filler using a putty knife, ensuring you press it deeply into the crack and smooth the surface for a seamless finish. For wider or more significant cracks, you might need to use a two part epoxy or polyurethane injection system that can penetrate deeper and provide more robust sealing. As Cosmodec recommends, choose a two component waterproof crack and joint sealer suitable for concrete surfaces to ensure permanent crack resolution.
After applying the fillers, allow sufficient time for complete curing before moving to the next waterproofing stage. For comprehensive insights into understanding wall cracks and their implications, explore our detailed guide on wall crack mysteries that can help you better comprehend potential structural issues. Remember that while minor cracks can often be self repaired, extensive or recurring cracks might indicate more serious structural problems requiring professional assessment.
Step 4: Apply Waterproof Sealing Products Thoroughly
With your basement walls cleaned, repaired, and prepared, you are now ready to apply waterproof sealing products that will protect your space from moisture intrusion. As Leroy Merlin recommends, use a robust, flexible water-based acrylic polymer rubberized coating designed for waterproofing and protecting various surfaces.
Begin the application process by selecting a high quality waterproofing membrane or sealant specifically formulated for basement walls. Choose a product that offers both water resistance and flexibility to accommodate minor structural movements. Using a roller or specialised brush, apply the product in smooth, even strokes, ensuring complete coverage of the wall surface. Work methodically from top to bottom, overlapping each stroke slightly to prevent any potential gaps. Pay extra attention to previously repaired crack areas and corners where moisture typically penetrates. Apply multiple thin layers rather than one thick coat, allowing sufficient drying time between applications as per the manufacturer instructions.
For comprehensive guidance on executing this process effectively, our waterproofing application process guide offers additional insights.
Remember that proper application is crucial for creating a lasting moisture barrier that will protect your basement from potential water damage and structural deterioration.
Step 5: Inspect and Test Wall Sealing Effectiveness
After applying your waterproofing membrane, the critical final step is thoroughly inspecting and testing the effectiveness of your sealing work. According to Spec Coats, you should carefully examine the waterproofing membrane to ensure it completely renders surfaces waterproof and can resist water pressure up to 5 bar.
Start by conducting a visual inspection of the entire sealed surface, looking for any inconsistencies, bubbles, thin spots, or areas where the coating might not have adhered properly. As Euro Rubber recommends, verify that the coating provides a seamless and highly flexible protection with no weak spots or overlaps. To test the waterproofing, you can perform a simple water spray test by using a garden hose to simulate rainfall and observing how water beads or flows off the surface. Pay close attention to previously problematic areas like corners and previous crack locations to ensure complete coverage.
For more comprehensive guidance on identifying potential waterproofing issues, review our waterproofing inspection guide. Keep in mind that while a DIY approach can be effective, persistent moisture problems or complex structural issues might require professional assessment to guarantee long term basement protection.
Protect Your Basement Walls with Trusted Waterproofing Solutions
Sealing basement walls to prevent water damage requires more than just DIY fixes. You understand the frustration of cracking, dampness, and mould growth that threaten your home’s safety and comfort. Achieving lasting waterproofing means addressing every detail from thorough wall preparation to expert application of sealing products. Our resources on Uncategorized – Pro Waterproofing empower you with knowledge, but for reliable and professional results, partnering with trusted experts is essential.

Do not let moisture issues worsen. At Pro Waterproofing, we specialise in comprehensive basement waterproofing that tackles cracks, seals imperfections, and restores structural integrity. Take control today and safeguard your property from costly damage. Visit our site now to discover proven solutions and request your personalised quote. Your basement deserves protection that lasts.
Frequently Asked Questions
How do I assess the condition of my basement walls before sealing them for waterproofing?
To assess your basement walls, conduct a thorough visual inspection for signs of moisture intrusion, such as mold or efflorescence. Additionally, check for cracks and soft spots, especially along corners and floor junctions, and document any issues you find for future repairs.
What steps should I take to prepare my basement walls for waterproofing?
To prepare your basement walls, start by removing all loose materials and old waterproof coatings. Then clean the walls thoroughly using a wire brush and vacuum away dust to create a clean surface for the new waterproofing treatment.
How do I repair cracks in my basement walls before applying waterproof sealing products?
Repair cracks in your basement walls by applying an appropriate filler suitable for the size of the crack. For small cracks, use a flexible masonry filler; for larger cracks, consider a two-part epoxy or polyurethane injection system to ensure a robust seal.
What type of waterproofing product should I use on my basement walls?
Select a high-quality waterproofing membrane or sealant specifically formulated for basement applications that offers both water resistance and flexibility. Ensure that the product can accommodate minor structural movements to maintain effectiveness over time.
How can I test the effectiveness of my basement wall sealing after application?
After sealing your basement walls, perform a simple water spray test by using a garden hose to simulate rainfall. Observe how the water behaves on the surface, looking for beading or runoff, especially in previously problematic areas, to confirm a solid waterproof seal.
What should I do if I notice persistent moisture problems after sealing my basement walls?
If you experience ongoing moisture problems after sealing, it may indicate deeper structural issues that require professional assessment. Consider consulting a foundation expert to diagnose the root cause and recommend appropriate solutions for long-term waterproofing.