Did you know that over 60 percent of roof leaks are caused by unnoticed vulnerabilities and poor waterproofing? Even a small crack or missed spot can turn into costly water damage. For homeowners, protecting your roof is about more than comfort. It is about preventing expensive repairs and keeping your property safe. Discover practical steps that make it easy to spot weak points and ensure long-lasting waterproof protection for your home.
Table of Contents
- Step 1: Assess Roof Condition And Identify Vulnerabilities
- Step 2: Clean And Prepare Roof Surface Thoroughly
- Step 3: Select And Apply Suitable Waterproofing Products
- Step 4: Seal Joints, Cracks, And Roof Penetrations Carefully
- Step 5: Inspect And Test Waterproofing For Complete Protection
Quick Summary
| Key Point | Explanation |
|---|---|
| 1. Conduct a thorough roof assessment | Inspect the entire roof for signs of damage, focusing on vulnerable areas like tiles, joints, and chimneys. |
| 2. Clean the roof thoroughly before waterproofing | Remove debris and contaminants to ensure proper adherence of new waterproofing materials to your roof surface. |
| 3. Choose waterproofing products carefully | Select products based on roof material and environmental conditions to ensure long-lasting protection against moisture. |
| 4. Seal all joints and cracks diligently | Address potential water entry points by using the correct sealants for different roofing materials and reinforcing them effectively. |
| 5. Test the waterproofing after application | After treatment, conduct inspections and flood tests to confirm that the waterproofing is effective and comprehensive. |
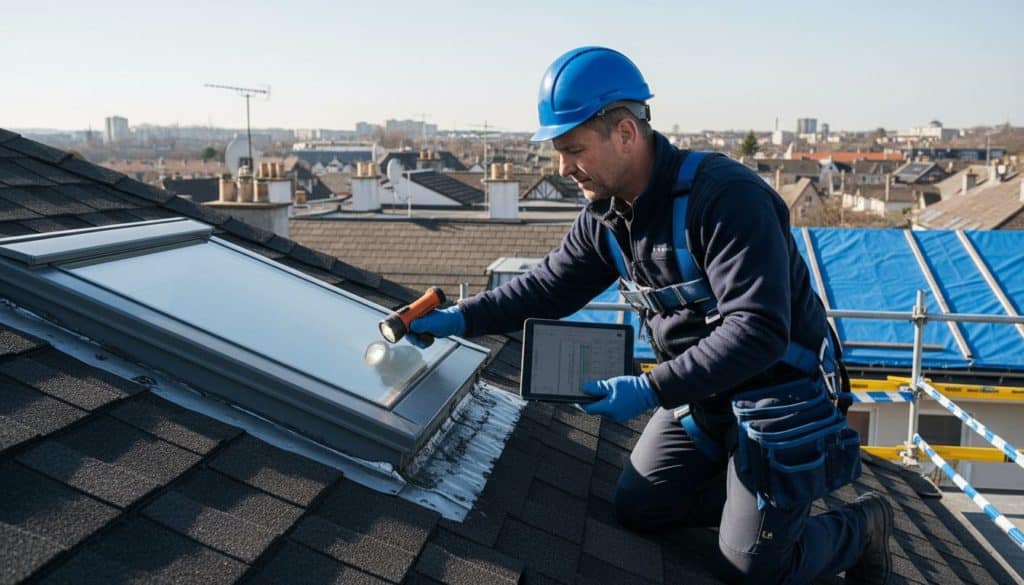
Step 1: Assess Roof Condition and Identify Vulnerabilities
Identifying potential roof vulnerabilities is your first critical step in waterproofing. This assessment helps you understand the current state of your roof and pinpoint areas requiring immediate attention.
Begin with a thorough visual inspection of your entire roof surface. Look for telltale signs of wear and potential water entry points such as cracked tiles, rusted metal sheets, or areas with missing protective coatings. According to the examples of leaky roofs guide, common vulnerabilities include:
- Hairline fractures in concrete or clay tiles
- Corroded metal sheet joints
- Deteriorating roof sealant
- Areas around chimneys and skylights
- Edge connections and roof perimeter
As outlined by the South African National Standard (SANS) 10400, roofs must resist rain penetration and maintain structural integrity. This means paying close attention to any signs of water damage such as discoloration, moss growth, or soft spots that could indicate underlying moisture problems.
For a comprehensive assessment, use a sturdy ladder and observe your roof from multiple angles. Examine both the exterior surface and interior ceiling for signs of water infiltration. Check roof valleys, flashing points, and areas around vents where water might potentially seep through.
Here’s a summary of key assessment points for common roof vulnerabilities:
| Vulnerability Area | Common Issues | What to Check For |
|---|---|---|
| Tiles & Concrete Surfaces | Hairline fractures Cracked tiles |
Visible cracks Surface breaks |
| Metal Roofs | Rusted joints Corrosion |
Rust patches Deterioration |
| Roof Sealant & Coatings | Deterioration Missing sections |
Peeling Gaps or soft spots |
| Chimneys & Skylights | Weak seals Water ingress |
Discolouration Damp surrounds |
| Roof Edges & Valleys | Loose connections Debris build-up |
Split joints Water pooling |
Pro Tip: Take clear photographs of any damage or potential vulnerabilities to track changes and provide documentation for potential repairs.
Once you have completed your initial assessment, you will be ready to move forward with targeted waterproofing strategies that address your specific roof condition.
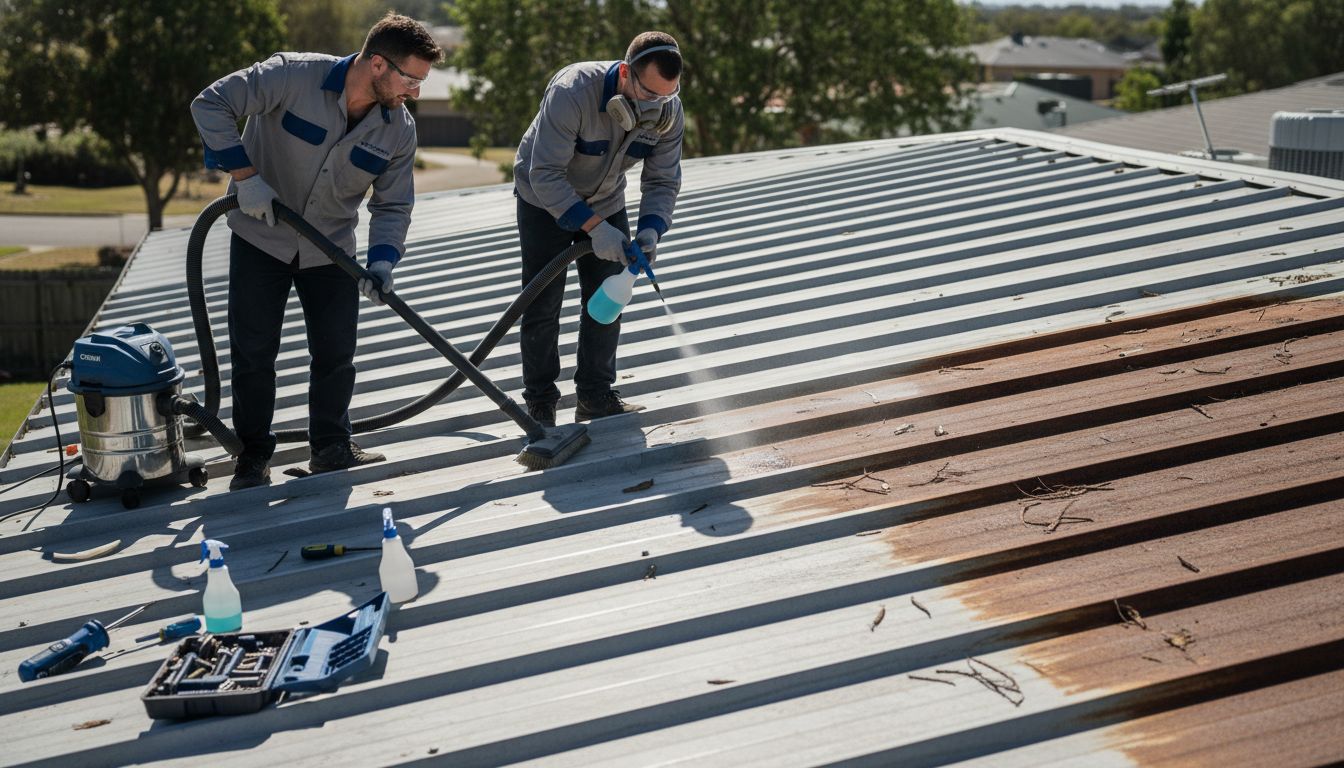
Step 2: Clean and Prepare Roof Surface Thoroughly
Cleaning and preparing your roof surface is a critical step in ensuring effective waterproofing. This process removes existing contaminants and creates an optimal surface for new protective treatments.
Start by thoroughly removing all existing debris, old waterproofing materials, and surface contaminants. According to the City of Ekurhuleni’s technical guidelines, your cleaning process should meticulously eliminate any substances that might prevent proper adhesion of new waterproofing membranes.
Begin with a comprehensive cleaning approach:
- Remove loose debris using soft brushes and industrial vacuum equipment
- Wash the surface with appropriate cleaning solutions compatible with your roof material
- Inspect for and repair any visible surface cracks or structural weaknesses
- Check and tighten all roof fixings and connections
As specified in the effective roof waterproofing workflow, special attention must be given to metal substrates. For metal roofs, use specific cleaning techniques that eliminate dust, rust, and potential contaminants without damaging the underlying surface.
The Gauteng Provincial Legislature recommends carefully inspecting and replacing any loose or missing screws during this preparation stage. Pay particular attention to roof edges, joints, and areas prone to water penetration.
Pro Tip: Use professional grade cleaning equipment and solutions specific to your roof material to prevent potential damage during the preparation process.
Once your roof surface is completely cleaned and prepared, you will be ready to move forward with applying waterproofing treatments that will protect your property effectively.
Step 3: Select and Apply Suitable Waterproofing Products
Selecting the right waterproofing products is crucial for protecting your roof against moisture damage and ensuring long lasting protection. Your choice will directly impact the effectiveness and durability of your waterproofing treatment.
When choosing waterproofing solutions, consider the specific characteristics of your roof material and local environmental conditions. According to the Professional Roof and Waterproofing Association (PRAWA), materials must be carefully selected to suit South Africa’s unique weather challenges.
Key considerations for product selection include:
- Compatibility with your existing roof substrate
- Resistance to UV radiation and temperature fluctuations
- Flexibility and elongation properties
- Chemical composition suitable for your specific roof type
As outlined in the understanding waterproofing system selection guide, different roof types require different waterproofing approaches. Metal roofs need different treatments compared to concrete or tile surfaces.
Agrement South Africa recommends using nationally approved products that meet strict quality standards. Look for products with certifications that demonstrate their performance under local conditions.
Pro Tip: Always purchase waterproofing products from reputable suppliers and verify their compatibility with your specific roof type before application.
Once you have selected appropriate waterproofing materials, you will be prepared to move forward with the precise application process that will protect your property from potential water damage.
Step 4: Seal Joints, Cracks, and Roof Penetrations Carefully
Sealing joints, cracks, and roof penetrations is a critical step in creating a comprehensive waterproofing barrier. Your goal is to eliminate potential entry points for moisture that could compromise your roof’s structural integrity.
According to the Gauteng Provincial Legislature’s technical specifications, every potential water ingress point requires meticulous treatment. This means systematically addressing all joints, fixings, and vulnerable areas with appropriate sealants and reinforcing materials.
Key areas to focus on during the sealing process include:
- Roof penetrations like chimneys, vents, and skylights
- Joints between different roofing materials
- Existing cracks or hairline fractures
- Areas around mounting brackets and structural connections
The sealing the cracks guide recommends using specialized sealants matched to your specific roof material. Different substrates require different approaches some need flexible silicone based products while others demand more rigid polyurethane sealants.
As outlined by the City of Ekurhuleni’s technical documentation, preparation is key. Clean all surfaces thoroughly before applying sealants and ensure that loose screed or unstable materials are properly addressed.
Pro Tip: Use a high quality backup reinforcement fabric with your sealant for additional strength in high stress areas.
Careful and comprehensive sealing will create a robust moisture barrier that protects your entire roof system from potential water damage.
Step 5: Inspect and Test Waterproofing for Complete Protection
Inspecting and testing your newly applied waterproofing treatment is the final critical step in ensuring comprehensive roof protection. This process verifies the effectiveness of your waterproofing work and identifies any potential weaknesses before they become costly problems.
According to the Gauteng Provincial Legislature’s technical specifications, comprehensive testing is mandatory after waterproofing installation. The primary goal is to confirm that your waterproofing solution provides complete and reliable protection against moisture infiltration.
Key inspection and testing methods include:
- Visual examination of entire roof surface
- Flood testing of sealed areas
- Checking for uniform membrane coverage
- Identifying potential weak points or missed sections
The understanding waterproofing inspection guide recommends systematic evaluation techniques that go beyond surface level assessment. This involves simulating water exposure conditions to verify the waterproofing performance under realistic scenarios.
As outlined by the City of Ekurhuleni’s technical documentation, you should document all inspection findings and retain guarantees provided by your waterproofing contractor. This documentation serves as crucial evidence of the work completed and potential future maintenance requirements.
Pro Tip: Conduct initial inspections during dry weather and follow up with water testing to ensure comprehensive evaluation of your waterproofing treatment.
Thorough inspection and testing will give you confidence in your roof’s ability to withstand moisture challenges and protect your property effectively.
Protect Your Roof with Expert Waterproofing Solutions
Waterproofing your roof is essential to stop leaks, prevent costly damage, and maintain your property’s value. This article explained vital steps like assessing roof condition, thorough cleaning, choosing the right products, sealing cracks carefully, and testing for full protection. However, translating this detailed guidance into effective action requires professional support and quality materials tailored to your specific roof.
Trust Pro Waterproofing to help you safeguard your property against water damage. Our team offers specialised waterproofing services that address vulnerabilities identified during your inspection. Whether you need roof repairs, product selection advice, or expert sealing and testing, we provide reliable solutions backed by local experience and best practices.

Take the stress out of waterproofing by connecting with professionals who understand every step from assessment to final testing. Visit our Uncategorized – Pro Waterproofing page to learn more about our services and get a personalised quote today. Act now to prevent leaks and secure your home or business with durable, certified waterproofing—from the experts at Pro Waterproofing.
Frequently Asked Questions
How do I assess the condition of my roof before waterproofing?
To assess your roof’s condition, conduct a thorough visual inspection for signs of wear, such as cracked tiles or rusted metal sheets. Check areas like chimneys and skylights for weak seals and take note of any visible damage for future repairs.
What steps should I take to clean my roof before applying waterproofing products?
Begin by removing all debris and old waterproofing materials with soft brushes and appropriate cleaning solutions. Ensure you inspect and repair any visible cracks or structural weaknesses while tightening loose fixings.
How do I select the right waterproofing products for my roof type?
Choose waterproofing products that are compatible with your roof material and local weather conditions. Consider factors like UV resistance and flexibility to ensure optimal protection.
What specific areas should I focus on while sealing my roof?
Focus on sealing joints, cracks, and roof penetrations such as vents and skylights to eliminate potential moisture entry points. Use specialized sealants that match your roof material to ensure a strong barrier.
How can I test the effectiveness of my waterproofing after application?
Conduct a visual inspection followed by a flood test of the sealed areas to ensure that your waterproofing treatment is effective. Make sure to document your findings to track performance over time.
What are the common vulnerabilities I should look for during my roof assessment?
Look for hairline fractures in tiles, rusted metal joints, and areas around chimneys and skylights. Pay special attention to surface deterioration and soft spots, which could indicate underlying moisture problems.