
Water damage remains one of the costliest headaches for homeowners, with roof leaks accounting for up to 40 percent of all building maintenance calls. Overlooking even minor issues can lead to mold, structural decay, and expensive repairs down the line. By understanding how to properly inspect, clean, repair, waterproof, and test your roof, you can prevent leaks before trouble starts and secure your property against the toughest weather.
Table of Contents
- Step 1: Inspect And Assess The Roof Condition
- Step 2: Clean And Prepare The Roof Surface
- Step 3: Repair Any Existing Roof Damage
- Step 4: Apply Waterproofing Membrane Or Coating
- Step 5: Test And Verify Waterproofing Effectiveness
Quick Summary
| Key Point | Explanation |
|---|---|
| 1. Inspect roof thoroughly for damage | Check key areas like shingles and gutters for wear or potential leaks to inform waterproofing efforts. |
| 2. Clean roof surface before waterproofing | Remove debris and dirt to ensure proper adhesion of waterproofing materials, enhancing effectiveness and longevity. |
| 3. Repair all existing roof issues | Address weakened areas and structural damage before applying waterproofing to prevent future leaks or deterioration. |
| 4. Apply waterproofing membrane properly | Use compatible materials and methods to ensure complete coverage and protection against water infiltration. |
| 5. Test waterproofing effectiveness post-application | Conduct water tests to verify integrity of the waterproofing; address any leaks immediately for best results. |
Step 1: Inspect and assess the roof condition
Inspecting your roof is the critical first step in ensuring comprehensive waterproofing and preventing potential water damage. According to homeinspection.co.za, a thorough roof assessment involves examining multiple components to identify potential vulnerabilities.
Begin your roof inspection by carefully checking the primary roof covering for signs of wear or damage. Look closely at key areas including gutters, downpipes, roof vents, flashing, skylights, and chimneys. Pay special attention to roof penetrations where water might potentially seep through. While conducting your assessment, prioritise safety and avoid walking on steep or potentially unstable roof surfaces. If you are uncomfortable performing the inspection yourself, consider hiring a professional who can comprehensively evaluate your roof’s condition.
As recommended by sans10400.co.za, your assessment should determine the specific exposure level your waterproofing system will face. This includes understanding your building’s location specific factors and the protection requirements for your particular roof type. Look for telltale signs of potential water damage such as:
- Discoloured or warped roof materials
- Cracked or missing shingles
- Visible rust on metal components
- Areas with moss or algae growth
- Soft or sagging sections in the roofing structure
If you discover any concerning signs during your inspection, document them carefully. These observations will be crucial for the next steps in your waterproofing process. Proper initial assessment sets the foundation for effective roof protection and can save you significant repair costs in the future.
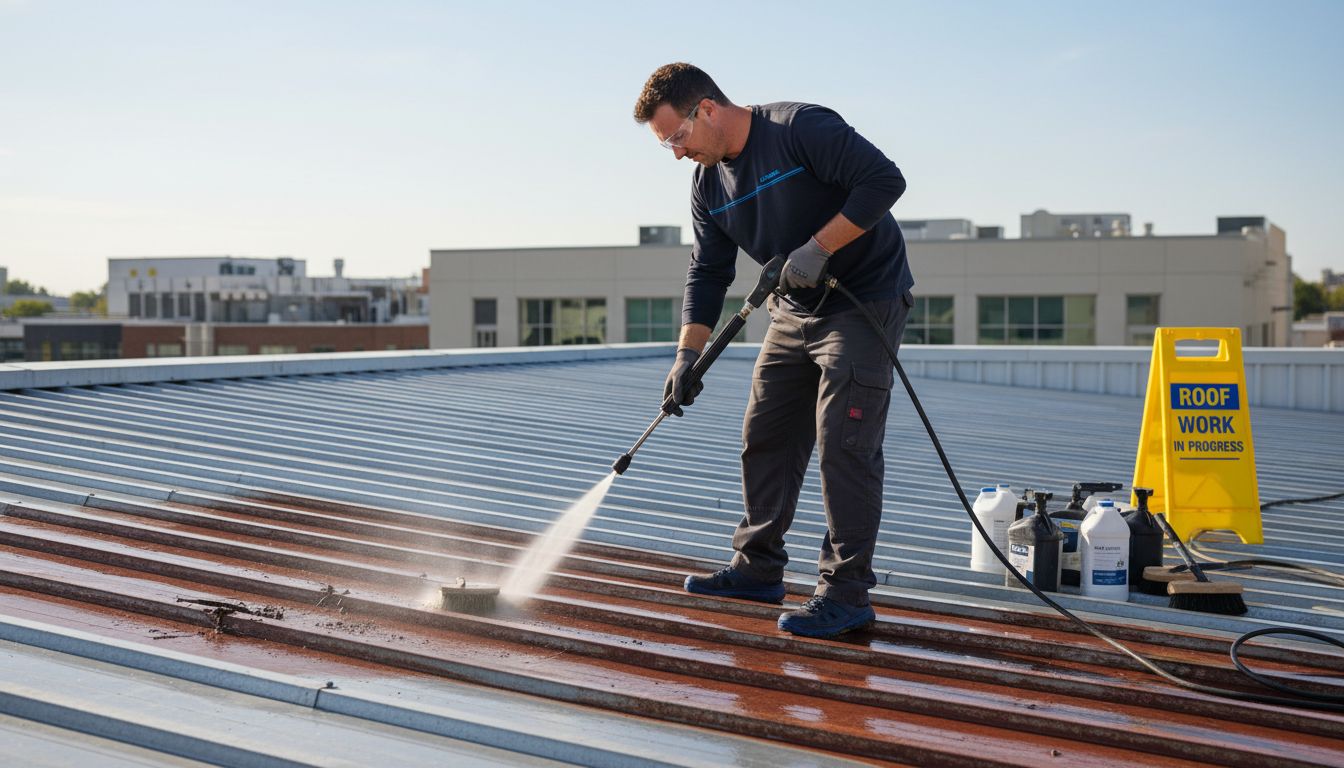
Step 2: Clean and prepare the roof surface
Cleaning and preparing your roof surface is a critical precursor to successful waterproofing. According to csir.co.za, thorough surface preparation involves several meticulous steps to ensure optimal waterproofing results.
Start by removing loose debris such as leaves, twigs, and dirt using a sturdy broom or blower. For metal roofs, use industrial wire brushes attached to angle grinders to eliminate rust and old coatings. Follow this with high pressure water jetting combined with hard bristled brooms and appropriate detergents to remove stubborn stains and remaining debris. When cleaning different roof materials like concrete, tiles, or metal, adjust your cleaning technique accordingly to prevent surface damage.
As recommended by sans10400.co.za, ensure your roof substrate allows moisture vapor to escape. A professional approach involves creating conditions that prevent potential delamination of the waterproofing system. This means thoroughly drying the surface after cleaning and checking for any structural issues that might compromise the waterproofing application.
Warning: Always wear appropriate safety gear like non slip shoes, gloves, and eye protection when cleaning and preparing your roof. If the roof surface appears extensively damaged or you are uncertain about the cleaning process, consulting a professional waterproofing specialist is the safest approach.
Preparing your roof surface meticulously sets the foundation for a successful waterproofing project.
 The cleaner and more properly prepared your roof is, the more effectively the waterproofing membrane will adhere and protect your property from potential water damage.
Step 3: Repair any existing roof damage
Repairing existing roof damage is crucial before applying any waterproofing solution. According to csir.co.za, addressing structural issues involves systematically checking and repairing different roof components to ensure a solid foundation for waterproofing.
For metal roofs, carefully inspect and re-secure all roof screws and washers. Replace any loose or corroded fasteners and install new Tek stitching screws at side laps where the roofing material feels weak or unstable. After completing mechanical repairs, apply a rust inhibiting primer across the entire surface to prevent further deterioration. This preparation creates a stable surface ready for waterproofing application.
For tiled roofs, sanika.co.za recommends special attention to roof valleys and ridges where water penetration frequently occurs. Carefully lift tiles in these vulnerable areas and install waterproofing membranes to increase surface protection. Ensure valleys are appropriately sized to facilitate efficient water drainage and prevent potential water ingress.
Warning: Roof repairs can be complex and dangerous. If you encounter extensive damage or feel uncertain about performing repairs yourself, consult a professional waterproofing specialist. Attempting complex repairs without proper expertise might compromise your roof’s structural integrity.
Thoroughly documenting and addressing each area of damage sets the stage for a comprehensive waterproofing strategy.
By methodically repairing your roof before applying waterproofing solutions, you significantly enhance your property’s long term protection against water damage.
Step 4: Apply waterproofing membrane or coating
Applying the right waterproofing membrane or coating is the critical final step in protecting your roof from water damage. According to sans10400.co.za, this process requires precision and adherence to specific standards to ensure your roof remains watertight for at least five years without extensive maintenance.
Begin by selecting a waterproofing membrane or coating compatible with your specific roof material such as metal, concrete, or tile. For liquid applied membranes, use a roller or specialised spraying equipment to create an even consistent layer. When using sheet membranes, carefully align and overlap edges to prevent potential water penetration points. Work systematically from one end of the roof to the other ensuring complete coverage with no gaps or thin spots.
Pay close attention to critical areas like roof joints, edges, and penetration points where water is most likely to seep through. Use additional reinforcement materials like corner patches or liquid sealants to strengthen these vulnerable zones. Membrane Waterproofing Explained: Complete South African Guide recommends focusing extra care on these transition areas to create a comprehensive water barrier.
Warning: Always wear appropriate personal protective equipment including gloves, safety glasses, and non slip footwear when applying waterproofing materials. Work in dry weather conditions and follow manufacturer instructions precisely to avoid compromising the membrane effectiveness.
Once applied, allow the waterproofing membrane sufficient time to cure and bond completely before exposing it to any water or foot traffic. This final protective layer represents your roof’s primary defence against potential water damage and structural deterioration.
Step 5: Test and verify waterproofing effectiveness
Testing and verifying your roof waterproofing is the final crucial step in ensuring long lasting protection for your property. According to sans10400.co.za, your waterproofing system must remain watertight for at least five years without extensive maintenance.
Begin by conducting a comprehensive water test simulating heavy rainfall conditions. Using a garden hose or professional water testing equipment, systematically spray water across different roof sections and observe how the membrane performs. Pay special attention to previously identified vulnerable areas such as joints, edges, and roof penetrations. Look for any signs of water seepage or moisture accumulation beneath the waterproofing layer.
To ensure thorough verification, Understanding Waterproofing Inspection for Property Owners recommends documenting your testing process meticulously. Take detailed photographs of the roof during testing and note any areas that show potential weakness. Check for uniform membrane coverage, smooth transitions between sections, and complete adhesion to the roof surface.
Warning: Professional testing might be necessary if you are uncertain about conducting the water test yourself. Some waterproofing systems require specific testing protocols that vary based on material type and roof structure.
After completing your verification process, allow sufficient time for the roof to dry completely. Any identified issues should be addressed immediately to prevent potential water damage. A successful test ensures your roof has the robust protection needed to withstand diverse weather conditions and protect your property investment.
![]()
Protect Your Roof with Expert Waterproofing Solutions Today
The challenge of ensuring a lasting, watertight roof is clear from the steps you have just explored. From careful inspection and meticulous cleaning to repairing damage and applying the right membrane, each stage requires precision and expertise. Ignoring these crucial steps can lead to costly water damage and undermine your peace of mind.
If you want to avoid the frustration of leaks, warped materials, or premature roof failure, turn to professional guidance. At Pro Waterproofing, we understand the importance of a correctly installed waterproofing system tailored to your roof type. Trusting experts means you benefit from thorough assessments, quality repairs, and specialist membrane applications that stand the test of time.

Explore our informative resources at Uncategorized – Pro Waterproofing and start your journey towards a fully protected roof. Don’t wait until water damage compromises your home or business. Visit Pro Waterproofing now to get professional advice and request a quote. Take control of your property’s safety and enjoy assured waterproofing that lasts.
Frequently Asked Questions
What are the first steps in roof waterproofing?
Inspect the roof condition to identify any damage or vulnerabilities. Begin by checking the roof covering, gutters, vents, and any penetrations for signs of wear, as this sets the stage for effective waterproofing.
How do I clean the roof surface before applying waterproofing?
Clean the roof surface by removing debris and using high-pressure water jetting with appropriate detergents. Ensure the surface is thoroughly dried to create optimal conditions for the waterproofing membrane to adhere.
What repairs should I make before waterproofing my roof?
Repair any existing roof damage, such as loose or corroded fasteners, and install waterproofing membranes in vulnerable areas like roof valleys. Addressing these issues ensures a stable surface for the waterproofing application.
How do I apply a waterproofing membrane or coating?
Apply the waterproofing membrane evenly using a roller or spray equipment, ensuring complete coverage. Pay special attention to joints and penetration points, reinforcing these areas to effectively prevent water ingress.
How can I test the effectiveness of my roof’s waterproofing?
Conduct a water test to simulate heavy rainfall by spraying water on the roof and observing for any seepage. Document your testing process and address any identified weaknesses immediately to ensure lasting protection.
How long should a waterproofing membrane last before needing maintenance?
A well-applied waterproofing membrane should remain watertight for at least five years without extensive maintenance. Regular inspections can help ensure durability and address any issues early.