
TL;DR:
- Interior basement waterproofing offers a cost-effective solution that addresses minor seepage and moisture migration. Proper assessment, crack repair, sealing, and interior drainage systems like French drains and sump pumps are essential for long-term effectiveness. Combining exterior water management with interior strategies ensures a comprehensive approach to preventing water intrusion.
Basement water intrusion is one of the most common and costly problems homeowners face. If you have noticed damp patches on your walls, a persistent musty smell, or puddles forming after heavy rain, you are already familiar with the damage water can do. Knowing how to waterproof basement from the inside gives you a practical, cost-effective way to tackle the problem without the disruption and expense of excavating your entire foundation. This guide walks you through every stage, from gathering the right materials to installing drainage systems and keeping everything working long term.
Table of Contents
- Key takeaways
- How to waterproof basement from the inside: what you need first
- Sealing inside basement walls step by step
- Interior drainage systems: French drains and sump pumps
- Limitations and verifying that your system works
- Long-term maintenance of interior waterproofing
- My honest take on interior basement waterproofing
- Get expert waterproofing help from Prowaterproofing
- FAQ
Key takeaways
| Point | Details |
|---|---|
| Interior is more affordable | Inside basement waterproofing typically costs far less than exterior excavation methods. |
| Preparation matters most | Cleaning, crack repair, and exterior drainage management must happen before any sealant is applied. |
| Sealants alone are limited | Interior wall sealant handles minor seepage but cannot resist significant hydrostatic pressure. |
| Drainage systems are often needed | French drains and sump pumps manage water that enters despite sealing efforts. |
| Regular maintenance is non-negotiable | Routine checks on pumps, sealants, and exterior grading keep the system effective for years. |
How to waterproof basement from the inside: what you need first
Before you pick up a brush or mix hydraulic cement, you need to set the groundwork properly. Skipping this stage is the single biggest reason interior waterproofing fails within a year or two.
Assessing your basement conditions
Start by identifying where water is actually coming from. Press a piece of plastic sheeting against a damp wall and tape all four edges. Leave it for 24 hours. If moisture appears on the wall side of the plastic, you have water migrating through the wall from outside. If it appears on the room side, you are dealing with condensation, which calls for a dehumidifier, not a sealant. These two problems have very different fixes, and treating them the same way wastes both time and money.
Check for cracks along the floor and wall junction, around pipe penetrations, and at the base of the foundation wall. Note whether any cracks are wider than 3mm or show signs of movement, such as uneven edges or white mineral deposits (called efflorescence). Structural issues like bowing walls require exterior intervention. Structural wall damage like bowing or large cracks requires exterior excavation and reinforcements that interior waterproofing simply cannot address.
Exterior water management before you start inside
Proper grading and gutter systems that divert water away from the foundation are non-negotiable prerequisites. A minimum 5% ground slope within three metres of your foundation, and downpipes discharging at least 1.8 metres from the base of the wall, dramatically reduce how much water reaches your basement in the first place. Fix these before spending anything on interior products.
Comparing common waterproofing materials
| Material | Best use | Pros | Cons |
|---|---|---|---|
| Hydraulic cement | Active leaks and cracks | Sets quickly even under water | Limited to crack filling, not broad coverage |
| Crystalline waterproof coating | Porous concrete block walls | Penetrates and blocks capillary channels | Needs clean, damp surface to activate |
| Waterproof paint or sealant | Vapour and minor seepage | Low cost, DIY-friendly | Fails under hydrostatic pressure |
| Dimple drainage membrane | Wall and floor protection behind finishing | Redirects water to drain without bonding | Requires perimeter drain to function |
| Drainage board | Interior wall liner systems | Works with sump systems | Labour-intensive installation |
Pro Tip: Always buy materials rated for below-grade use. Products labelled “water-resistant” for interior walls are not the same as waterproofing membranes designed for constant moisture exposure.
Sealing inside basement walls step by step
This is the core of most DIY interior waterproofing projects. Done correctly, sealing inside basement walls can stop minor seepage and significantly slow moisture migration through porous masonry.
Surface preparation and crack repair
Clean every surface you plan to coat. Remove efflorescence with a stiff wire brush. Cut out any loose or crumbling mortar. If you find mould, address it properly. Painting over mould is ineffective and leads to recurrence, so treat affected areas with a mould-killing solution and allow full drying before proceeding.
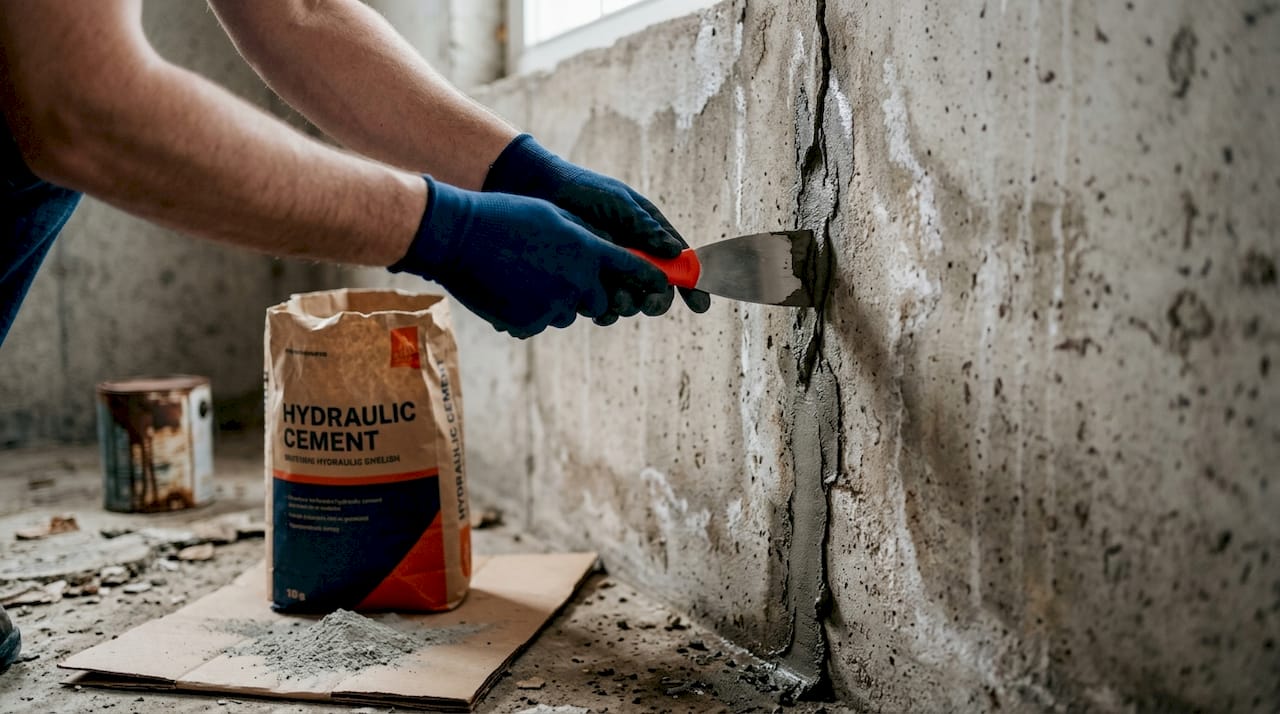
For cracks and active leaks, mix hydraulic cement according to the manufacturer’s instructions and press it firmly into the crack with a gloved hand or putty knife. Hold it in place for three to five minutes until it sets. Work from the bottom of the crack upward to avoid water tracking beneath your repair.
Applying interior waterproof coatings
Once repairs are cured and surfaces are clean, apply a crystalline or cementitious waterproof coating. These products bond to the masonry and form a barrier within the concrete itself, making them far more durable than film-forming paints. Apply the first coat while the surface is still slightly damp (not wet) for best adhesion, using a stiff-bristle brush to work the product deep into pores. Most products require two coats.
Pro Tip: Do not apply waterproof coatings to painted walls without stripping the paint first. Coatings bond to masonry, not to paint, and the entire application will peel away with the existing layer.
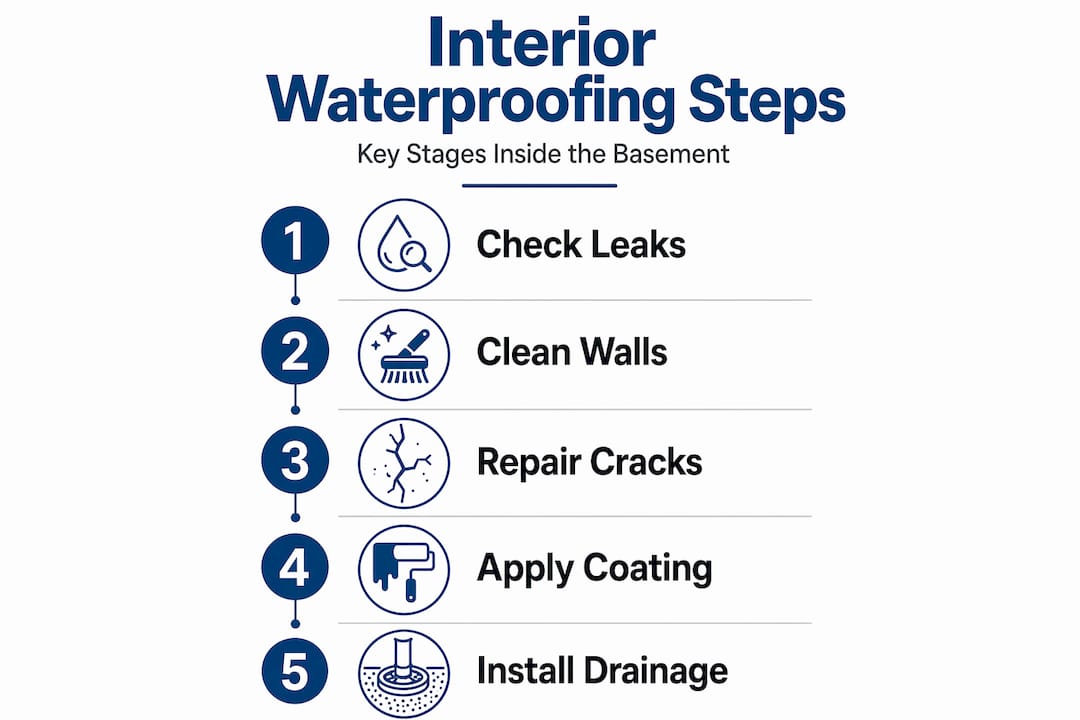
Here is a summary of the sealing process in sequence:
- Identify moisture source (intrusion vs. condensation).
- Strip paint or loose material from walls and floor edges.
- Remove mould and allow surfaces to dry fully.
- Fill all cracks and holes with hydraulic cement.
- Allow repairs to cure for the time specified on the product label.
- Apply crystalline or cementitious waterproof coating in two coats.
- Allow full cure time before testing or finishing walls.
Bear in mind that sealants reduce minor seepage or vapour but cannot handle bulk water intrusion under significant pressure. If your basement floods during storms, sealing alone will not be enough.
Interior drainage systems: French drains and sump pumps
When water pressure is too high for sealants to handle, you need a system that collects and removes water rather than simply blocking it. This is where interior French drain channels and sump pumps become the centrepiece of your waterproofing strategy.
How an interior French drain works
A professional interior French drain involves breaking the concrete along the floor perimeter, typically 300 to 450mm wide, then excavating a shallow trench into the sub-base. Gravel and a perforated pipe are laid in the trench, which then routes water to a sump pit. The concrete is poured back over the top, so the finished floor looks intact. Water that enters through the wall-floor junction or through the base of the walls is intercepted at floor level before it can flood the space.
This system relieves the hydrostatic pressure that interior coatings cannot handle. It does not stop water from reaching the wall, but it gives that water somewhere to go other than your floor. For more on how different basement drainage solutions compare in cost and effectiveness, it is worth reviewing a detailed breakdown before committing to a particular system.
Sump pump selection and installation
The sump pit collects all the water the drain channels deliver. A submersible sump pump then ejects that water away from your foundation. Sump pump costs range from roughly R9,000 to R27,000 (US$500 to $1,500), and a battery backup unit is strongly recommended because pump failure during a power outage is one of the most common causes of basement flooding in heavy storms.
| Component | Approximate cost | Installation time | Effectiveness |
|---|---|---|---|
| Interior French drain (perimeter) | R54,000 to R270,000 | 2 to 4 days | High for water management |
| Sump pump (primary) | R9,000 to R27,000 | 4 to 8 hours | High when maintained |
| Battery backup pump | R5,400 to R18,000 | 2 to 4 hours | Critical during power outages |
| Dimple membrane liner | R18,000 to R54,000 | 1 to 2 days | Moderate, supports drainage |
Pro Tip: Test your sump pump monthly by pouring a bucket of water into the pit. If the pump does not activate automatically, the float switch may be stuck or the pump may need servicing. Do not wait for a storm to find out.
Key maintenance habits for your drainage system:
- Clean the sump pit of debris every three to six months.
- Check the discharge pipe outlet is clear and not frozen or blocked.
- Replace battery backups every three to five years even if they appear functional.
- Inspect the perforated drain pipe annually for sediment build-up.
Limitations and verifying that your system works
Interior waterproofing is a management strategy, not a complete solution. Understanding what it cannot do is as important as knowing what it can. Interior waterproofing does not relieve hydrostatic pressure on walls. Ongoing pressure can cause structural stress over time, and if your walls are already bowing or severely cracked, no internal system will prevent further deterioration without exterior reinforcement.
Signs that your interior waterproofing is not performing as it should:
- Persistent damp patches on walls above the floor level despite sealed cracks.
- White efflorescence reappearing within weeks of cleaning.
- A musty odour returning between wet seasons.
- Visible mould growth on finished wall surfaces.
- Sump pump running continuously or not activating during wet weather.
To verify that your system is working, conduct a moisture test with plastic sheeting every six months. Monitor the sump pump cycle frequency during heavy rain periods. Check the relative humidity inside the basement: the ideal humidity is 30 to 50% and anything above this range consistently suggests water is still entering. A simple digital hygrometer costs very little and gives you ongoing data to act on.
When persistent leaks or high humidity continue despite proper sealing and a functioning drainage system, the problem is almost certainly originating from a source that interior methods cannot address. At that point, consulting a specialist about exterior waterproofing approaches is the logical next step.
Long-term maintenance of interior waterproofing
A well-installed interior waterproofing system can last for decades, but only with routine attention.
Key seasonal maintenance tasks:
- Test the sump pump at the start of each rainy season.
- Inspect all sealed cracks and reapply product to any that show new movement or deterioration.
- Clean gutters and check downpipe discharge points before winter rains arrive.
- Run a dehumidifier during warmer months to control condensation. Note that dehumidifiers control condensation but cannot resolve actual water intrusion caused by cracks or hydrostatic pressure. They support your system, they do not replace it.
- Have a professional inspect the drainage system every three to five years, especially if you are noticing reduced pump cycling or surface dampness.
Pro Tip: Keep a simple maintenance log with dates of tests, observations, and any repairs. If you ever sell the property or make an insurance claim, this record demonstrates due diligence and can support a warranty claim on professionally installed systems.
A layered approach to waterproofing, combining exterior water diversion, interior sealing, and drainage systems, is the most effective and long-lasting arrangement. No single element works in isolation.
My honest take on interior basement waterproofing
I have spoken with many homeowners who assumed that painting on a waterproof sealant was all they needed. In my experience, that expectation leads to disappointment within one or two wet seasons. Interior waterproofing done well is genuinely effective, but it works best when homeowners understand what they are actually buying: a water management system, not a water elimination system.
The biggest mistake I see is treating interior waterproofing as the final word. It is not. If the gutters are dumping water against the foundation, if the ground is sloped toward the house, or if there are structural cracks that have never been properly assessed, no amount of internal sealing will hold up. I always recommend addressing the exterior drainage first. It is often cheaper than people expect and dramatically reduces the load on the interior system.
What I genuinely value in a professional waterproofing installation is the warranty. Interior systems from reputable contractors often come with lifetime transferable warranties, which adds real value when you sell the property. That is something a Saturday afternoon with a tin of waterproof paint will never give you. If your budget is tight, start with proper crack repair and exterior drainage improvements. Add the sump system when you can. Prioritise sequentially rather than doing everything half-properly at once.
— Eben
Get expert waterproofing help from Prowaterproofing

If your basement is giving you trouble despite your best DIY efforts, Prowaterproofing offers professional assessment and installation services tailored to residential and commercial properties across South Africa. The team at Prowaterproofing can evaluate exactly what your basement needs, whether that is a targeted sealant application, a full interior French drain system, or a combination of interior and exterior solutions. Professional systems include warranties that protect your investment long after the work is done, and an expert inspection often reveals issues that are invisible to an untrained eye. Reach out for a consultation and get a clear picture of what your property actually requires before spending a rand on materials. You can also explore the best waterproofing approaches in more detail to prepare for that conversation.
FAQ
What is the most effective way to waterproof a basement from the inside?
A combination of crack repair with hydraulic cement, crystalline waterproof coatings on walls, and an interior French drain routed to a sump pump delivers the most reliable results. Sealant alone is not sufficient where water pressure is significant.
Can I waterproof basement walls from inside without professional help?
Minor seepage and vapour transmission can be addressed with DIY sealants and waterproof paints, but significant leaks or recurring flooding typically require a professionally installed drainage system and sump pump for lasting results.
How long does interior basement waterproofing last?
A professionally installed interior drainage system with quality sealants can last 20 years or more with proper maintenance. DIY sealant applications typically require inspection and reapplication every three to seven years depending on conditions.
Does interior waterproofing stop mould growth?
Controlling moisture entry significantly reduces mould risk, but any existing mould must be properly remediated before sealing. Mould that is painted or sealed over will recur and spread beneath the surface.
When should I choose exterior over interior waterproofing?
Exterior waterproofing is required when walls show structural damage such as bowing or severe cracking, or when hydrostatic pressure is severe enough that interior drainage alone cannot manage the volume of water entering the basement.