TL;DR:
- Identifying the specific entry point of water is essential before applying any basement leak repair method.
- Preventing leaks starts with exterior water management, including regrading soil, extending downspouts, and cleaning gutters regularly.
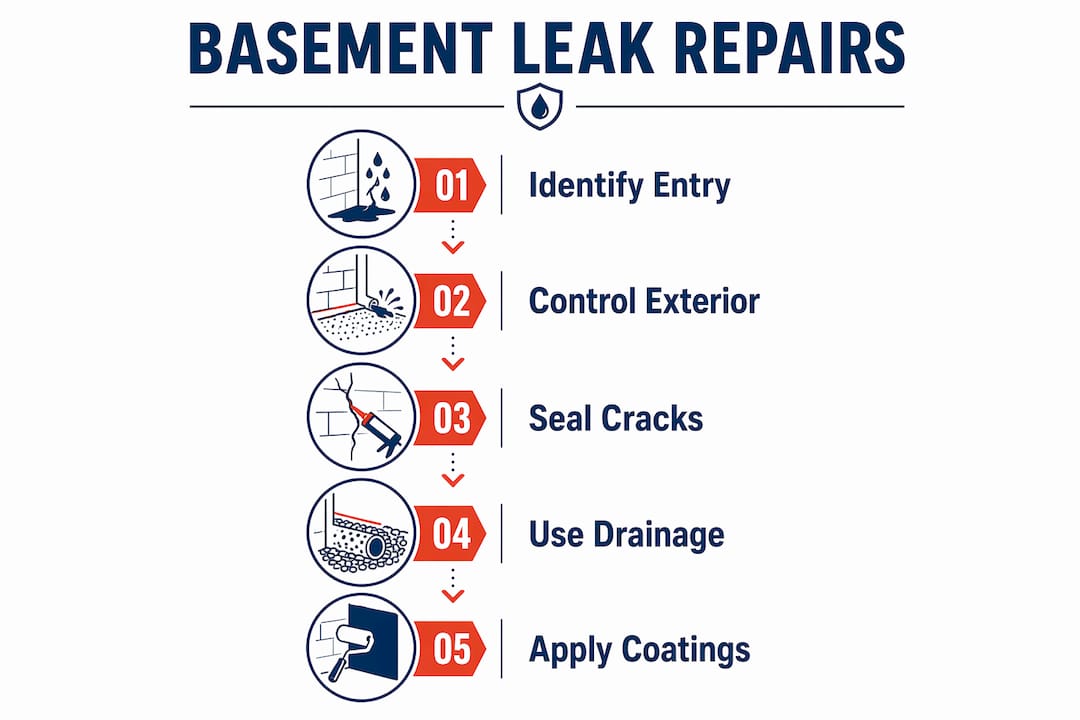
Stopping basement leaks means identifying exactly where water enters your foundation and applying the correct repair method for that specific entry point. Most basement leaks originate from foundation cracks, wall-floor joints, or hydrostatic pressure building beneath the slab. Each of these requires a different fix. Applying a waterproof coating over an undiagnosed crack, for example, wastes money and fails within months. This guide walks you through diagnosis, exterior water control, crack sealing, interior drainage, and protective coatings so you can match the right solution to your actual problem.
How to stop basement leaks: identifying where water enters
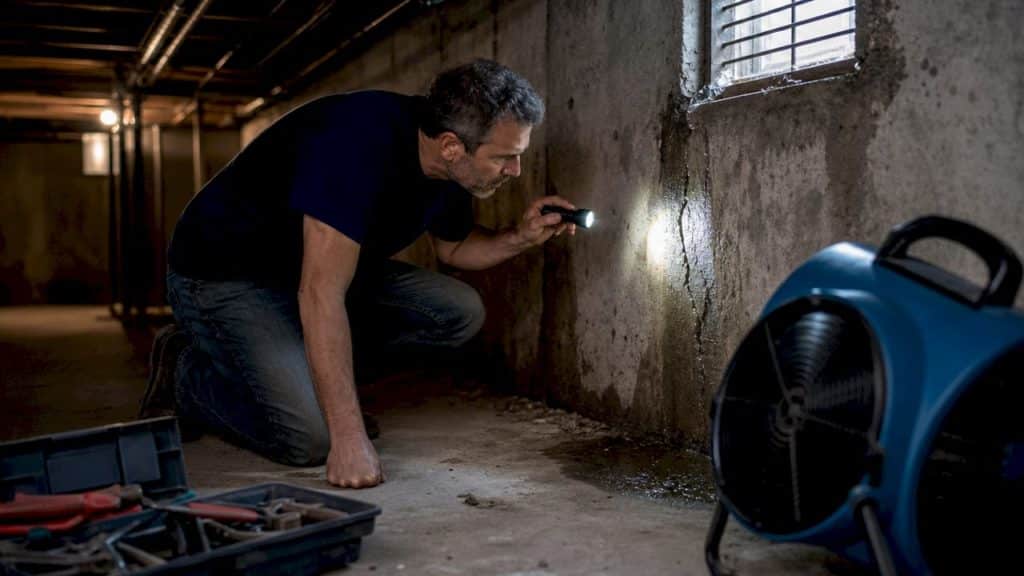
The first step in any basement water leak repair is separating condensation from active seepage. Tape a piece of plastic sheeting to a damp wall section and seal all four edges. Leave it for 24 hours. If moisture appears on the room-facing side, the problem is condensation. If moisture appears behind the plastic, water is coming through the wall.
Correct diagnosis is critical to avoid spending money on the wrong fix. Homeowners who skip this step often apply sealants to walls that are sweating, not leaking, and wonder why the damp returns.
The three most common entry points are:
- Foundation cracks. Vertical and diagonal cracks in poured concrete or block walls allow water to pass directly through under pressure.
- Wall-floor (cove) joints. The joint where the wall meets the floor slab is a structural gap. Hydrostatic pressure forces water upward through this joint during heavy rain.
- Slab seepage. Water migrates upward through a porous or cracked floor slab when the water table rises.
| Entry point | Typical cause | Repair approach |
|---|---|---|
| Foundation crack | Settlement, shrinkage, freeze-thaw | Polyurethane injection or hydraulic cement |
| Wall-floor joint | Hydrostatic pressure | Interior perimeter drain and sump pump |
| Slab seepage | High water table | Interior drainage system |
| Window well | Poor drainage, blocked drain | Well drain, cover, and regrading |
Understanding which entry point you are dealing with determines every repair decision that follows.
How do you manage exterior water to prevent basement leaks?
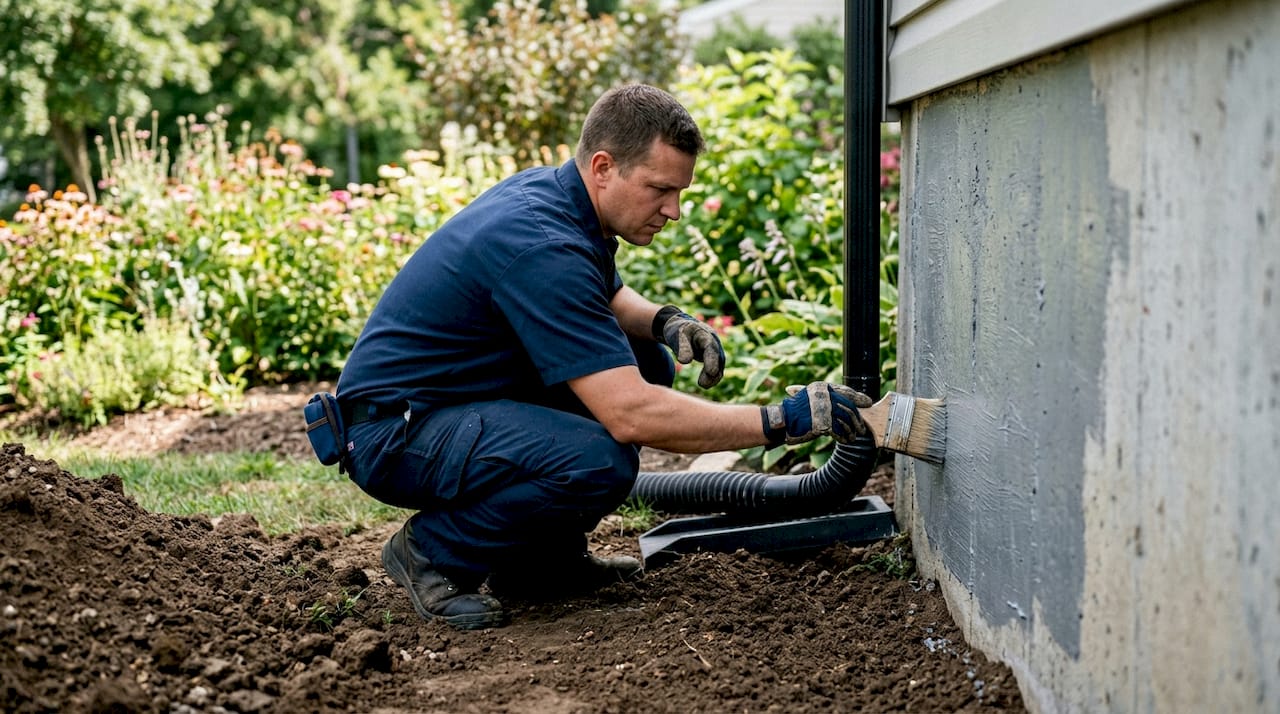
Exterior water management is the first line of defence against basement water intrusion. Regrading soil to slope away from your foundation, extending downspouts at least 6 feet from the house, and cleaning gutters twice yearly resolves a large proportion of basement leaks at low cost. These steps reduce the volume of water pressing against your walls before it ever becomes a structural problem.
After any heavy rain, walk the perimeter of your home and look for pooling water near the foundation. Pooling indicates the soil has settled or compacted and no longer drains away from the house. Adding topsoil and regrading the affected area corrects this quickly.
Follow these steps for effective exterior water control:
- Regrade the soil. The ground should slope away from the foundation at a gradient of at least 6 inches over the first 10 feet. Use clean topsoil, not clay, which holds water.
- Extend downspouts. Attach plastic or aluminium extensions so water discharges at least 6 feet from the foundation. Splash blocks help disperse flow.
- Clean gutters twice yearly. Blocked gutters overflow and saturate the soil directly against your walls. Schedule a clean in spring and autumn.
- Maintain window well drains. Window wells fill with debris. Clear the drain at the base of each well and fit a polycarbonate cover to keep rain out.
- Check for underground drainage blockages. French drains and soakaways around the perimeter can become blocked with silt over time. Flush them with a garden hose annually.
Pro Tip: Create a seasonal maintenance checklist and photograph your foundation perimeter after every significant rainfall. Patterns in where water pools reveal drainage problems before they become expensive repairs.
Seasonal maintenance prevents recurring leaks more reliably than any single repair. Exterior fixes are always cheaper than interior drainage installations.
Which repair methods work best for sealing cracks?
Two materials dominate basement crack sealing: hydraulic cement and polyurethane injection. They serve different purposes and are not interchangeable.
Hydraulic cement sets in 3–5 minutes and expands as it cures, making it effective for stopping an actively flowing crack as an emergency measure. It is a surface patch, however, not a deep seal. Water pressure can eventually find a path around it if the underlying cause is not addressed.
Polyurethane injection fills the full depth of a crack without excavation. It cures in 4–6 hours at temperatures of 60°F or warmer and bonds to wet concrete. This makes it the preferred method for a lasting basement wall leak repair on poured concrete foundations.
Surface preparation is non-negotiable before either method. Efflorescence, the white powdery salt deposit that forms on damp masonry, must be removed first. It prevents adhesion and causes sealants to fail early. Use a wire brush or a diluted muriatic acid wash, then rinse thoroughly and allow the surface to dry before applying any product.
| Method | Best for | Sets in | Durability |
|---|---|---|---|
| Hydraulic cement | Active flowing leaks, emergency patching | 3–5 minutes | Moderate |
| Polyurethane injection | Deep crack sealing, poured concrete | 4–6 hours | High |
| Epoxy injection | Structural crack repair, dry cracks | 24–48 hours | Very high |
Pro Tip: Never apply polyurethane injection in temperatures below 10°C. The resin will not cure properly and the seal will fail. Wait for warmer conditions or use a heat lamp to bring the wall surface temperature up before injecting.
For block wall foundations, crack injection is less effective because water migrates through the mortar joints and hollow cores. Block walls typically need an interior drainage solution rather than crack sealing alone. For a detailed look at sealing basement leaks, Prowaterproofing covers the full range of techniques.
When should you use interior drainage and sump pumps?
Interior drainage systems are the correct solution when water enters at the wall-floor joint or through a porous slab. Interior drain tile systems intercept water at the cove joint and channel it to a sump pit, where a pump discharges it away from the house. They do not stop water from entering the wall. They manage it before it spreads across your floor.
Hydrostatic pressure during heavy rain events creates the highest risk for basement flooding. An interior drainage system relieves that pressure by giving water a controlled path to the sump pit rather than forcing it through the slab or wall joint.
A standard interior drainage installation involves these steps:
- Break the concrete perimeter. A channel roughly 150–200mm wide is cut around the inside perimeter of the basement floor.
- Lay perforated drain pipe. The pipe sits in gravel and collects water seeping in at the wall-floor joint.
- Install a sump pit and pump. The pit collects water from the drain pipe. The pump activates automatically when water reaches a set level.
- Patch the concrete. The channel is filled with new concrete, leaving the drain pipe and sump pit accessible.
- Fit a battery backup pump. Power cuts happen during storms, exactly when you need the pump most. A battery backup unit activates if the primary pump fails or loses power.
| Component | Function | Maintenance interval |
|---|---|---|
| Perforated drain pipe | Collects water at wall-floor joint | Flush every 2–3 years |
| Sump pump | Discharges collected water | Test monthly, replace every 7–10 years |
| Battery backup pump | Operates during power failure | Test quarterly, replace battery every 3–5 years |
| Check valve | Prevents water flowing back into pit | Inspect annually |
Inadequate sump capacity is the most common failure point in interior drainage systems. Size the pump to handle peak inflow during the heaviest rain your area receives, not average conditions. Prowaterproofing’s guide on interior waterproofing costs breaks down what a professional installation involves.
How to apply waterproofing coatings to basement walls
Waterproofing coatings add a protective layer to masonry walls and slow moisture transmission. They work best as part of a complete system that already controls exterior water and drainage. Applied alone to a wall under active hydrostatic pressure, they will eventually blister and fail.
Surface preparation determines whether a coating lasts or peels within a season. Efflorescence removal using a wire brush or muriatic acid wash before sealant application greatly improves adhesion and longevity. Fill any holes or cracks with hydraulic cement and allow them to cure fully before coating.
Key steps for applying waterproofing coatings:
- Clean the wall thoroughly. Remove dirt, grease, efflorescence, and loose paint. A pressure washer works well on bare masonry.
- Apply hydraulic cement to active cracks. Allow it to cure for at least 24 hours before coating over it.
- Use a masonry waterproofing product. Products such as Drylok or Xypex are formulated for below-grade masonry. Apply with a stiff brush to work the coating into pores.
- Apply two coats. The second coat should go on while the first is still slightly tacky for best adhesion.
- Avoid application below 10°C. Cold temperatures prevent proper curing and reduce the coating’s effectiveness.
Pro Tip: Apply coatings from the floor upward, not top-down. Starting at the floor prevents drips from contaminating freshly coated lower sections and gives you better control over coverage at the wall-floor joint.
Coatings are most effective on poured concrete walls with minor seepage. For block walls or walls under significant hydrostatic pressure, exterior waterproofing with a membrane and drainage board provides far greater protection. Exterior barrier systems can last 30–50 years, though the installation cost reflects that durability.
Key takeaways
Stopping basement leaks requires a layered approach: diagnose the entry point first, control exterior water, seal cracks with the correct material, and install drainage where hydrostatic pressure is the driving force.
| Point | Details |
|---|---|
| Diagnose before repairing | Distinguish condensation from seepage using the plastic sheet test before spending on repairs. |
| Control exterior water first | Regrading soil and extending downspouts at least 6 feet resolves many leaks at low cost. |
| Match the repair to the crack | Use hydraulic cement for active leaks and polyurethane injection for lasting deep crack sealing. |
| Install drainage for cove joint leaks | Interior perimeter drains and sump pumps manage hydrostatic pressure at the wall-floor joint. |
| Prepare surfaces before coating | Remove efflorescence and patch cracks before applying any waterproofing sealant or membrane. |
What I have learned from years of basement leak repairs
The single most expensive mistake homeowners make is skipping the diagnosis and going straight to a product. I have seen beautifully applied coatings peel off within one winter because the wall behind them was under constant hydrostatic pressure with nowhere for the water to go. The coating was not the problem. The missing drainage was.
My approach now is always staged. First, stop any active flowing crack with hydraulic cement as an emergency measure. Second, fix the exterior water management. Third, assess whether the remaining moisture is seepage through the wall or pressure at the cove joint, and choose the repair accordingly. Repairing cracks without addressing exterior water load leads to new leak paths forming adjacent to the repair. The water finds another way in.
The other thing I would tell any homeowner is this: do not underestimate the sump pump battery backup. I have attended properties where a brand-new interior drainage system failed during a storm because the power went out and there was no backup. The pump sat in a full pit doing nothing. A battery backup unit costs a fraction of what a flooded basement costs to remediate.
For anything beyond a single crack repair or a coating application, bring in a professional. Exterior waterproofing with excavation and membrane installation costs between $8,000 and $20,000 depending on conditions, but it is the most durable solution for serious hydrostatic pressure problems. That is not a DIY project. Knowing when to call a specialist is part of getting the repair right.
— Eben
Professional waterproofing services worth considering
Basement water seepage repair is straightforward when the entry point is a single crack. When the problem involves hydrostatic pressure, multiple entry points, or a failing exterior membrane, professional assessment saves time and prevents repeated failures.

Prowaterproofing offers exterior waterproofing, interior drainage installation, sump pump fitting, and crack injection services for residential properties across South Africa. Their team provides site assessments and written warranties, so you know exactly what is being done and what protection you are getting. For homeowners who want a lasting waterproofing solution rather than a temporary patch, Prowaterproofing is a practical starting point. You can also find useful guidance on exterior basement waterproofing from other South African specialists to compare approaches before committing to a contractor.
FAQ
What is the most common cause of basement leaks?
Foundation cracks and wall-floor joint failures caused by hydrostatic pressure are the most common sources of basement water intrusion. Each requires a specific repair rather than a general waterproofing coating.
Can I fix a leaking basement wall myself?
Single cracks in poured concrete walls can be repaired with polyurethane injection or hydraulic cement as a DIY project. Wall-floor joint leaks and widespread seepage typically require professional drainage installation.
How do I stop water from seeping through basement walls during heavy rain?
Extend downspouts at least 6 feet from the foundation, regrade soil to slope away from the house, and seal any visible cracks with polyurethane injection. If seepage continues, an interior perimeter drain and sump pump will manage the hydrostatic pressure.
Does waterproofing paint actually stop basement leaks?
Waterproofing coatings slow moisture transmission through masonry but cannot withstand active hydrostatic pressure alone. They work best as a final layer after exterior water management and crack repairs are already in place.
How long does basement waterproofing last?
Interior drainage systems with sump pumps last 10–25 years with regular maintenance. Exterior membrane systems can last 30–50 years. Surface coatings applied to well-prepared masonry typically last 5–10 years before reapplication is needed.