
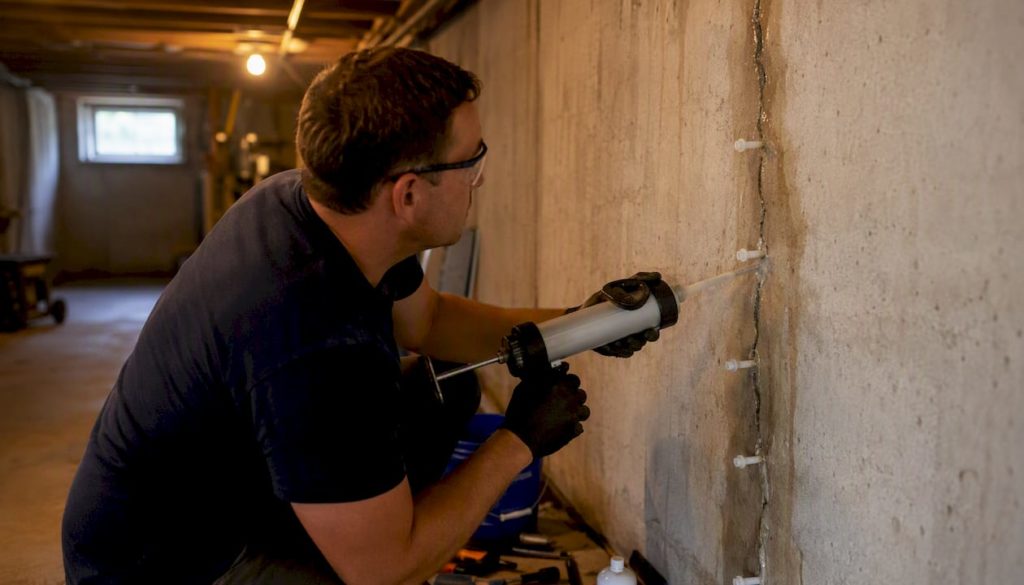
If water is coming into your basement right now, stop it at the source before you do anything else: check whether it is surface water pooling against the wall, a plumbing leak, or seepage through the floor, then move anything valuable off the floor immediately. Blocked gutters and downspouts cause a huge share of basement leaks, so that is the first thing worth checking, alongside your sump pump if you have one. Everything else, the diagnosis, the permanent fix, the cost, can wait ten minutes while you triage.
Here’s what to do in the first half hour:
- Move furniture, boxes, and electronics off the floor and away from wet walls.
- Switch off electrical circuits feeding any sockets or fittings sitting in or near standing water.
- Check the gutters and downspouts outside for blockages or disconnected sections directing water at the foundation.
- Look at window wells for debris or standing water and clear them if it is safe to reach.
- Confirm the sump pump (if fitted) is running and the discharge line isn’t frozen or blocked.
- Lay towels or a wet vacuum on the wet area to limit spread while you assess the cause.
Pro Tip: Take photos of the water line, wet materials, and any cracks before you clean up. If you need a contractor or an insurance claim later, that evidence is far more useful than a memory of “it was pretty bad.”
If you see a horizontal crack, bulging wall, sudden heavy inrush, or a burning electrical smell, stop the DIY effort and call a professional immediately. For everything short of that, read on: the sections below cover causes, diagnosis, low-cost fixes, and the permanent options.
Key Takeaways
Fixing a basement leak permanently requires correcting external drainage first, then matching the repair method (injection, interior drainage, or external tanking) to whether the cause is surface water or hydrostatic pressure.
| Point | Details |
|---|---|
| Triage first | Move valuables, cut power to wet areas, and check gutters and the sump pump before diagnosing anything. |
| Diagnose before repairing | Use the hose test and a plumbing shut-off test to separate surface water, plumbing, and structural causes. |
| Match the fix to the cause | Crack injection suits isolated cracks; interior cavity-drain systems suit ongoing hydrostatic pressure. |
| Know the red flags | Horizontal cracks, bulging walls, or repeated system failure mean it’s time for a structural engineer. |
| Get a proper quote | Prowaterproofing offers a site survey, written quote, and warranty terms before any work begins. |
Table of Contents
- What’s causing your basement to leak?
- Diagnose the leak: step-by-step checks and tests
- Cheap fixes to try before you call anyone
- Permanent fixes: interior drainage or external tanking?
- When does a basement leak need a professional?
- What does it cost to fix a basement, and how long does it take?
- Stop leaks from coming back: a maintenance checklist
- Detailed instructions for epoxy and polyurethane crack injection
- How to safely handle mould and mildew from basement dampness
- Structural damage from leaks: what to look for beyond cracks
- Author perspective: common homeowner mistakes and quick corrective actions
- Get a proper survey before you commit to a fix
- Frequently asked questions
- Sources
What’s causing your basement to leak?
Most basement leaks trace back to one of a handful of repeat offenders, and figuring out which one you’re dealing with narrows your repair options fast.
- Hydrostatic pressure: groundwater builds up against your foundation walls and floor, forcing moisture through pores, joints, and cracks. This is common in clay soils after heavy rain, where water has nowhere to drain and simply pushes inward.
- Poor grading: if the ground slopes toward your house instead of away from it, every rainstorm sends water straight to the foundation.
- Blocked gutters and downspouts: overflowing gutters dump water right next to the wall, which is functionally the same problem as bad grading.
- Leaking drains or supply pipes: a slow leak behind a wall can look identical to groundwater seepage, but it’s a plumbing job, not a waterproofing one.
- Window well overflow: wells without proper drainage fill up in storms and spill over the sill.
- Wall or floor joint failure and cracks: the cove joint where the wall meets the floor is a common weak point, along with any crack wider than a hairline.
A persistent drip at the same spot on the floor-wall joint after every rain usually points to hydrostatic pressure or a failed joint, not a one-off event.
Diagnose the leak: step-by-step checks and tests
Before you fix anything, find out exactly where the water is coming from. This diagnostic routine takes an afternoon and saves you from paying for the wrong repair.
- Do a visual inspection of walls, floor joints, and any visible cracks, noting efflorescence (the white chalky residue left by mineral deposits) as a sign of long-term moisture movement.
- Run the garden hose test: aim it at a suspected trouble spot for 15 to 20 minutes while someone watches inside. If water appears within minutes, you’ve found your entry point.
- Check the sump pit and any interior drainage channels for standing water, debris, or a pump that isn’t cycling.
- Inspect window wells and external grading for pooling, missing covers, or soil that slopes the wrong way.
- Run a plumbing shut-off test: turn off the main water supply for a few hours and see if the leak continues. If it does, it isn’t your pipes.
A small, well-documented diagnostic routine like this separates plumbing problems from structural or hydrostatic ones quickly, without guesswork.
Pro Tip: Water appearing only during or right after rain usually means surface drainage or grading. Steady seepage regardless of weather, especially in wetter seasons, points to a high water table or ongoing hydrostatic pressure, which needs a different fix entirely.
Cheap fixes to try before you call anyone
A surprising number of basement leaks stop once you deal with drainage outside the house, no digging or membranes required.
- Clear and extend downspouts so they discharge water at least 1.8 metres from the foundation.
- Regrade the soil near the wall so it slopes away from the house rather than toward it.
- Clean and improve window well drainage, adding gravel or a well cover if pooling is the issue.
- Seal small cracks with cementitious repair mortar for hairline surface cracks, or polyurethane/epoxy injection for cracks that run through the wall. Don’t attempt injection on anything wider than a few millimetres or on a crack that’s actively moving.
- Use temporary measures during an active leak: directed drains, sandbags, and a portable sump pump with a battery backup if the power might fail mid-storm.
Tools and materials for most of these jobs: a caulking gun, hydraulic cement, polyurethane or epoxy injection kits, a shop vacuum, and a portable sump pump. Wear gloves and eye protection, and never work in standing water near an active electrical circuit.
Pro Tip: If the same spot keeps leaking after you’ve sealed it twice, that’s not a sealing problem anymore. It’s a pressure problem, and it needs a drainage solution, not more caulk.
DIY crack sealing and drainage fixes are a genuine stopgap, but they don’t address hydrostatic pressure at scale. If the leak returns after the next heavy rain, you’re looking at a permanent system.
Permanent fixes: interior drainage or external tanking?
Once the cheap fixes have been tried and the leak persists, you’re choosing between two fundamentally different approaches: manage the water once it’s inside, or stop it before it reaches the wall.
- Interior cavity-drain membrane plus sump pump: this hides water behind a membrane and channels it to a sump pump, letting you finish the interior afterwards. It’s the most common retrofit choice because it doesn’t require excavation.
- Crystalline or cementitious coatings: these work reasonably well on masonry with minor dampness but won’t stop active hydrostatic pressure on their own.
- Epoxy or polyurethane crack injection: targeted repair for specific cracks rather than a whole-wall solution.
- External tanking (positive-side waterproofing): membranes applied to the outside of the wall, usually paired with a French drain, are the gold standard for new builds but disruptive and costly as a retrofit since they require excavation around the foundation.
For an existing basement, an internal cavity-drain system is often the more practical retrofit solution, while external tanking suits new construction or situations where you’re already excavating for other reasons. A cut-off trench or French drain running alongside the foundation, sloped ground for roughly three metres out, and a protection board over any membrane all work as complementary measures rather than standalone fixes, per South African waterproofing standards.
When does a basement leak need a professional?
Some warning signs mean you should stop troubleshooting and pick up the phone. Horizontal or bulging cracks, visible wall settling, sudden major flooding, gas odours, repeated failure of a system you already installed, or any electrical hazard near water all fall into this category.
When you’re vetting a contractor, ask:
- Are you licensed and insured for structural and waterproofing work in this area?
- How many basement systems have you installed, and can I see recent references?
- What specific method are you proposing, and why that one for my situation?
- What warranty applies to labour versus materials?
- Will this job need a geotechnical or structural engineer’s sign-off?
Contract documents in the waterproofing trade commonly specify a five-year workmanship warranty alongside a ten-year material guarantee, so treat anything shorter as a red flag. Structural alterations affecting stability often need municipal plan approval, and if you’re in a sectional title scheme, body corporate consent too, though the exact rules depend on your local authority.
Pro Tip: A contractor who proposes a fix without ever asking about your soil type or water table is skipping a step. Geotechnical context should drive the method, not the other way round.
What does it cost to fix a basement, and how long does it take?
Costs vary enormously by region and by what’s actually wrong, but the ranges tend to follow a predictable order.
- Small DIY fixes (crack sealing, downspout extensions, regrading): lowest cost, usually a weekend’s work.
- Interior cavity-drain system with sump pump: mid-range cost, typically completed in a few days without major excavation.
- Epoxy or polyurethane injection: priced per crack or per linear metre, a targeted job rather than a whole-basement project.
- External tanking: the highest cost due to excavation, and the longest timeline, often a week or more depending on access.
Access difficulty, soil type, hydrostatic pressure levels, and whether structural repairs are needed all push costs up or down. Diagnostics usually take a day; small repairs finish within a week; full waterproofing projects can run from several days to a few weeks.
Stop leaks from coming back: a maintenance checklist
A leak you’ve just fixed will return if you skip basic upkeep. Build this into your calendar twice a year, spring and autumn:
- Clean gutters and check downspout extensions are still directing water away from the wall.
- Confirm the ground still slopes away from the foundation; soil settles over time.
- Test the sump pump manually and check the battery backup.
- Clear window wells of leaves and debris before the wet season.
- Monitor indoor humidity and run a dehumidifier if it climbs above comfortable levels.
Pro Tip: Test your sump pump’s battery backup by unplugging the unit and pouring a bucket of water into the pit. If it doesn’t kick in immediately, replace the battery before you need it, not after a power cut during a storm.
Detailed instructions for epoxy and polyurethane crack injection
Crack injection is one of the few basement repairs a confident DIYer can genuinely do well, provided the crack is a straightforward vertical hairline rather than a structural warning sign.
Epoxy injection suits structural cracks where you want to restore the wall’s strength, not just stop water. Clean the crack surface, install injection ports (small plastic fittings) along its length spaced roughly 15 to 20 centimetres apart, then seal the surface between ports with a fast-setting epoxy paste. Once that paste cures, usually within a few hours, inject epoxy resin through the lowest port until it appears at the next one up, then move up the crack in sequence.
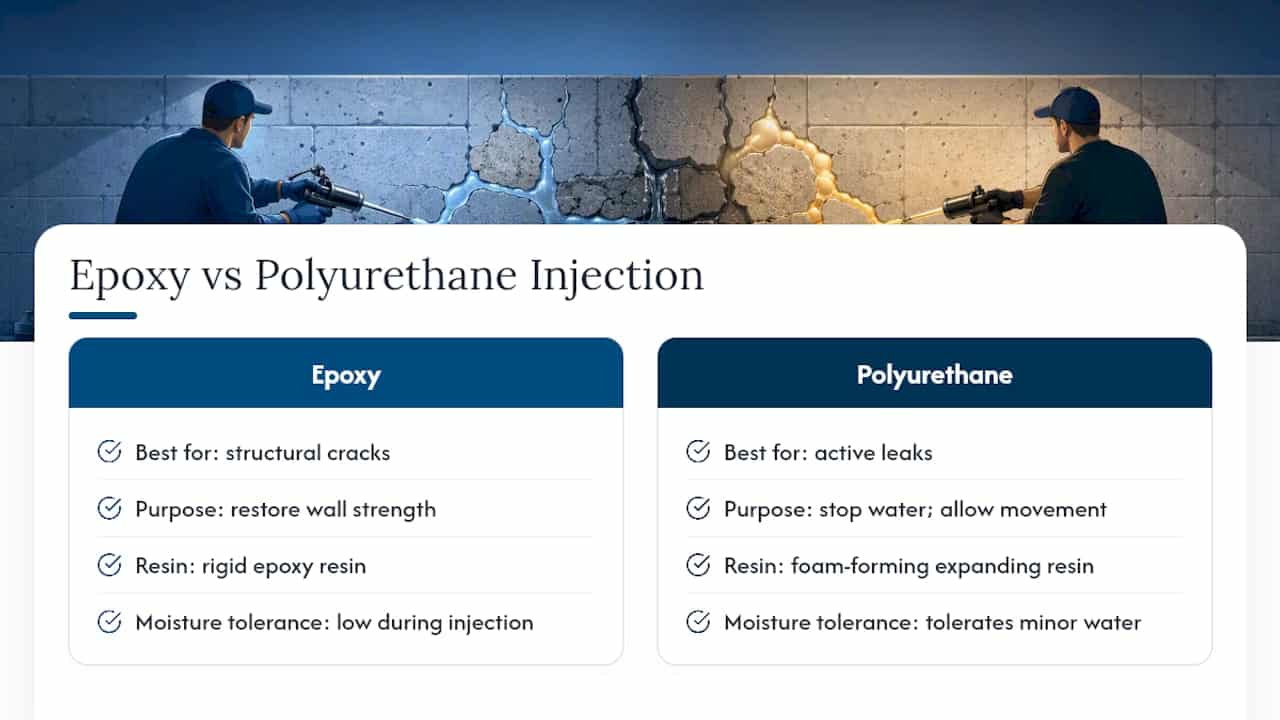
Polyurethane injection is better suited to active leaks because it expands on contact with moisture and remains slightly flexible, which matters if the crack moves seasonally. The port installation is nearly identical, but you’re injecting a foam-forming resin rather than a rigid epoxy, so it tolerates minor ongoing water intrusion during the injection process itself.
Both methods need a caulking gun rated for injection cartridges, the ports, the sealing paste, and the resin itself. Wear gloves and ventilate the space, since both resins carry strong fumes while curing. If the crack is wider than about 6 millimetres, actively growing, or paired with any bulging or horizontal displacement, this is a structural issue, not a sealing job, and needs an engineer before you touch it with a caulking gun.
How to safely handle mould and mildew from basement dampness
Mould shows up within 24 to 48 hours on any surface that’s stayed damp, so treat it as a parallel task to fixing the leak itself, not an afterthought.
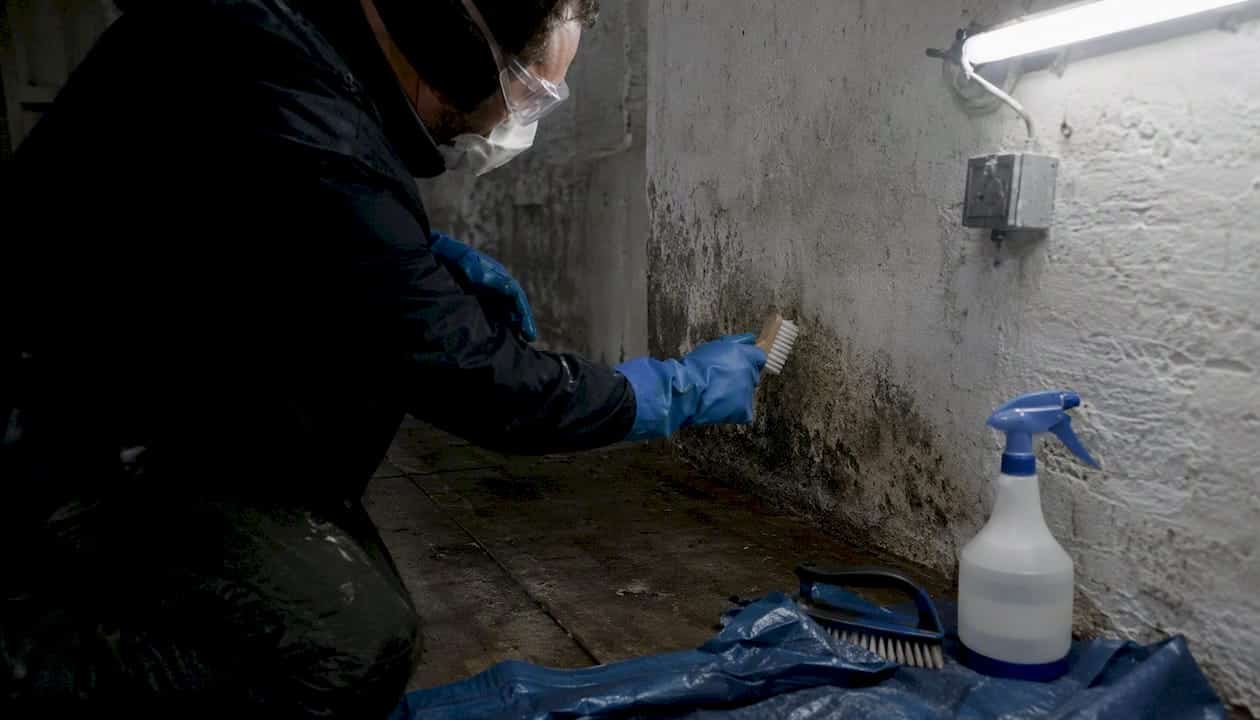
Small patches, under about one square metre, on hard non-porous surfaces like concrete or tile can usually be cleaned yourself. Wear an N95 mask, gloves, and goggles, then scrub with a solution of water and a household detergent or a diluted bleach solution, rinsing and drying the area thoroughly afterwards. Never mix bleach with ammonia-based cleaners; the fumes are dangerous.
Porous materials, drywall, carpet, insulation, or wood that has been wet for more than 48 hours, generally can’t be cleaned effectively and need to be removed and replaced rather than treated. Bag contaminated materials before carrying them through the house to avoid spreading spores.
Run a dehumidifier during and after cleanup to bring humidity below roughly 50%, and keep the area ventilated with a fan pointed toward an open window or door, never recirculating air through the rest of the house. If mould covers more than about 3 square metres, or you’re dealing with a health-sensitive household member (asthma, immune compromise), bring in a remediation specialist rather than tackling it yourself. Fixing the underlying leak matters more than any cleaning product: mould returns within days if the moisture source is still active.
Structural damage from leaks: what to look for beyond cracks
Water damage doesn’t stop at a wet patch on the floor. Left unaddressed, it can undermine the structure in ways that aren’t obvious until they’re serious.
Watch for doors and windows that suddenly stick or won’t close properly, which often signals the frame has shifted as the foundation moves. Uneven or sloping floors upstairs, not just in the basement, can indicate the foundation has settled unevenly under sustained water pressure. Stair-step cracking in masonry, following the mortar joints in a zigzag pattern rather than running straight, is a classic sign of differential settlement rather than simple shrinkage.
Vertical hairline cracks generally mean minor settlement, treatable with injection methods described earlier. Horizontal cracks or any wall that bulges inward tell a different story: lateral soil pressure pushing against a wall that’s losing its ability to resist it. That distinction isn’t cosmetic. A structural engineer needs to assess horizontal or bulging cracks before any cosmetic repair goes near them, because sealing over a structural failure just hides the problem while it worsens.
Persistent musty smells even after visible water is gone, efflorescence that keeps returning after cleaning, and gaps opening up between the wall and floor are all worth documenting with photos and dates. If you notice two or more of these signs together, that’s a stronger signal than any one alone, and it’s the point where a professional inspection stops being optional.
Author perspective: common homeowner mistakes and quick corrective actions
The mistake I see most often isn’t a bad repair, it’s the wrong repair. Homeowners seal a crack and declare victory, when the water was never coming through the crack in the first place, it was pooling against the wall because a downspout was dumping water three feet from the foundation. Fix the drainage first. Then, if water still gets in, fix the wall.
The second mistake is treating a sump pump as “installed and forgotten.” Test it twice a year, or it will fail exactly when you need it most.
Get a proper survey before you commit to a fix
You’ve now got the diagnostic steps, the cheap fixes, and the permanent options. Where Prowaterproofing earns its place is the step most guides skip: getting an accurate read on which of those options your specific basement actually needs, rather than guessing from a checklist.

A site survey identifies whether you’re dealing with hydrostatic pressure, a failed joint, or simple grading, and you get a written quote outlining the proposed system, the timeline, and the warranty terms before any work starts. That’s the difference between paying once for the right fix and paying twice because a DIY patch only bought you a season. If your basement has been leaking for more than one storm, or you’ve already tried sealing a crack and it’s back, book a survey and quote with Prowaterproofing and get a proposal built around what’s actually happening under your foundation.
Frequently asked questions
How much does it cost to fix a basement leak?
It depends heavily on the cause. Sealing a single crack or fixing drainage costs far less than an interior cavity-drain system, and external tanking costs the most due to excavation.
Can I fix a basement leak myself?
Grading, gutter fixes, and sealing hairline cracks are reasonable DIY jobs. Anything involving a horizontal crack, bulging wall, or ongoing hydrostatic pressure needs a professional.
How long does it take to fix a leaking basement?
Diagnostics take about a day, small repairs finish within a week, and full waterproofing projects can run from several days to a few weeks depending on scope and access.
Will fixing the leak get rid of the mould?
Not on its own. You need to remove contaminated porous materials and dry the space with a dehumidifier alongside stopping the water source.
Sources
- The Ultimate Guide to Basement Waterproofing: Costs, Systems & Solutions for SA Homes | ServiceLink SA
- SOUTH AFRICAN NATIONAL STANDARD: The waterproofing of buildings (including damp-proofing and vapour barrier installation)
- ANNEXURE A: Waterproofing BOQ (NHBRC)
Building rules vary by municipality, so confirm local permit requirements before starting structural work.