
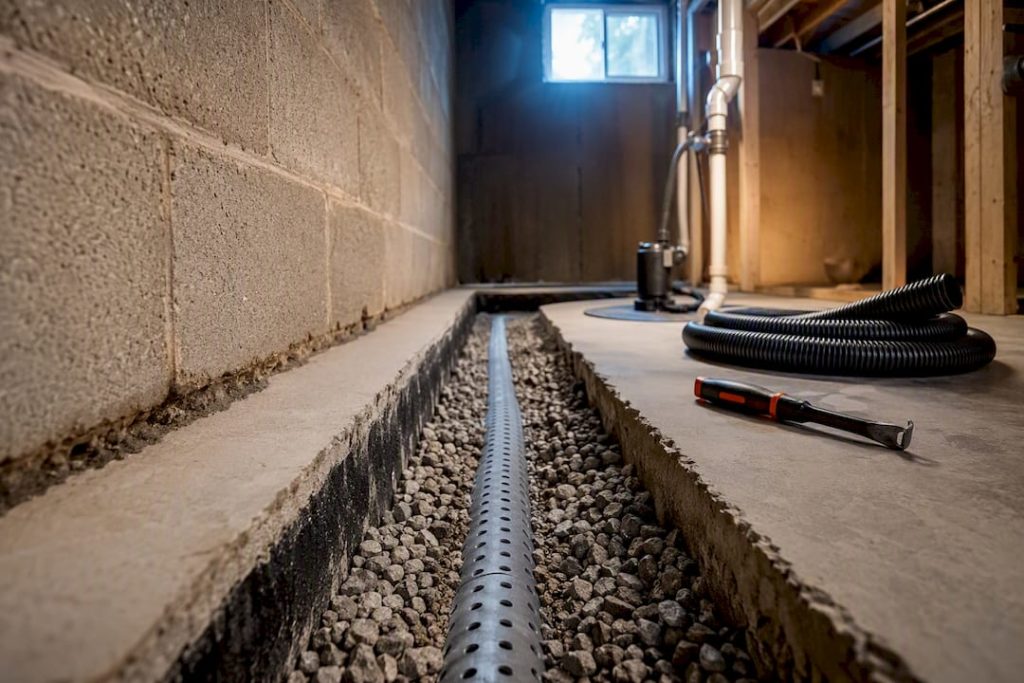
Interior basement drainage manages water that has already breached your foundation, routing it to a sump pump before it pools on the floor. For active leaks and finished basements, it is generally the correct retrofit choice, since excavating the exterior is often impractical once a house is built. If your basement is damp, start by checking the cove joint where the floor meets the wall, then book a professional site assessment before the next heavy rain.
TL;DR:
- Interior drainage systems are management solutions that route water to a sump pump, which must always be present and functioning to control moisture.
- The cove joint where the floor meets the wall is the most common entry point for water and cannot be permanently sealed, making a drainage channel essential.
- Installing interior drainage typically involves excavation in the basement, with costs varying based on foundation type, volume of concrete, and specific system chosen.
- Routine maintenance, including pump testing and cleaning, is vital to ensure the system functions during heavy rain or power outages, especially when backup pumps are not installed.
- Interior drainage is preferable for finished basements or where external excavation is impractical, while exterior tanking provides stronger prevention but requires longer, more disruptive work.
Table of Contents
- What is interior basement drainage and how does it work?
- Which type of interior drain system suits your basement?
- What does interior basement drainage cost, and how long does it take?
- How do you choose the right interior drainage system?
- What happens during installation, and how should you prepare?
- How do you maintain an interior drainage system?
- Interior or exterior drainage: which does your basement actually need?
- When should you bring in a professional?
- What Eben has learnt from years of basement inspections
- How Pro Waterproofing can help with your basement
- Sources
What is interior basement drainage and how does it work?
Water finds three main routes into a basement: cracks in the wall, the keyway or cove joint where the floor slab meets the foundation wall, and seepage rising through the slab itself. Interior basement drainage doesn’t try to stop that water at the source. It accepts that some moisture will get through and gives it a controlled path out, rather than letting it spread across your floor.
A typical interior drainage installation involves a sub-floor drain or channel running along the perimeter, a bed of aggregate or an engineered channel to carry the flow, a sump pit sunk into the slab, and a sump pump that ejects the water outside through discharge piping. Some setups add a cavity membrane against the wall to intercept moisture before it reaches the drain.
The distinction that trips up most homeowners is this: interior systems relieve hydrostatic pressure rather than block water entry outright. Interior drainage intercepts groundwater at the interior perimeter and routes it to a sump pump, managing the water after it arrives instead of preventing it from arriving at all. That’s a meaningfully different job from external tanking, which tries to keep water out in the first place.
The cove joint deserves special attention. It’s the narrow gap between the floor slab and the foundation wall, and it is the single most common place water gets in. Experts note that the cove joint cannot be reliably patched on a permanent basis — sealant fails again as hydrostatic pressure builds behind the wall. Drain tile installed along that joint gives the water somewhere to go before it ever reaches your floor.
System components typically include:
- A perimeter drain or channel along the base of the foundation wall
- Aggregate or an engineered plastic channel to carry water to the sump
- A sump pit and pump, sized to the property’s water volume
- Discharge piping routed away from the foundation
- Optional cavity membrane where wall seepage is significant
One figure worth remembering: interior systems are consistently described as a management solution rather than a barrier, which is why the sump pump isn’t optional equipment. It’s the component that actually gets water out of the building.
Which type of interior drain system suits your basement?
Not every basement needs the same drain. The right choice depends on your slab type, how finished the space is, and how much disruption you can tolerate during the work.
Sub-floor perimeter drains (the interior French drain). This is the most invasive option, cutting a channel around the entire perimeter of the slab and burying pipe in gravel below floor level. It’s also the most reliable for basements with a separate footing and slab, because it intercepts water at the lowest point before it can rise. Expect several days of jackhammering and dust, but it’s the gold standard for persistent seepage.
Engineered channel systems. These sit in a shallower cut than a full French drain, using a moulded plastic channel rather than loose aggregate. They’re popular in finished basements because the footprint is smaller and reinstatement is quicker, though they generally carry less capacity than a full sub-floor drain in high-volume situations.
Baseboard or surface-mounted drainage. The least invasive option, fixed along the base of the wall without cutting the slab at all. It suits minor seepage and damp walls rather than active water intrusion, and it’s a reasonable stopgap where a full installation isn’t yet affordable.
Thin-floor or low-profile systems. Designed for basements where the slab sits close to the footing, leaving little depth to work with. These use narrower channels and shallower pits, trading some capacity for the ability to fit where a standard system physically cannot.
Pro Tip: Ask your contractor to identify whether your foundation has a monolithic slab or a separate footing and slab before they quote. It changes which system will actually work, and a contractor who skips this step is guessing.
What does interior basement drainage cost, and how long does it take?
Costs vary widely by region, foundation size, and how much concrete needs breaking and reinstating, so treat any figure as a starting point for your own quotes rather than a fixed number. Interior systems are generally priced per linear metre of perimeter drain, with the sump pump and discharge work quoted separately.
Expect the quote to move up when any of the following apply:
- Deeper footings requiring extra excavation depth
- Large volumes of concrete needing removal and reinstatement
- Existing plumbing, electrical conduit, or ductwork that must be rerouted around the new channel
- A high water table demanding a larger sump pit or dual-pump setup
- Battery backup or a secondary pump added for storm resilience
On timeline, interior work is genuinely quick compared with digging up a garden. Interior drainage installations are commonly completed quickly, often within a few days, while exterior excavation and tanking can stretch into a week or more once landscaping, access, and backfill are factored in.
Budget a contingency beyond the initial quote. Contractor pricing often diverges because of differing assumptions about the slab and whether hidden remediation, such as replacing sections of concrete or working around a pocketed footing, turns out to be necessary once the floor is opened up. Ask what warranty covers the drain, the pump, and the labour separately, since these are frequently different terms bundled into one document.
How do you choose the right interior drainage system?
Match the system to three things: your foundation type, how finished the basement is, and how much ongoing maintenance you’re realistically prepared to do. A rental property with no basement finish can tolerate a more visible channel than a family room with new carpet.
Watch for these red flags when comparing quotes:
- Vague scope of work. If the quote doesn’t specify pipe diameter, channel type, or excavation depth, it’s not a real estimate.
- No mention of a battery backup or dual pump. Any system that dumps water into a single pump with no backup is one power cut away from a flooded basement.
- No written warranty period. Verbal promises about “lifetime” coverage mean nothing without a document.
- No references or completed local jobs. A contractor unwilling to show past work on a similar foundation type is worth avoiding.
Ask contractors directly: what pipe material and diameter will they use, does the discharge route avoid trapping water where it can freeze or back up, what make and model is the pump, and is the float switch mechanical or electronic? A fair quote itemises the drain, the pit, the pump, the discharge line, and the reinstatement of flooring separately, so you can see where the money actually goes.
Pro Tip: Request the pump’s model number in writing, then look it up yourself. A contractor quoting a domestic sump pump for a high water table property is setting you up for repeat failures.
What happens during installation, and how should you prepare?
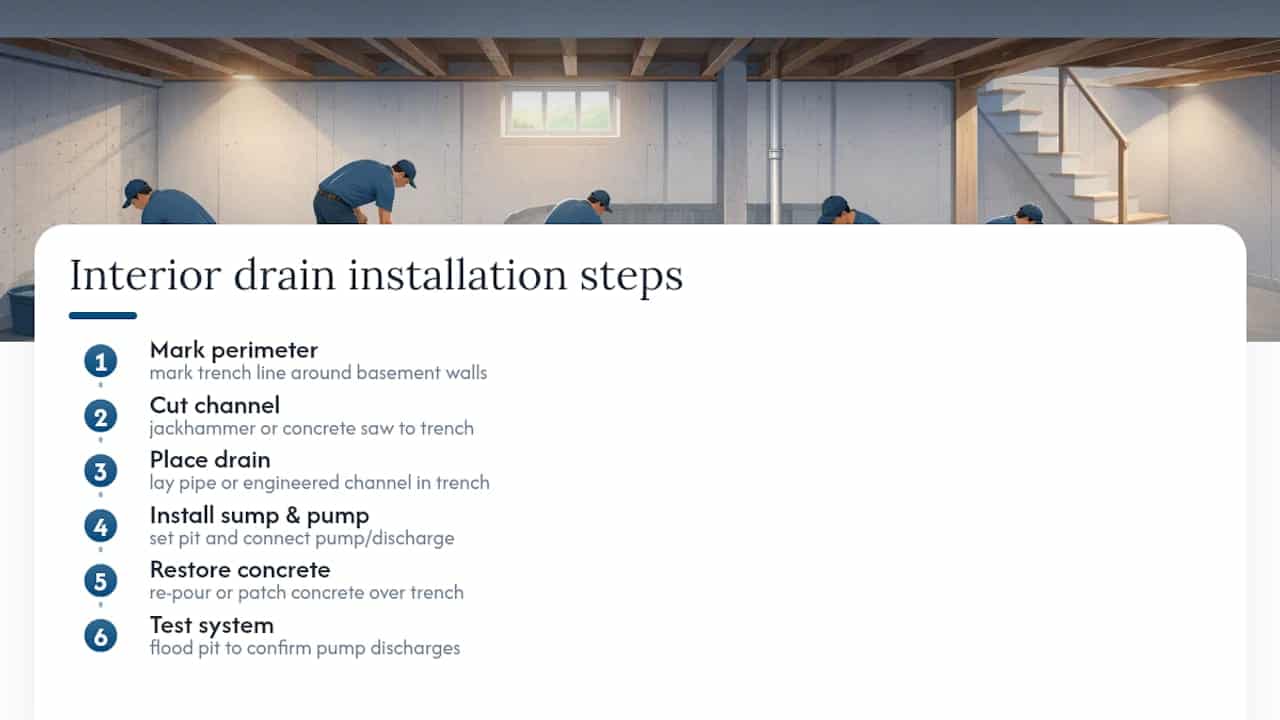
A typical interior drainage job follows a fairly fixed sequence: the crew marks the perimeter line, cuts the channel with a jackhammer or concrete saw, lays the drain pipe or engineered channel in the trench, installs the sump pit and pump, reinstates the concrete over the trench, and finally tests the system by flooding the pit to confirm the pump activates and discharges correctly.
Before the crew arrives, clear furniture and storage away from the perimeter walls, protect any remaining flooring from dust, and cover HVAC return vents to stop concrete dust circulating through the house. Reputable installers will avoid undermining the footing itself by keeping the trench a set distance from the foundation wall, and most jobs generate a genuine amount of dust and rubble that needs bagging and removing, so ask how waste disposal is handled before work starts.
A straightforward interior job will not require external excavation. If the assessment finds structural cracking, a collapsing foundation wall, or grading problems pushing water directly at the house, that points toward exterior work instead, sometimes alongside the interior system rather than as a substitute for it.
How do you maintain an interior drainage system?
A sump pump left unchecked for years is the most common way an otherwise sound drainage system fails when you actually need it. Routine maintenance is simple but easy to neglect.
- Run a test cycle every few months by pouring water into the pit until the pump activates
- Inspect the float switch for debris or sticking, since this is the single most common point of failure
- Clean sediment out of the sump pit periodically, particularly after heavy rain
- Check the discharge line outside for blockages, ice, or animal nests
Pumps typically need replacing every several years depending on usage and build quality, and a battery losing its charge quietly is one of the more common causes of a “sudden” flood. Battery backup or a dual-pump setup is recommended wherever pump failure would cause significant damage, and a water alarm tied to the pit gives an early warning if the primary pump ever stops keeping up.
Pro Tip: Set a calendar reminder to test the pump before the rainy season starts each year, not during the first storm of the season when you’ll find out it failed months ago.
Interior or exterior drainage: which does your basement actually need?
Exterior tanking excavates around the foundation and seals it from the outside, which is the stronger approach when you can get at the perimeter, typically on a new build or a property with clear yard access. It keeps water from ever reaching the wall, but it’s expensive, slow, and disruptive to landscaping.
Interior drainage wins out when the basement is already finished, when excavation would damage a driveway, patio, or neighbouring structure, or when the budget simply doesn’t stretch to a full exterior dig. It’s also the only realistic option for row houses and properties with no side access at all.
- Exterior tanking: stronger prevention, higher cost, longer timeline, requires perimeter access
- Interior drainage: faster, cheaper, works on finished basements, manages rather than blocks water
- Combined approach: membrane plus interior drain, used where hydrostatic pressure is severe
Any membrane solution, interior or exterior, still needs somewhere for water to go once it’s diverted. A cavity drain membrane without a functioning perimeter drain and sump pump is a system with no exit, which is why the two always get installed together on any serious retrofit.
When should you bring in a professional?
Persistent seepage after rain, cracking in the foundation wall, visible efflorescence, or a sump pump that keeps failing are all signals to stop patching and get a proper assessment. A professional visit typically maps moisture across the floor and walls, inspects the cove joint specifically, and considers local soil type and water table depth before recommending a system.
SANS guidance on waterproofing recognises drained cavity construction and under-floor drainage as accepted methods, alongside a clear emphasis on site drainage and construction detailing rather than treating the membrane as a standalone fix.
A proper report should include:
- Moisture readings taken at multiple points, not a single spot check
- An assessment of the cove joint and any visible cracking
- A recommendation matched to your specific foundation type
- A written specification covering pipe size, pump model, and warranty terms
Pro Waterproofing’s technical content, including a detailed guide to interior waterproofing written by the team, sets out how cavity drain systems are specified and reinstated correctly.
What Eben has learnt from years of basement inspections
The mistake I see most often isn’t choosing the wrong drain type. It’s ignoring surface water entirely, then wondering why an interior system struggles under load it was never sized for. Grading and downpipe routing outside the house do more preventative work than most homeowners credit.
The second mistake is trusting a cheap pump with no backup, and the third is accepting a quote with no written specification. Focus on three things: control surface water first, install a sump with genuine backup, and insist on a written scope with a real warranty. If your basement is showing signs of seepage, get a site survey done properly rather than guessing from the symptoms.
— Eben
How Pro Waterproofing can help with your basement
Pro Waterproofing installs interior drainage systems, sump pump setups with battery backup, and ongoing maintenance plans for homeowners and property managers dealing with basement moisture. Rather than a generic call-out, you get a specialist who understands the difference between a cove joint leak and a hydrostatic pressure problem, and who specifies the system accordingly.

A site visit from Pro Waterproofing includes a moisture inspection, readings at key points around the perimeter, and a written specification setting out pipe type, pump model, and warranty terms before any work begins. That written scope is exactly what the red flags above warn you to demand, and it’s standard on every assessment. For construction detailing that keeps vulnerable junctions like parapets and wall penetrations from undermining drainage work, Pro Waterproofing also draws on guidance such as this watertight building overview.
If your basement has shown any sign of seepage this year, request a quote through Pro Waterproofing and get a proper site assessment booked before the next heavy rain arrives.
Sources
- Interior Basement Drainage Systems: Types, Costs & How to …
- Interior vs. Exterior Drainage Systems
- Why does my basement leak between the wall and floor?