

Torch-on waterproofing is a way of sealing flat and low-slope surfaces by using a gas torch to melt the underside of a rolled bitumen membrane, so that it bonds to the surface below. The sheets are fused to each other along the overlaps, which gives a continuous, watertight layer. This guide explains how the application works, what preparation it needs, where it goes wrong and what to ask a contractor before work starts.
TL;DR
- Torch-on is a rolled, polymer-modified bitumen membrane. A propane torch melts its underside so it bonds to a primed, clean, dry substrate.
- Sheets are overlapped and heated until a thin bead of melted bitumen appears at the joint. That bead shows the seam is welded.
- Preparation decides the result. Poor priming, damp or dusty surfaces and wrong heat are the usual causes of failure.
- Open flame brings real fire risk, especially near timber. Only trained installers should do the work, with extinguishers and a fire watch.
- Ask any contractor about training, warranty and how they handle details such as upstands and penetrations.
Table of Contents
- What torch-on waterproofing actually is
- How torch-on application works, step by step
- Can you torch over an existing roof?
- Fire safety during torch-on work
- Why torch-on membranes fail
- Torch-on compared with liquid membranes
- How to choose a torch-on contractor
- Our perspective
- Get a quote for your roof or deck
- FAQ
- Sources
What torch-on waterproofing actually is
A torch-on membrane is a sheet of bitumen that has been modified with polymers and reinforced with polyester or glass fibre. It is supplied in rolls, much like heavy roofing felt, but it is installed very differently. Instead of nails or cold adhesive, the installer uses heat.
The underside of the sheet carries a thin film that is designed to melt. According to the Canadian Roofing Reference Manual, that underside film melts under heat, the softened bitumen bonds the membrane to the substrate, and heated base and cap sheets fuse into a single monolithic layer. A manufacturer’s product sheet for an SBS torch-on membrane describes the same idea: a polyester-reinforced, SBS-modified bituminous membrane, torch-applied to create a fully bonded waterproof layer.
You will see torch-on used on flat roofs, concrete decks, podiums, balconies, plant rooms and, in some systems, basements and retaining walls. It suits places where water must be kept out of a large, mostly horizontal surface, and where a robust, multi-layer system is wanted.
SBS and APP: the two main types
The bitumen is modified in one of two common ways. The IKO guide to torch-down roofing explains that the membrane is typically asphalt modified with either rubber (SBS) or plastic (APP), which gives it flexibility and durability against temperature changes.
In practice the difference matters to the installer:
| Feature | SBS (rubber-modified) | APP (plastic-modified) |
|---|---|---|
| Feel | More flexible, stays pliable in the cold | Stiffer |
| Heat needed to apply | Less | More |
| Typical role | Cap sheets and base sheets where movement is expected | Often used as a base or mid layer in multi-layer systems |
The comparison of flexibility and heat comes from IKO’s UK advice on torch-on roofing. Which type suits your building depends on the structure, the climate and the specification, and a good contractor will explain the choice rather than simply name a product.
How torch-on application works, step by step
Exact methods vary between products, so the manufacturer’s data sheet always governs. The sequence below follows the general approach described in manufacturer and industry guidance.
1. Check and prepare the surface
This stage matters more than any other. The manufacturer’s application manual for bituminous membranes says substrates must be uniform, firm, smooth, clean and dry, and free of sharp protrusions, grease, oil, dust and loose particles. Holes and voids should be exposed and repaired before installation, as the same company’s step-by-step guide points out.
On a concrete deck, that usually means cleaning, patching cracks and honeycombing, forming smooth transitions at corners, and making sure the slab is properly dry. Our own guide to surface preparation in waterproofing goes into this in more detail for South African conditions.
2. Prime the surface
A suitable primer is applied to the prepared surface and left to dry. The same application manual sets out this step, and a manufacturer of APP membranes also recommends a suitable primer on all substrates to prepare the surface and improve adhesion. If you want to understand why this coat matters, read our article on substrate primer choices and membrane adhesion.
3. Unroll, align and set out the sheets
The rolls are unrolled dry and aligned before any heat is applied. The manufacturer’s guidance says rolls should be aligned and staggered so that side and end laps do not stack up in one place. The installer then rolls the sheet back to the starting point, ready to bond.
4. Heat and bond
This is the part people picture when they hear “torch-on”. The installer heats the substrate and the underside of the roll together, at a steady pace, until the backing film starts to melt and the membrane is ready to stick. The roll is then pressed down as it is unrolled, so that a small wave of molten bitumen travels ahead of it.
The torch is a tool for controlled melting, not for browning the surface. The Canadian manual describes torching as critical to both performance and safety and says it must be done by trained, skilled roofers who watch and control the heat applied to the roll and substrate.
5. Weld the overlaps
Where sheets meet, the overlap is heated until a trickle of melted bitumen about 1 cm wide appears along the joint. The manufacturer’s application manual describes this bead, and the step-by-step guide says it indicates the joint has been welded. A continuous, even bead is what a careful installer is looking for along every seam.
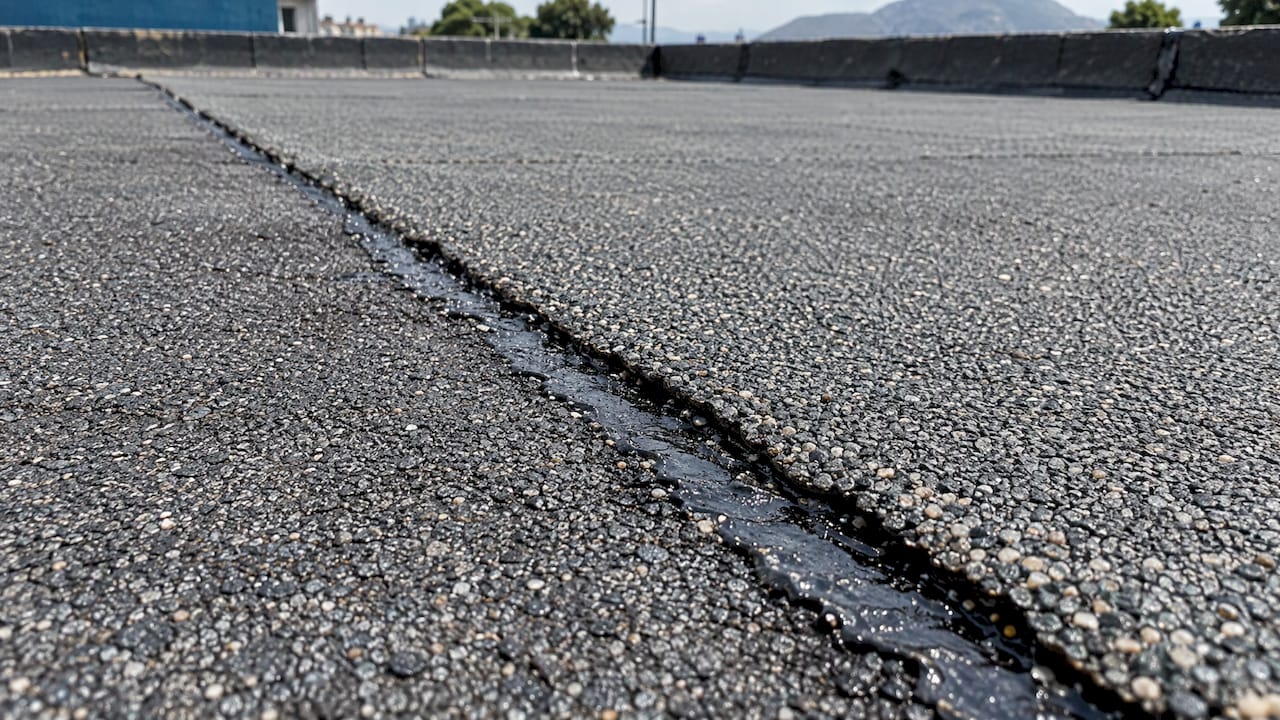
On mineral-surfaced sheets, the granules at the overlap need to be embedded into the hot bitumen. Industry guidance says this is mandatory for good adhesion, because without it the bond may be inadequate and could lead to delamination or moisture penetration.
6. Add the cap sheet and finish details
Multi-layer systems have a base sheet and a cap sheet, with the cap laps offset from the base laps. Upstands, corners, drains and pipe penetrations are the places where leaks usually start, so these are detailed with extra care, often with additional strips of membrane and proper terminations at the top edge. For a wider view of how the whole job flows, see our guides to the waterproofing application process and roof waterproofing steps.
Can you torch over an existing roof?
Sometimes, but it depends on what is underneath. One manufacturer’s UK product sheet states that its SBS membrane may be used over existing bituminous membranes when they are well bonded, provided the deck is dry, clean, sound and free from dust, debris and sharp projections.
A New Zealand technical appraisal of a torch-on system says such systems may be used on new or existing buildings, but existing substrates must be assessed for suitability and the work must be done by licensed, trained installers. The lesson is general: an old surface needs inspection before anyone lights a torch, and a trustworthy contractor will tell you what they found and what they propose.
Fire safety during torch-on work
Open flame on a roof is a serious hazard, and the safety rules are part of the product, not an extra. The points below come from industry bodies in different countries; local regulations and your insurer’s requirements still apply.
- Training. A US roofing safety manual for certified torch applicators says certified applicators should operate torches that contact roofs, keep two 4A60BC extinguishers within 10 feet, never leave a lit torch unattended and keep a fire watch for at least two hours after the work finishes.
- Extinguishers. The Canadian manual also states a fire extinguisher must be near the torching operation at all times.
- Timber. UK roofing guidance warns that applying an open-flame torch directly to timber roof decks or upstands is a significant fire risk and should be avoided in favour of flame-free methods or protective base layers.
Roof penetrations such as flues and extraction vents sit exactly where heat, combustible materials and waterproofing details meet, so they deserve a conversation with your contractor. For a related look at how vents on a roof cause both leaks and fire risk, see these notes on dryer vent roof problems.
As an owner or manager, you can ask three practical questions before work begins. Who will be holding the torch and what training do they have? What is the fire-safety plan, including extinguishers and the post-work check? What does your insurer require for hot work on the property?
Why torch-on membranes fail
A torch-on system that is well specified and carefully installed is a robust build-up. When it fails, the cause is almost always in the application.
Wrong heat. The Canadian manual explains that overheating can damage the reinforcement, causing punctures or waves, while underheating gives weak seams and poor adhesion. The installer is looking for the middle ground, and that takes experience.
Poor preparation. A dirty, damp, unsound or unprimed surface will undermine even a good membrane. Trapped moisture is a classic culprit, because heat turns it to vapour beneath the sheet and creates blisters. Our bituminous waterproofing membrane guide covers how these systems are built up.
Skipped details. Seams without granule embedment, thin upstand terminations and unsealed penetrations let water in at the edges while the main field of the roof looks fine.
Wrong substrate. Timber decks and some existing coverings need different methods or protective layers, as the fire-safety guidance above shows.
Torch-on compared with liquid membranes
Both are widely used. Torch-on arrives as a factory-made sheet with consistent thickness, and is bonded with heat. Liquid-applied systems are brushed, rolled or sprayed on and cure to form a seamless coating, which can suit awkward shapes. The right answer depends on the shape of the roof, access, what the structure can safely take, and the fire risk of working with flame at that particular building. Rather than choosing a product by name, ask a contractor to explain why their recommended system suits your roof.
How to choose a torch-on contractor
Because so much of the result depends on skilled application, the contractor matters as much as the membrane. Look for:
- Proven training and experience with torch-applied systems, ideally on buildings like yours.
- A clear written scope: surface preparation, primer, number of layers, details at upstands, drains and penetrations.
- A fire-safety method statement covering extinguishers, supervision and the post-work check.
- A written warranty that explains what is covered and for how long.
- Proper licensing and insurance for the type of work and the type of property.
Our article on five contractor checks for bituminous membrane waterproofing expands on these, and the guide to essential things to know before installing a new roof helps with planning.
Our perspective
In our experience, the membrane gets the attention but the installer decides the outcome. Two crews can lay the same product on the same roof and deliver very different results, because heat control, surface preparation and detailing are craft skills.
That is why we focus on helping property owners ask the right questions before hiring: about quality, experience, licensing and warranties. A written scope and a clear warranty tell you more about a contractor than a brochure.
We connect owners of homes, commercial buildings and industrial sites with vetted waterproofing professionals, so the person on your roof is someone you have been able to question properly first.
Eben
Get a quote for your roof or deck
If you own or manage a residential, commercial or industrial property and want waterproofing assessed, we can help you reach vetted waterproofing professionals. Send us a quote request describing the surface, its condition and where the water is getting in, and we will take it from there.
Start on the Pro Waterproofing home page and complete the quote form. The more detail you give about the roof or deck, the easier it is for a contractor to advise on a suitable system.
FAQ
What is torch-on waterproofing used for?
It is used mainly on flat and low-slope roofs, concrete decks and similar horizontal surfaces, and in some systems on basements and retaining walls. The sheet is bonded to the surface with heat, forming a continuous waterproof layer.
Is torch-on waterproofing safe?
It is safe when done by trained installers who follow fire-safety rules. Those rules include extinguishers at hand, never leaving a lit torch unattended and a fire watch after the work, and avoiding direct flame on timber. Ask your contractor for their fire-safety plan and check your insurer’s requirements.
Can torch-on membrane be applied over an old roof?
It can be applied over some existing bituminous membranes if they are well bonded and the surface is dry, clean and sound. The existing roof must be assessed first, and some substrates, such as timber, need a different method or a protective layer.
Why does the overlap need to show a bead of bitumen?
The bead of melted bitumen along the joint shows the two sheets have been heated enough to fuse. Without it, the seam may be weakly bonded and let water through.
Sources
- Canadian Roofing Reference Manual: Application of Membrane
- Cromar SBS Torch-on product sheet
- IKO: Guide to torch-down roofing
- IKO: What is torch-on roofing and why is it used?
- Application manual for bituminous torch-on membranes
- How to apply torch-on membrane
- APP membranes product page
- Viking torch-on technical appraisal
- CERTA certification student manual
- NFRC Safe2Torch guidance
- Dryer vent roof problems