Over 70 percent of household insurance claims in South Africa are related to water damage, highlighting just how common basement leaks have become. Even small cracks or damp patches can quickly turn into expensive repairs if left unchecked. By understanding where your basement is most at risk, you gain the power to prevent serious moisture problems and keep your property safe from hidden threats.
Table of Contents
- Step 1: Inspect And Identify Vulnerable Areas
- Step 2: Prepare Surfaces And Address Existing Damage
- Step 3: Apply Appropriate Waterproofing Products
- Step 4: Install Effective Drainage Solutions
- Step 5: Test Waterproofing And Ensure Quality
Quick Summary
| Key Point | Explanation |
|---|---|
| 1. Inspect vulnerable areas | Thoroughly examine your basement for signs of moisture and structural weaknesses to prevent water damage. |
| 2. Prepare surfaces carefully | Clean and repair all surfaces in your basement to ensure effective waterproofing application. |
| 3. Use high-quality products | Select and apply specialized waterproofing membranes designed for below-ground surfaces for best results. |
| 4. Install proper drainage systems | Implement both exterior and interior drainage solutions to redirect water away from your foundation. |
| **5. Test waterproofing effectiveness |
**| Conduct water simulation tests to verify that your waterproofing system is functioning properly.
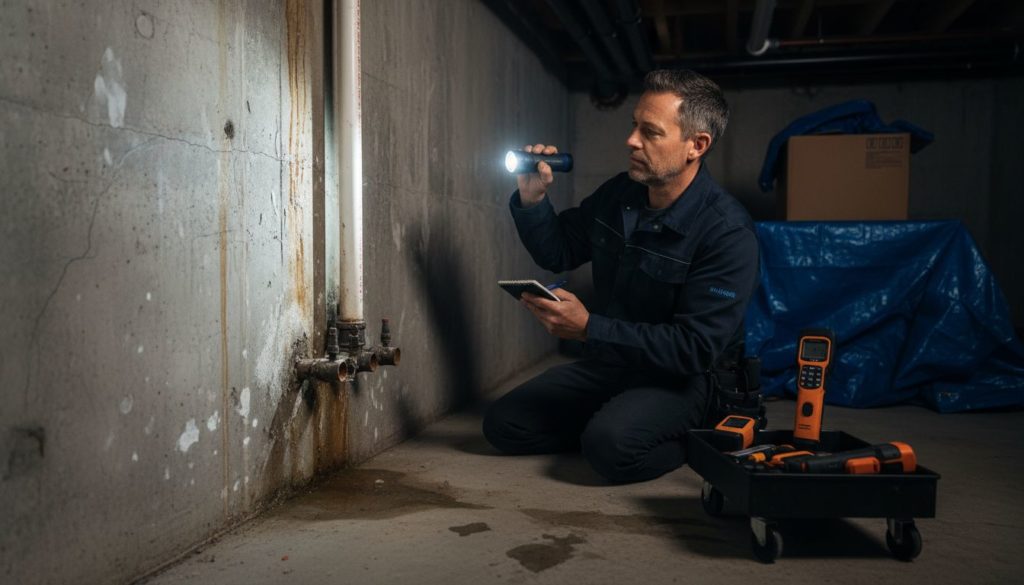
Step 1: Inspect and Identify Vulnerable Areas
Identifying potential water vulnerability points in your basement requires systematic observation and strategic assessment. You will learn how to thoroughly examine your space for signs of moisture intrusion and structural weaknesses that could compromise your property’s integrity.
Start by conducting a comprehensive visual inspection around your basement perimeter. Look carefully for telltale signs of water damage including discoloured wall surfaces, musty odours, white powdery mineral deposits known as efflorescence, and any visible water stains or dark patches. According to research from the South African government drainage guidelines, these indicators often signal underlying moisture penetration risks.
Pay special attention to key vulnerability zones such as wall joints, floor slab edges, window wells, and pipe penetrations. These areas frequently represent potential water entry points due to natural structural stress and potential microscopic cracks. Understanding Waterproofing Inspection for Property Owners provides additional insights into professional assessment techniques.
Here’s a summary of key vulnerable areas to inspect and what to look for:
| Vulnerable Area | Common Signs of Moisture | Additional Inspection Tips |
|---|---|---|
| Wall joints | Cracks Efflorescence |
Use torchlight for subtle irregularities |
| Floor slab edges | Water stains Dark patches |
Check for recent or worsening marks |
| Window wells | Discolouration Damp spots |
Inspect frames and surrounding masonry |
| Pipe penetrations | Musty odours Drips |
Feel for condensation or leaks |
Pro Tip: Use a bright flashlight during your inspection to reveal hidden moisture marks and subtle structural irregularities that might escape casual observation.
During your assessment, document everything. Take clear photographs of suspicious areas and measure any visible cracks or moisture stains. This documentation will prove invaluable if you decide to engage professional waterproofing services or need to track potential deterioration over time.
Remember that early detection prevents extensive water damage. Your meticulous inspection now could save significant repair costs and protect your property’s structural integrity in the long term.
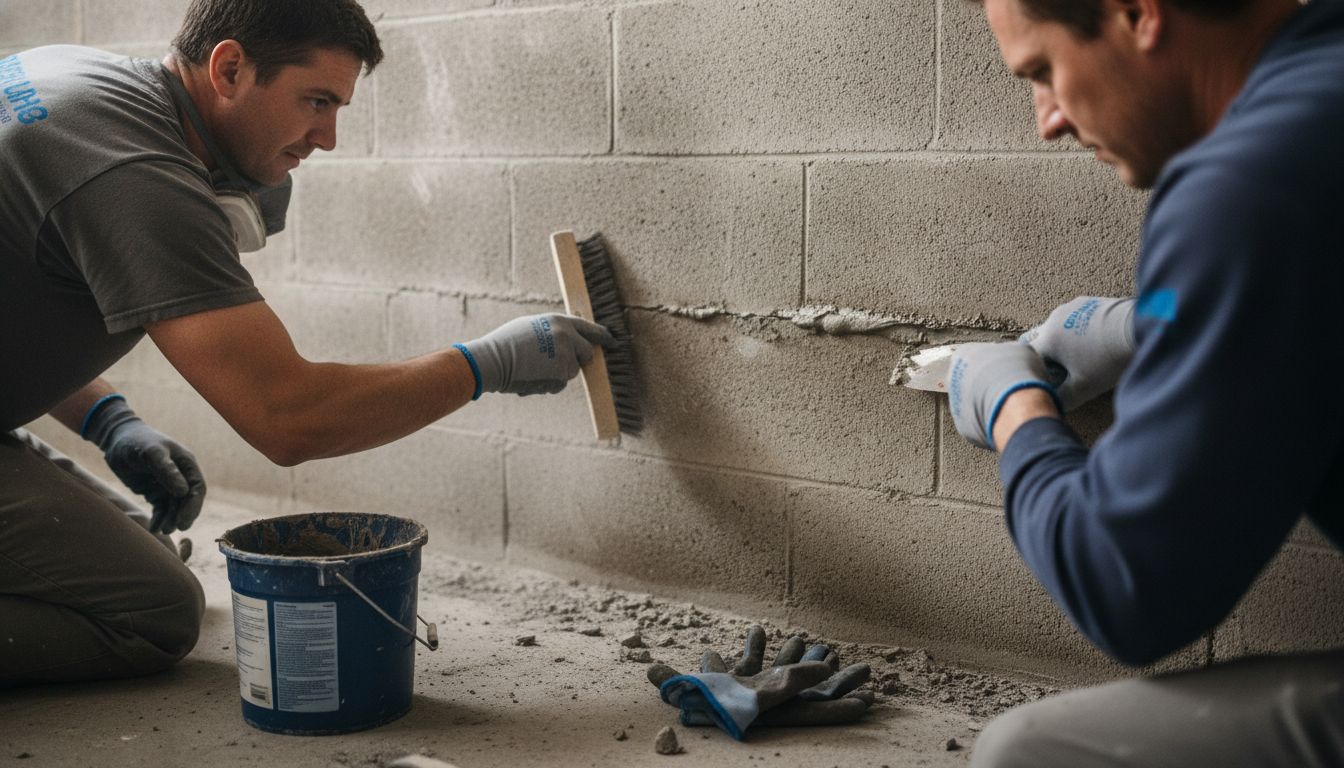
Step 2: Prepare Surfaces and Address Existing Damage
Surface preparation is a critical step in creating a robust waterproofing solution for your basement. This section will guide you through comprehensive surface repair and preparation techniques that will significantly enhance your waterproofing efforts.
Begin by thoroughly cleaning all surfaces to remove loose debris, old paint, and any existing mineral deposits. Use a stiff wire brush and industrial cleaner to scrub walls and floors, ensuring you create a clean and smooth surface. According to the Agrement South Africa approval for innovative construction products, proper surface preparation is fundamental to achieving effective waterproofing outcomes.
Carefully inspect and repair any visible cracks or structural damage. For small hairline cracks, use specialised masonry filler or hydraulic cement that can expand and seal microscopic openings. Larger structural issues might require professional intervention. As research from the Banbric Building System suggests, addressing structural damage is essential for long term building durability.
Warning: Never attempt to seal large structural cracks without professional assessment. These could indicate more serious foundational problems that require expert attention.
After repairs, apply a high quality primer designed for moisture prone areas. This creates an optimal surface for subsequent waterproofing treatments and helps improve overall adhesion. Allow each layer of repair material to dry completely before proceeding to the next stage of waterproofing.
Your meticulous surface preparation sets the foundation for a successful waterproofing project. The time and effort invested now will protect your property from potential water damage and costly future repairs.
Step 3: Apply Appropriate Waterproofing Products
Applying the right waterproofing products is crucial for creating a robust moisture barrier in your basement. This step will help you select and implement the most effective waterproofing solutions tailored to your specific structural needs.
Choose a high quality waterproofing membrane or coating specifically designed for below ground surfaces. According to the Agrement South Africa approval for Prominent Paints Waterproofing Wall Coating, selecting product systems that offer comprehensive moisture protection is fundamental. Understanding the Waterproofing Application Process provides additional guidance on product selection.
Apply the waterproofing product systematically using a roller or specialised spray equipment. Start from the bottom of the wall and work upwards in consistent overlapping strokes. Ensure complete coverage without leaving any gaps or thin spots that could compromise your moisture barrier. Pay extra attention to corners and joints where water penetration is most likely.
Pro Tip: Always follow manufacturer instructions precisely. Different products require specific application techniques and drying times.
For optimal results, consider applying multiple layers. The first layer acts as a primary barrier while subsequent coats enhance overall protection and durability. Allow each layer to dry completely before applying the next one. Some professional grade products recommend a minimum of two thin coats for maximum effectiveness.
Remember that proper application is just as important as product selection. Take your time and work meticulously to ensure comprehensive coverage and long lasting protection for your basement.
Step 4: Install Effective Drainage Solutions
Installing a robust drainage system is crucial for protecting your basement from water intrusion and potential structural damage. This step will guide you through implementing comprehensive drainage solutions that redirect water away from your foundation.
Begin by assessing your property’s current landscape and grading. According to government drainage guidelines, proper surface drainage is fundamental in preventing water accumulation near your basement walls. Unveiling the Shield: The Role of Exterior Drainage Systems in Waterproofing offers deeper insights into effective drainage strategies.
Install a perimeter drainage system around your basement exterior. This typically involves digging a trench alongside the foundation and placing a perforated pipe surrounded by gravel. The pipe should slope away from the building to ensure water is effectively channelled away from the structure. As research from Agrement South Africa indicates, advanced drainage systems play a critical role in maintaining building integrity.
Pro Tip: Ensure your drainage pipe has at least a 2% gradient to facilitate natural water flow and prevent potential blockages.
Complement your exterior drainage with interior solutions such as a French drain or sump pump system. These additional measures provide extra protection by capturing and redirecting water that might penetrate your basement perimeter. Choose materials and systems appropriate to your specific soil conditions and local water table levels.
Regular maintenance is key to keeping your drainage system functioning optimally. Inspect and clean your drainage channels periodically to prevent debris accumulation and ensure continuous water redirection.
Step 5: Test Waterproofing and Ensure Quality
Testing your newly installed waterproofing system is a critical final step in ensuring long lasting protection for your basement. This process will help you verify the effectiveness of your waterproofing efforts and identify any potential areas that might require additional attention.
Begin with a comprehensive water simulation test. Carefully spray water against your basement walls using a garden hose to mimic rainfall conditions. Observe how water interacts with the newly applied waterproofing membrane. According to the Agrement South Africa approval process for waterproofing products, rigorous testing is essential to validate product quality and effectiveness. Quality Assurance in Waterproofing: Complete Guide provides additional insights into professional testing techniques.
Monitor the interior walls and floor during and after the water test. Look for any signs of moisture penetration such as water droplets condensation or damp spots. Pay close attention to previously identified vulnerable areas like wall joints corners and pipe penetrations. These locations often represent potential weak points in your waterproofing system.
Pro Tip: Conduct your water test during different weather conditions to simulate various moisture exposure scenarios.
Document your test results meticulously. Take clear photographs of any areas showing potential water infiltration and measure the extent of any moisture penetration. These records will be invaluable if you need to address any issues or consult with professional waterproofing specialists.
Remember that waterproofing is an ongoing process. Plan to repeat this testing annually and after significant weather events to ensure your basement remains protected from water damage.
Secure Your Basement with Expert Waterproofing Solutions
Basements vulnerable to water damage can cause immense stress and costly repairs. This article highlights key challenges like identifying moisture entry points, preparing surfaces, applying the right waterproofing products, and installing effective drainage systems. If you recognise issues such as efflorescence, damp patches, or musty odours in your basement, these are clear signs that immediate action is required to protect your property’s foundation and longevity.
Do not wait for water damage to worsen. Pro Waterproofing specialises in comprehensive basement waterproofing services designed to address every step outlined in this guide. From professional inspections to expertly applied waterproof membranes and drainage solutions, we safeguard your home or business against persistent moisture threats. Visit our Uncategorized – Pro Waterproofing page to learn more about our expert approaches and client success stories.

Take control now by consulting with trusted waterproofing professionals who understand the unique challenges of South African properties. Visit Pro Waterproofing to request a detailed assessment or quote today. Early intervention means peace of mind tomorrow. Protect your basement’s integrity and enjoy dry, secure living and working spaces.
Frequently Asked Questions
What are the key areas to inspect for basement waterproofing?
Identifying vulnerable areas is essential for effective basement waterproofing. Focus on wall joints, floor slab edges, window wells, and pipe penetrations to check for cracks, discoloration, and dampness.
How can I prepare surfaces before applying waterproofing products?
Thoroughly clean all surfaces to remove debris and old materials, ensuring a smooth application area. Use a stiff wire brush and industrial cleaner to scrub the walls and floors, and address any visible cracks with masonry filler before waterproofing.
How do I apply waterproofing products effectively?
Apply a high-quality waterproofing membrane or coating starting from the bottom of the wall and working upward with overlapping strokes. Ensure complete coverage without gaps, and consider applying at least two thin coats for maximum durability.
What drainage solutions should I install for my basement?
Implement a perimeter drainage system by digging a trench and placing a perforated pipe surrounded by gravel to redirect water away from your foundation. Additionally, consider installing interior solutions like a French drain or sump pump to provide extra protection against water intrusion.
How can I test the effectiveness of my basement waterproofing?
Conduct a water simulation test by spraying water against the basement walls and observing any interactions with the waterproofing membrane. Monitor for moisture penetration and document any signs of dampness to address potential weak points.
How often should I repeat waterproofing tests for my basement?
Plan to conduct waterproofing tests annually and after significant weather events to ensure continued protection. Regular checks can help identify issues early and maintain a dry basement environment.