
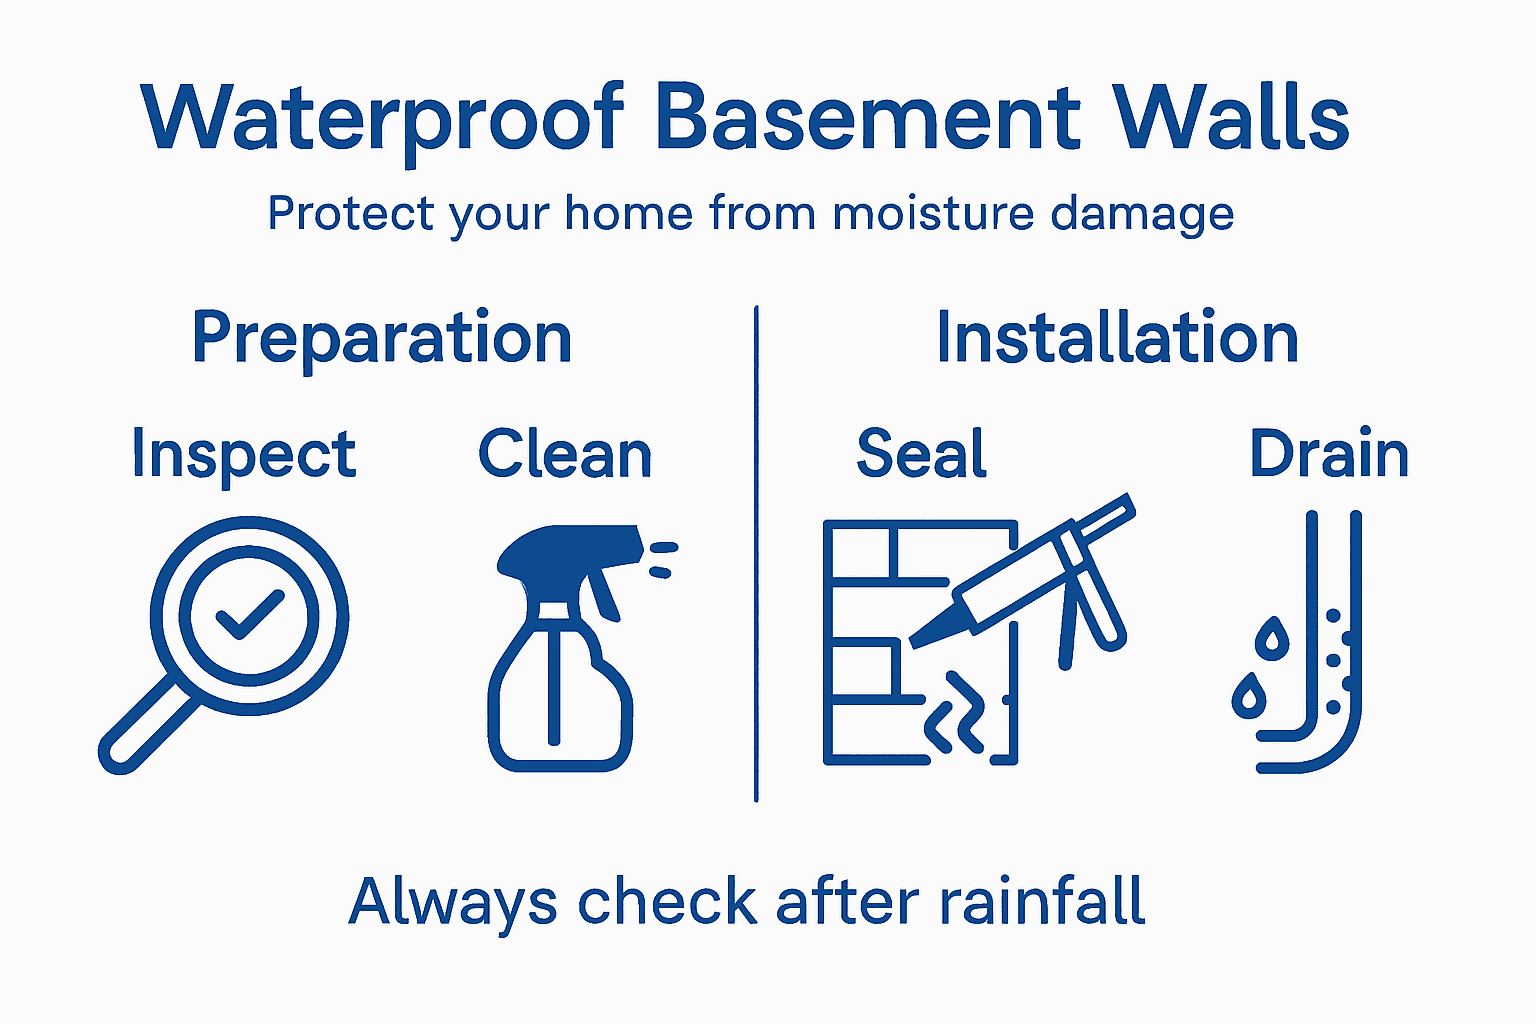
Persistent damp on basement walls is a source of frustration for many homeowners across Gauteng and Western Cape. Left unchecked, this issue can lead to costly repairs and threaten your property’s structural safety. By focusing on a systematic assessment of moisture sources, you gain control over water ingress and set the stage for reliable waterproofing. This guide shows practical methods for diagnosing, preparing, and resolving exterior basement wall dampness with proven solutions.
Table of Contents
- Step 1: Assess The Basement Walls For Dampness Issues
- Step 2: Prepare Surfaces And Remove Existing Defects
- Step 3: Apply Waterproofing Membrane And Sealant
- Step 4: Install Protective Drainage And Moisture Barriers
- Step 5: Inspect Waterproofing And Test Effectiveness
Quick Summary
| Key Point | Explanation |
|---|---|
| 1. Assess for Moisture Sources | Conduct a thorough visual inspection of basement walls for signs of dampness, such as stains or mould growth. |
| 2. Prepare Surfaces Diligently | Clean and repair walls thoroughly before applying waterproofing to ensure effective adhesion and protection. |
| 3. Apply Appropriate Membrane | Choose the correct waterproofing membrane type and apply it systematically for complete coverage against moisture. |
| 4. Implement Effective Drainage Systems | Create a positive ground slope and install drainage systems to manage water flow and minimise seepage around the foundation. |
| 5. Perform Rigorous Inspections | After waterproofing, conduct detailed inspections and tests to ensure the system is functioning correctly and to maintain long-term protection. |
Step 1: Assess the Basement Walls for Dampness Issues
Assessing your basement walls for moisture problems is the critical first step in preventing long-term water damage. By understanding the extent of dampness, you can develop targeted strategies to protect your property’s structural integrity.
Begin with a comprehensive visual inspection. Look for telltale signs of moisture intrusion such as water stains, peeling paint, mould growth, or white powdery residue on basement walls. These symptoms suggest underlying moisture issues that require immediate attention. Moisture investigation techniques recommend examining both interior and exterior surfaces methodically.
Your assessment should include several key strategies:
- Examine wall surfaces carefully for discolouration or texture changes
- Check for active water seepage or condensation
- Inspect wall corners and lower sections where moisture typically accumulates
- Use a moisture meter to quantify dampness levels
- Look for cracks or structural weaknesses that might allow water penetration
Pay particular attention to potential moisture entry points. Exterior drainage, gutter performance, ground slope near foundation walls, and masonry condition all contribute to basement dampness. Understanding basement moisture sources helps diagnose the root cause of water infiltration.
Here’s a quick overview of common basement moisture sources and their typical impact:
| Moisture Source | Typical Impact | Likelihood of Occurrence | Suggestion for Mitigation |
|---|---|---|---|
| Poor drainage | Wall dampness, flooding | Very frequent | Install proper drainage channels |
| Faulty gutter systems | Localised water ingress | Frequent | Maintain and repair gutters |
| Ground slope towards wall | Persistent seepage | Common | Reshape landscape for runoff |
| Cracked masonry | Severe moisture infiltration | Occasional | Repair cracks with masonry filler |
| Condensation | Mould growth, surface wetness | Seasonal | Improve basement ventilation |
Systematic assessment is key to effective moisture control and preventing long-term structural damage.
Pro tip: Conduct your moisture assessment during or immediately after rainfall to identify active water entry points most effectively.
Step 2: Prepare Surfaces and Remove Existing Defects
Preparing your basement walls for waterproofing involves meticulous surface preparation and repair. This critical stage ensures that your waterproofing treatment will adhere properly and provide maximum protection against moisture intrusion.
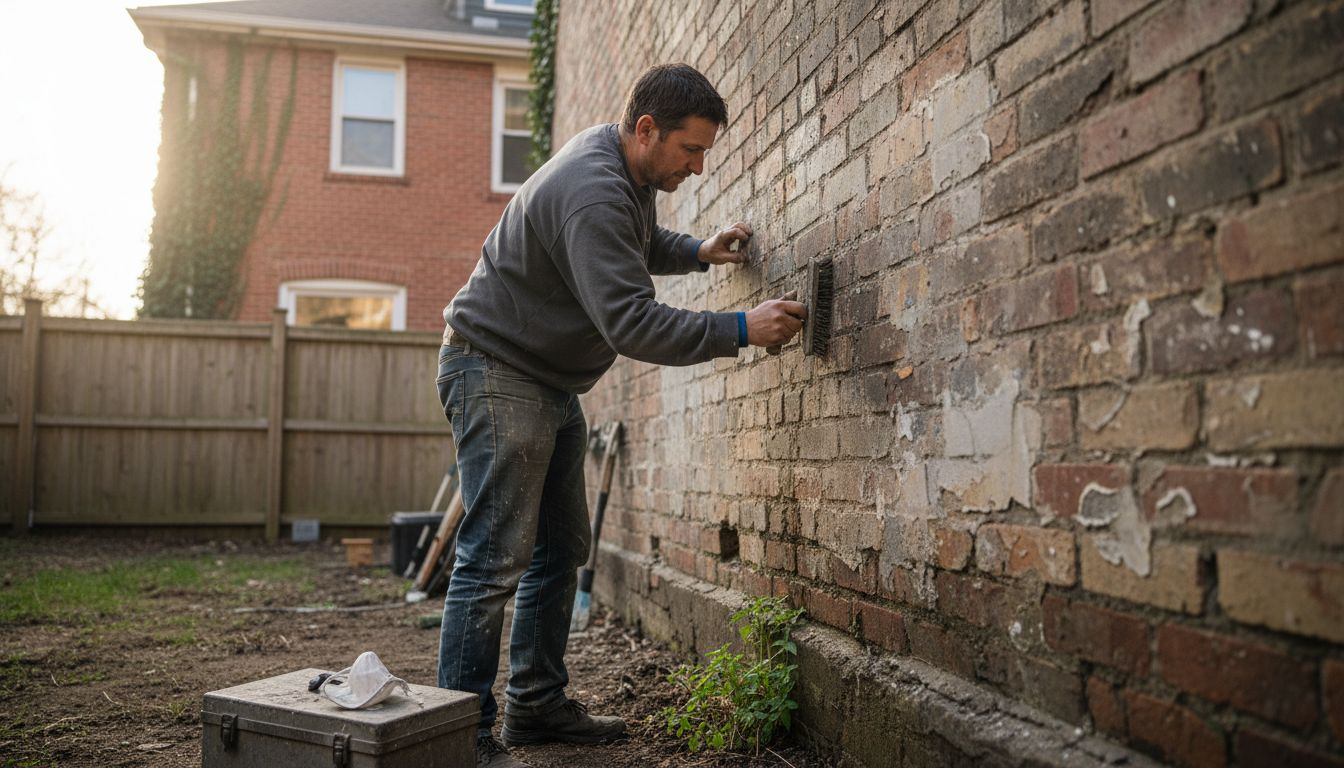
Begin by thoroughly cleaning the basement walls. Remove all loose debris, dirt, and existing paint or sealant using wire brushes, pressure washers, or specialised cleaning tools. Surface preparation techniques emphasise the importance of creating a clean, sound surface for optimal waterproofing membrane adhesion.
Your surface preparation should address several key areas:
- Identify and repair structural cracks
- Remove loose or flaking render
- Chisel out and clean any spalled concrete sections
- Smooth uneven surface areas
- Eliminate all surface contaminants like oil, grease, or biological growth
For structural repairs, use high-quality repair compounds designed for masonry surfaces. Fill small cracks with specialised masonry crack fillers, and consider professional repair techniques for larger structural issues. Existing surface repair methods recommend comprehensive defect remediation before applying any waterproofing layer.
Proper surface preparation is the foundation of effective, long-lasting waterproofing protection.
Pro tip: Allow repaired surfaces to cure completely and dry thoroughly before applying any waterproofing membrane to ensure maximum adhesion and effectiveness.
Step 3: Apply Waterproofing Membrane and Sealant
Applying a waterproofing membrane is your critical defence against basement moisture penetration. This stage transforms your prepared surface into a robust barrier that protects your property from water damage and structural deterioration.
Choose between liquid or sheet membrane systems based on your specific basement wall conditions. Waterproofing membrane types offer various solutions including bituminous coatings, polyurethane liquids, and cementitious materials. For basement walls, liquid membranes often provide the most seamless coverage, allowing you to create a continuous protective layer without joins or overlaps.
Your membrane application process should follow these key steps:
- Ensure surface is completely clean and dry
- Select appropriate membrane type for your specific wall conditions
- Apply membrane using recommended tools (rollers, brushes, or sprayers)
- Maintain consistent thickness across entire surface
- Pay extra attention to corners and potential water entry points
- Allow recommended curing time between membrane layers
Membrane installation techniques emphasise the importance of creating a continuous, watertight seal. Work systematically, ensuring complete coverage and paying special attention to potential weak points like wall joints, pipe penetrations, and structural cracks.
A properly applied waterproofing membrane creates an impenetrable shield against moisture intrusion.
Pro tip: Always apply waterproofing membranes in moderate temperatures and avoid application during extreme weather conditions to ensure optimal adhesion and performance.
To help you select the best waterproofing membrane, here is a comparison of popular options:
| Membrane Type | Application Method | Durability | Suitability for Basements |
|---|---|---|---|
| Liquid applied | Roller, brush, spray | High, seamless fit | Excellent, covers corners |
| Bituminous sheet | Manual laying | Moderate, may joint | Good, but joints are vulnerable |
| Polyurethane liquid | Brush, roller, spray | Very high, flexible | Best for irregular surfaces |
| Cementitious | Trowel application | Moderate, rigid | Suitable for masonry walls |
Step 4: Install Protective Drainage and Moisture Barriers
Installing comprehensive drainage and moisture barriers is your final line of defence against basement water infiltration. This critical step ensures that water is systematically redirected away from your foundation, preventing potential structural damage and moisture-related issues.
Moisture management strategies emphasise the importance of controlling water through multiple integrated approaches. Your drainage system should incorporate both surface and subsurface solutions to effectively manage groundwater and prevent hydrostatic pressure build-up around basement walls.
Key components of an effective drainage installation include:
- Create a positive ground slope away from foundation
- Install French drainage system around exterior perimeter
- Use perforated pipes with appropriate gravel backfill
- Implement landscape grading to direct water flow
- Add root barriers to prevent vegetation interference
- Ensure proper pipe gradient for water movement
Drainage system principles recommend systematic water management that addresses multiple moisture entry points. Consider installing a combination of surface drainage channels, subsurface perforated pipes, and strategic landscaping to create a comprehensive water management solution.
Effective drainage systems are your basement’s first line of defence against moisture intrusion.
Pro tip: Conduct periodic drainage system inspections and maintenance to ensure continued effectiveness and prevent potential water infiltration issues.
Step 5: Inspect Waterproofing and Test Effectiveness
After completing your waterproofing installation, a comprehensive inspection and testing process is crucial to verify the system’s integrity and performance. This final evaluation ensures that your investment provides robust protection against potential moisture intrusion.
Field testing techniques recommend multiple assessment methods to validate waterproofing effectiveness. Thorough inspection involves examining substrate conditions, conducting adhesion tests, and performing comprehensive moisture evaluations to identify any potential vulnerabilities.
Your waterproofing inspection should include the following critical steps:
- Perform visual surface examination
- Measure moisture content at multiple points
- Conduct pull-off adhesion testing
- Execute comprehensive water flood tests
- Check for potential structural weak points
- Document all findings systematically
Waterproofing inspection protocols emphasise the importance of detailed documentation and adherence to industry standards. Pay close attention to any signs of potential water penetration, membrane adhesion issues, or structural compromises that might compromise your waterproofing system.
Rigorous testing is the ultimate guarantee of your basement’s long-term moisture protection.
Pro tip: Consider hiring a professional waterproofing inspector for an unbiased, comprehensive assessment if you’re uncertain about conducting thorough testing yourself.
Protect Your Basement Walls with Expert Waterproofing Solutions
Waterproofing exterior basement walls is essential to safeguard your property from costly moisture damage and structural issues. If you have noticed signs like water stains, mould growth, or persistent dampness, it is time to trust professionals who understand the importance of proper surface preparation, membrane application, and effective drainage systems. At Pro Waterproofing, we specialise in delivering lasting protection tailored to your basement’s unique needs by addressing common problems such as poor drainage and cracked masonry.

Discover how our experienced team can help you avoid the risks of water infiltration by offering quality workmanship, licensed services, and warranted solutions you can rely on. Visit our Uncategorized – Pro Waterproofing page to learn more about our services or reach out directly through the main Pro Waterproofing website. Take the first step towards a dry, secure basement with expert advice and professional waterproofing that stands the test of time.
Frequently Asked Questions
How do I assess dampness issues in my exterior basement walls?
Begin by conducting a visual inspection of your basement walls for signs of moisture, such as water stains, peeling paint, or mould growth. Use a moisture meter to quantify dampness levels and check for cracks that may allow water penetration.
What surface preparation is required before applying a waterproofing membrane to my basement walls?
Thoroughly clean the walls by removing dirt, loose debris, and any existing paint or sealant. Repair structural cracks and ensure the surfaces are smooth and free from contaminants to enable optimal adhesion of the waterproofing membrane.
How do I choose the right type of waterproofing membrane for my exterior basement walls?
Select between liquid or sheet membrane systems based on your wall conditions. Liquid membranes often provide seamless coverage and are ideal for basements, so apply them for a continuous protective layer.
What are the key components of an effective drainage system for preventing moisture in my basement?
An effective drainage system should include a positive ground slope away from the foundation, a French drainage system around the perimeter, and perforated pipes for water movement. Ensure proper landscape grading to direct water flow away from the basement walls.
How can I ensure the effectiveness of my waterproofing installation?
Conduct a thorough inspection and testing process after installation. Check for moisture content, perform pull-off adhesion tests, and document any findings to identify potential vulnerabilities in your waterproofing system.