TL;DR:
- Proper surface preparation is essential for durable waterproofing and prevents costly repairs.
- Regional conditions require selecting waterproofing systems that resist local climate challenges.
- Regular inspection and maintenance extend the lifespan of waterproofing systems and protect property value.
Poor waterproofing preparation is behind most costly structural repairs in South Africa, yet it remains the step most homeowners and building managers overlook. Water leaks cause 40% of structural damage in South African homes, and when preparation fails, repair costs run three to five times the original project price. If your property sits in Gauteng or the Western Cape, you face specific challenges: intense summer storms, coastal salt air, wind-driven rain, and dramatic temperature swings. This guide walks you through every critical step, from first inspection to final sign-off, so your waterproofing investment actually lasts.
Table of Contents
- Understanding the risks: Why preparation matters for waterproofing
- Inspection and assessment: The smart start to any project
- Surface preparation: The foundation of waterproofing success
- System selection and regulatory essentials for Gauteng and the Western Cape
- Professional application, inspection, and maintenance: Securing lasting results
- Our expert perspective: What most people miss in waterproofing preparation
- Get expert help for your waterproofing project
- Frequently asked questions
Key Takeaways
| Point | Details |
|---|---|
| Thorough prep is essential | Most waterproofing failures stem from poor cleaning, repair, or priming of surfaces. |
| Regional needs matter | Choose systems and practices suited to Gauteng or Western Cape climates for reliable results. |
| Certified contractors add value | Using certified experts protects you with warranties and compliance with South African standards. |
| Ongoing checks prevent failures | Regular inspections and maintenance keep your waterproofing performing for years. |
Understanding the risks: Why preparation matters for waterproofing
Skipping or rushing the preparation phase is the single most common reason waterproofing systems fail within the first few years. The consequences are not just cosmetic. Persistent moisture causes concrete to spall, steel reinforcement to corrode, and timber structures to rot. Once structural damage takes hold, you are no longer dealing with a waterproofing bill. You are dealing with a structural engineering bill.
Poor preparation causes most failures, and repair costs reach three to five times the initial project cost. That figure should stop anyone in their tracks. A R15,000 waterproofing job that fails because surfaces were not properly cleaned or dried can easily turn into a R60,000 remediation project, plus the cost of damaged ceilings, flooring, and contents.
Regional conditions make this even more pressing. In the Western Cape, salt-laden coastal air accelerates the breakdown of poorly bonded membranes. Cape Town’s winter rainfall is relentless, and any gap in coverage becomes a direct entry point for water. In Gauteng, the challenge is different but equally serious. Summer thunderstorms deliver enormous volumes of water in short bursts, and the freeze-thaw effect on the Highveld can crack substrates that were never properly repaired before application.
Common mistakes that lead to waterproofing failure examples include applying membranes over damp or dusty surfaces, ignoring existing cracks, and hiring contractors without verified experience or certification. Understanding the causes of waterproofing failure helps you avoid repeating them.
Warning signs that preparation has been inadequate:
- Blistering or bubbling membranes within months of application
- Delamination at corners, joints, or penetrations
- Persistent damp patches despite recent waterproofing work
- Efflorescence (white salt deposits) on walls or slabs
- Mould growth on interior surfaces near external walls
Now that you know why you cannot risk poor preparation, let’s get practical.
Inspection and assessment: The smart start to any project
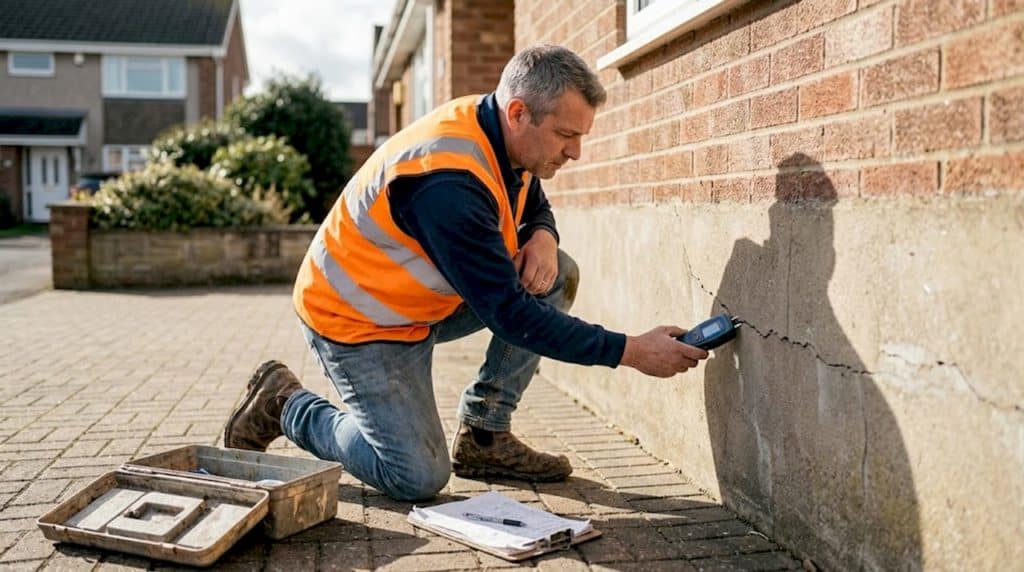
Every successful waterproofing project begins long before a single product is opened. Thorough site inspection and assessment identifies moisture sources, substrate condition, and existing damage, and determines which system will actually work for your specific situation.
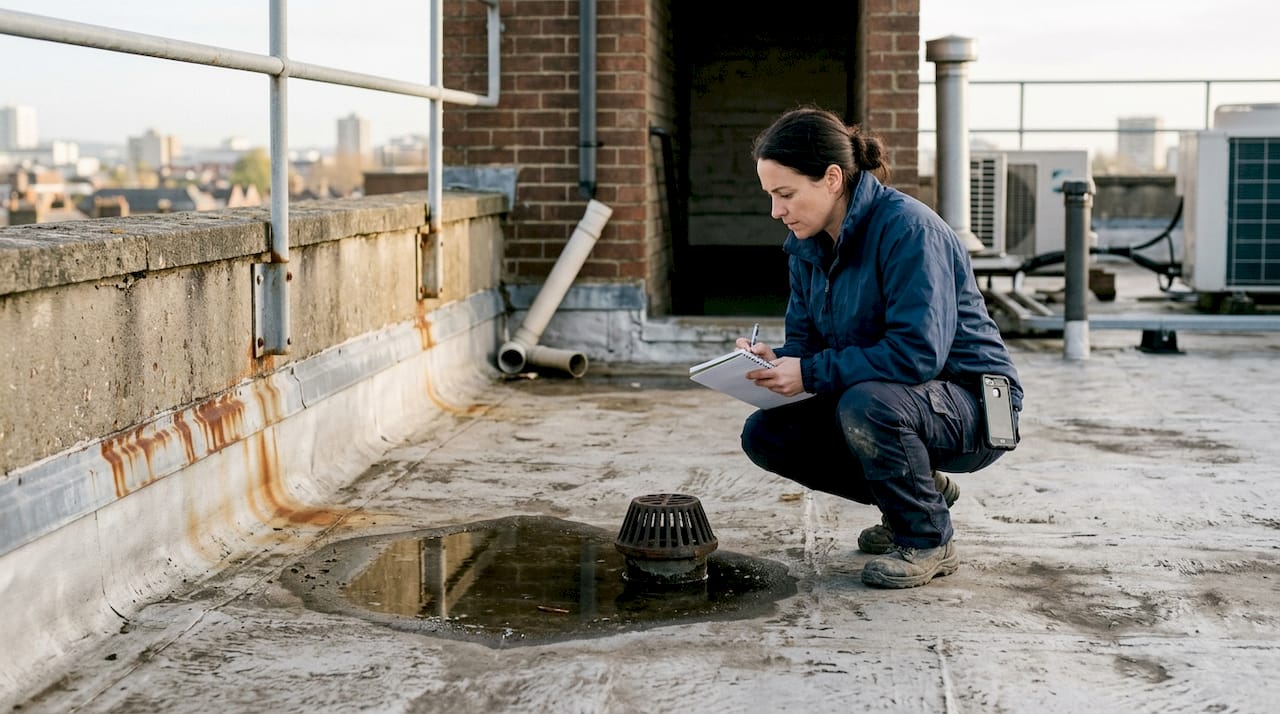
A proper inspection covers the roof, all external walls, floors, and any below-grade areas such as basements or retaining walls. You are looking for past leak paths, signs of rising damp, failed previous waterproofing, and drainage issues. Blocked or poorly positioned drainage is a major contributor to waterproofing failures that gets missed far too often.
For below-grade applications, a moisture meter is not optional. It tells you the actual moisture content of the substrate, which directly affects whether a membrane will bond correctly. For more complex projects involving basements or earth-retaining structures, a geotechnical report gives you the full picture of soil conditions and hydrostatic pressure.
Use this checklist to identify waterproofing problems before work begins:
| Area | What to check | Tool or method |
|---|---|---|
| Roof | Ponding, cracked screed, failed flashings | Visual, tap test |
| External walls | Cracks, efflorescence, damp staining | Visual, moisture meter |
| Floors and slabs | Hollow spots, cracks, rising damp | Tap test, moisture meter |
| Drainage | Blockages, incorrect fall, overflow points | Visual inspection |
| Below-grade areas | Hydrostatic pressure, soil saturation | Geotechnical report |
| Penetrations | Pipe entries, service ducts, expansion joints | Visual, probe |
Do not rely solely on a visual check. Many moisture problems are hidden behind finishes or inside wall cavities. A contractor who only glances at the surface and immediately starts quoting is a red flag.
Pro Tip: Carry out a self-inspection every six months, ideally at the end of summer and again after the rainy season. Catching small issues early costs a fraction of what a full remediation will set you back.
With risks understood, it is time to start with professional assessment.
Surface preparation: The foundation of waterproofing success
Surface preparation is the single biggest factor in system failure or success.
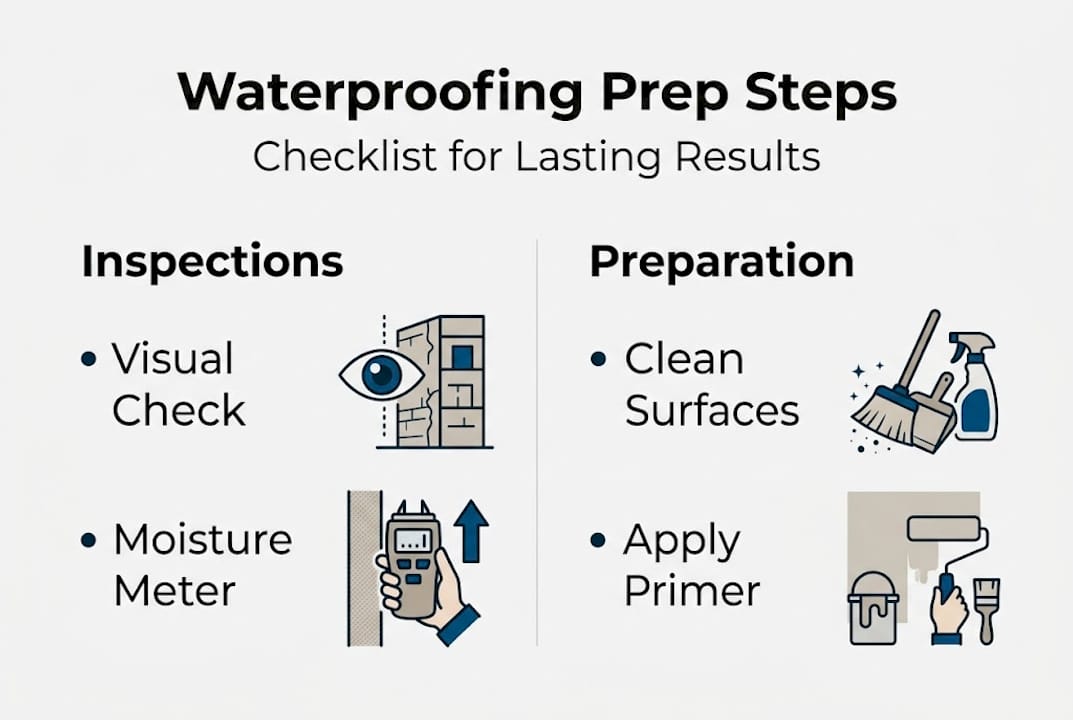
This is not an opinion. It is the consistent finding across every waterproofing project that goes wrong. Surface preparation is the most critical step: surfaces must be clean, dry, and structurally sound before any membrane is applied. Loose material, oil, dust, and previous coatings must all be removed, and cracks filled with appropriate repair mortars.
Follow these steps in order for every project:
- Clean thoroughly. Remove all dirt, algae, grease, and loose material using high-pressure washing or mechanical grinding. Any contamination left behind will prevent proper adhesion.
- Repair all defects. Fill cracks, holes, and spalled areas with compatible repair mortars. Do not apply a membrane over unrepaired damage and expect it to hold.
- Dry completely. Moisture content must be within the product’s specified limits before priming. In the Western Cape’s damp winters, this step requires patience and sometimes forced drying.
- Prime correctly. Priming seals the surface and improves adhesion, and the primer must be matched to the specific substrate. Concrete, screed, and masonry each require different primer formulations.
- Reinforce stress points. Corners, joints, and penetrations must be reinforced with fabric or mesh tape before the main membrane is applied. These are the areas under the most movement stress.
For a detailed breakdown of surface prep best practice specific to South African substrates, it is worth reviewing the full guidance before your contractor begins.
| Substrate type | Recommended primer | Repair method |
|---|---|---|
| Concrete slab | Epoxy or acrylic primer | Cementitious repair mortar |
| Brick masonry | Penetrating primer | Polymer-modified mortar |
| Screed | Acrylic bonding agent | Self-levelling compound |
| Timber | Flexible primer | Flexible filler |
Pro Tip: The spots most likely to fail are the ones that are hardest to reach. Inspect behind downpipes, around roof penetrations, and at parapet wall junctions. These are where contractors cut corners and where leaks begin.
After a thorough assessment, every great result is built on these key preparation steps.
System selection and regulatory essentials for Gauteng and the Western Cape
With your surfaces perfectly prepped, picking the right system and staying compliant is your next critical step. Not all waterproofing systems perform equally in all conditions, and choosing the wrong one for your region is a costly mistake.
For the Western Cape, coastal salt and humidity demand membranes with high flexibility and resistance to UV degradation. Liquid-applied systems work well on complex roof geometries with multiple penetrations. For Gauteng, where thermal movement is significant, torch-on bituminous membranes with a high elongation rating perform reliably on flat roofs and podium decks.
Liquid-applied and torch-on systems dominate for durability in the South African climate. Both have their place, but the selection must be driven by substrate type, exposure conditions, and the specific demands of the structure.
Compliance is not a bureaucratic formality. It protects your insurance cover, your home’s resale value, and your legal standing if something goes wrong. Review the full waterproofing standards guide before committing to a system or contractor.
Key regulatory and quality requirements:
- SANS 10400 Parts K and L compliance is mandatory for all new and remedial waterproofing work
- Products must carry SANS certification; ask your contractor for product data sheets
- Insist on a minimum five-year workmanship warranty in writing
- Contractors must be registered with a recognised industry body
- Non-compliant work can void your building insurance and affect Gauteng home value on resale
Do not accept verbal assurances. Get the product names, certification numbers, and warranty terms in writing before any work starts.
Professional application, inspection, and maintenance: Securing lasting results
With the right system in place, execution and ongoing diligence are the keys to durable outcomes. Even the best-specified system will fail if applied incorrectly or neglected after installation.
Follow these steps when engaging a contractor and overseeing application:
- Verify certification. DWASA-registered contractors are your baseline. Check licensing, request references from similar projects, and confirm experience with your specific substrate and system.
- Review the project plan. A professional contractor will provide a written scope of work, product specifications, and a timeline before starting.
- Monitor application conditions. Waterproofing must be applied in the correct number of coats, at the specified thickness, under suitable weather conditions. Do not allow work to proceed in rain, extreme heat, or high wind.
- Allow full curing. Rushing the curing period is one of the most common on-site errors. Confirm the required curing time with the product data sheet and enforce it.
- Conduct post-application checks. Inspect for full coverage, seals, and drainage before signing off. A flood test on flat roofs is standard practice and should not be skipped.
For a step-by-step overview of the full installation workflow from start to finish, reviewing the process in advance helps you ask the right questions on site.
Once the work is complete, maintenance is what keeps it performing. Inspect drainage and waterproofing surfaces every six months. Clear debris from outlets, check sealants around penetrations, and address any small cracks before they grow.
Pro Tip: When checking contractor references, ask specifically whether the waterproofing is still performing after two or three years, not just whether the client was happy at handover. Long-term performance is the real measure.
Our expert perspective: What most people miss in waterproofing preparation
After years of working on waterproofing projects across Gauteng and the Western Cape, the pattern is clear. The projects that fail are rarely the result of a bad product. They fail because of decisions made before the first coat was ever applied.
Most property owners focus on the visible work: the membrane going down, the contractor on the roof. What they do not see is whether the substrate was properly dried, whether the primer was the right formulation, or whether the contractor reinforced the joints. These invisible steps are where projects are won or lost.
There is also a persistent myth that waterproofing is a once-off fix. It is not. Why waterproofing matters goes beyond the membrane itself. It is about maintaining a system that interacts with your structure, your drainage, and your local climate every single day. A small crack in a parapet, a blocked outlet, or a failed sealant around a pipe can undo years of good work within a single rainy season.
The clients who get the best long-term results are those who treat waterproofing as an ongoing responsibility, not a transaction. Prevention through regular maintenance is always cheaper than reactive repair.
Get expert help for your waterproofing project
Preparing for a waterproofing project the right way takes knowledge, the right products, and a contractor you can genuinely trust. Cutting corners at any stage puts your property, your insurance cover, and your peace of mind at risk.

At Pro Waterproofing, we work with certified, experienced contractors across Gauteng and the Western Cape who follow every step in this guide as standard practice. Whether you need a professional site assessment, a detailed quote, or simply want to talk through your options before committing, we are ready to help. Acting now, before the next rainy season, is always the right call for protecting your property’s long-term value.
Frequently asked questions
What is the most important step in preparing for a waterproofing project?
Surface preparation is the most critical step for waterproofing success. Cleaning, repairing, drying, and priming surfaces correctly determines whether the system bonds and lasts.
How do you choose the right waterproofing system for your region?
Select products certified for your local climate conditions, such as torch-on or liquid-applied systems, and confirm they meet SANS-certified product standards under SANS 10400.
Why use a certified contractor for waterproofing?
DWASA-registered contractors follow industry regulations, reduce the risk of system failure, and provide legally binding warranties for their work.
How can I make sure my waterproofing lasts longer?
Inspect drainage and waterproofing surfaces every six months, maintain sealants around penetrations, and address small defects promptly before they develop into costly failures.