TL;DR:
- A leaking basement can cause structural damage and health issues if left unaddressed. Identifying the true leak source through proper diagnosis ensures effective, long-lasting repairs. Professional assessment and appropriate sealing methods are vital for sustainable waterproofing and long-term basement dryness.
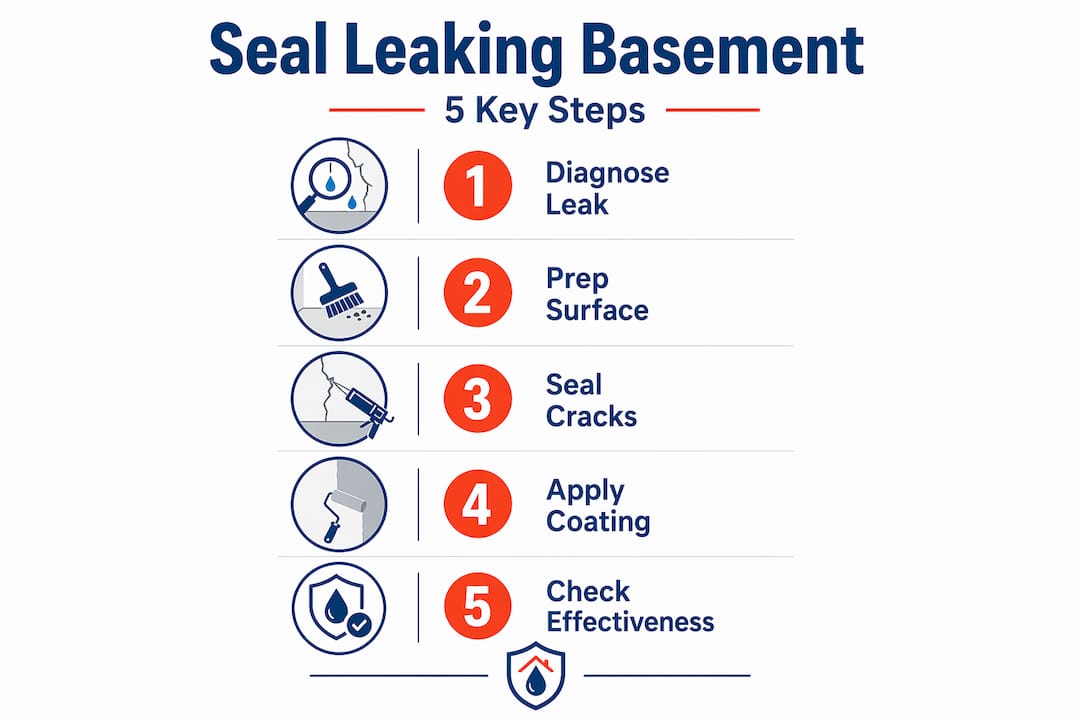
A leaking basement is more than an inconvenience. Left unchecked, water seeping through your basement walls or floor can rot timber supports, corrode reinforcing steel, and create the kind of persistent dampness that feeds mould and triggers respiratory problems for your family. Knowing how to seal a leaking basement correctly is the difference between a fix that lasts a decade and one that fails before the next rainy season. This guide walks you through diagnosing the true source of your leak, preparing your basement for treatment, applying the right sealing method, and confirming the work has actually succeeded.
Table of Contents
- Diagnosing the source of your basement leak
- Preparing your basement for sealing
- Effective sealing methods for common basement leaks
- Installing drainage solutions for pressure-driven leaks
- Verifying sealing and waterproofing effectiveness
- Why diagnosing leak causes trumps quick fixes
- Professional basement waterproofing services tailored for South African homes
- Frequently asked questions
Key Takeaways
| Point | Details |
|---|---|
| Diagnose first | Identifying the water entry cause ensures effective, not wasted, waterproofing effort. |
| Prepare thoroughly | Clean and repair basement surfaces fully before sealing or coating for best results. |
| Seal minor leaks | Small cracks can be sealed temporarily but are ineffective against high water pressure. |
| Use drainage | Hydrostatic pressure requires interior drains like French drains to relieve water pressure. |
| Verify and maintain | Test your waterproofing and maintain sump pumps to prevent recurring leaks. |
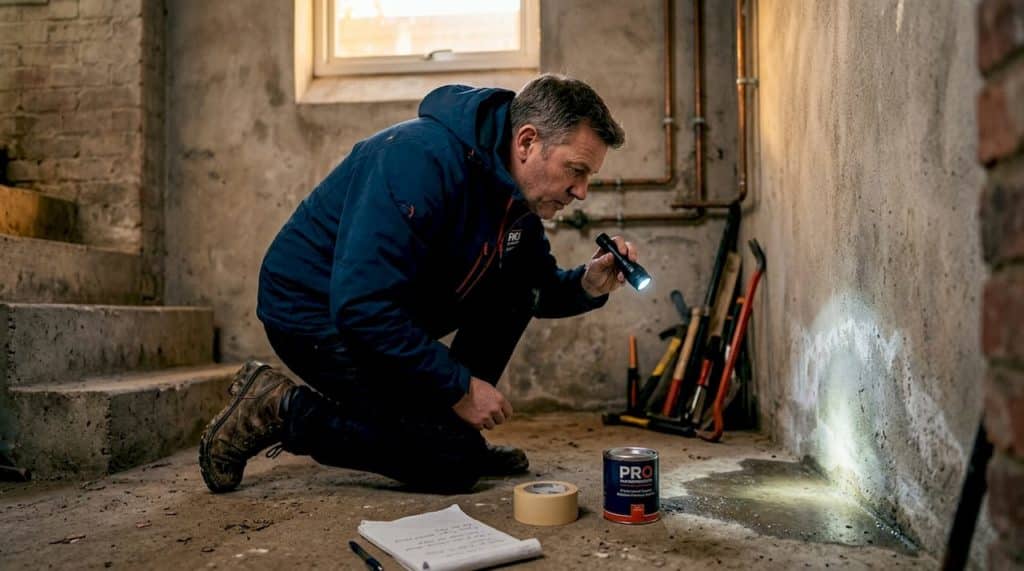
Diagnosing the source of your basement leak
Before you buy a single tin of waterproofing paint or mix a bag of hydraulic cement, you need to know exactly where your water is coming from. This is not optional. Diagnosing the source before committing to any repair method is the step that separates effective fixes from expensive failures.
Basement water problems fall into three broad categories:
- Condensation. Warm, humid air meets cool concrete walls and floors, producing moisture on the surface. It looks like a leak but is entirely atmospheric.
- Surface seepage. Rainwater or irrigation water migrates through porous concrete or mortar joints because the external ground is not graded to drain away from the building.
- Hydrostatic pressure intrusion. Saturated soil pushes groundwater directly through the slab, floor-wall joints (called the cove joint), or wall cracks with real force. This is the most damaging category and the one most commonly misdiagnosed.
The simple aluminium foil test separates condensation from the other two. Tape a 30 cm square of foil tightly to a damp section of wall and leave it for 24 hours. If moisture collects on the outer face of the foil, the air in your basement is too humid. If water tracks behind the foil and against the concrete, water is entering from outside. Understanding this distinction protects you from applying the wrong treatment entirely.
Also look for efflorescence, which is the white, chalky deposit left behind when water carries mineral salts through concrete. It is one of the clearest indicators that groundwater is pushing through your walls. Staining at the cove joint, floor cracks, or pipe penetrations all point to specific entry routes. Explore the range of basement waterproofing methods available once you have identified your entry point.
Pro Tip: If your basement stays dry during light rain but floods after prolonged downpours or when garden irrigation is running nearby, hydrostatic pressure is almost certainly your culprit. For comparison, roof leak detection advice uses similar diagnostic logic: pinpoint the entry mechanism before you attempt any repair.
Preparing your basement for sealing
Once you know the leak’s origin, preparation is the next vital step before any sealing or waterproofing. Skipping this phase is one of the most reliable ways to waste your money. Cleaning, repairing cracks larger than 3 mm, and ensuring structural integrity are essential before applying any waterproofing treatment.
Follow these steps in order:
- Clear the area. Remove stored items, shelving, and any floor coverings so you have full access to all walls and the floor perimeter.
- Clean all surfaces. Use a wire brush and, where necessary, a pressure washer to remove dirt, loose paint, mould, and efflorescence. Waterproofing products will not bond to contaminated surfaces.
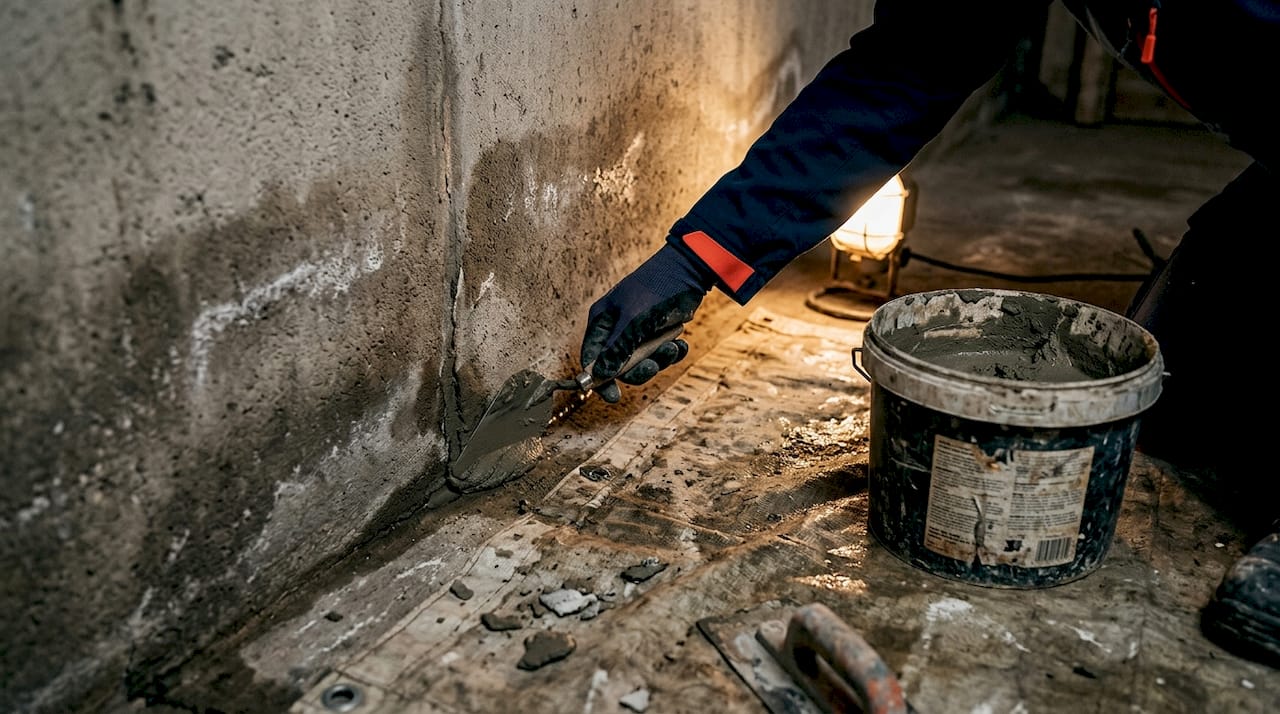
- Chip out and fill cracks. Use an angle grinder or cold chisel to widen hairline cracks into a V-shape or dovetail profile. This gives hydraulic cement or suitable repair mortar a mechanical grip. Press the material firmly into the prepared crack and smooth flush.
- Seal pipe penetrations and joints. Anywhere a pipe, conduit, or fitting passes through the wall or floor is a potential entry point. Pack these with non-shrink hydraulic cement and finish with a waterproof sealant.
- Inspect for structural damage. Wide cracks running diagonally from corners, bowing walls, or any sign of settlement require a structural engineer’s assessment before you proceed. No amount of sealant will hold against a moving structure.
Check out our guidance on sealing basement walls for additional surface-level techniques that complement this preparation phase.
The right surface preparation for your specific finish matters too. Cementitious membrane preparation differs from that required for bituminous or acrylic coatings, so always read your product’s technical data sheet before applying.
Pro Tip: Dampen the concrete slightly before applying cementitious waterproofing products. Bone-dry concrete absorbs water from the mix too quickly, weakening the bond. The surface should look damp but have no standing water.
Effective sealing methods for common basement leaks
After preparing your basement, here are the practical sealing techniques available and, crucially, their limitations.
Hydraulic cement is a fast-setting mortar that expands slightly as it cures, making it ideal for actively dripping cracks and holes. You mix it to a putty consistency and press it into the repair with a gloved hand, holding firm for three to five minutes while it sets. It is reliable for isolated, pressure-free entry points.
Polyurethane caulk works well for static cracks at floor-wall joints where movement is not expected. It remains slightly flexible once cured, which gives it an advantage over rigid mortars in situations with minor thermal movement.
Waterproof paints and cementitious membranes are brushed or rolled onto prepared walls and floors in two or three coats. They create a barrier against moisture vapour and light seepage. Products such as two-component cementitious coatings bond directly to concrete and perform well in South African conditions where temperature variation can be significant.
However, sealing minor hairline cracks with hydraulic cement or polyurethane caulk is a temporary measure when active hydrostatic intrusion is present. And critically, sealants alone cannot stop water under hydrostatic pressure; the pressure simply finds new entry points.
| Sealing method | Best for | Longevity | Suitable for hydrostatic pressure |
|---|---|---|---|
| Hydraulic cement | Active drips, isolated holes | 2 to 5 years | No |
| Polyurethane caulk | Static cracks, joints | 3 to 7 years | No |
| Cementitious membrane | Porous walls, moisture vapour | 5 to 15 years | Partial |
| Crystalline waterproofing | Concrete walls and slabs | Long-term | Partial |
| Interior drainage system | Hydrostatic pressure | Permanent | Yes |
Explore the full range of waterproofing techniques to understand which coating category suits your specific wall construction and leak type.
Pro Tip: Apply cementitious coatings in at least two coats at 90 degrees to each other, the same logic a painter uses when ensuring even coverage. Let the first coat achieve a leather-hard set before applying the second.
Installing drainage solutions for pressure-driven leaks
When sealing is not enough because water pressure is building below the slab, installing an effective drainage system is the only reliable solution. Hydrostatic pressure requires interior drain tile and sump pump systems to relieve water pressure rather than simply blocking the surface.
The process for a basic interior perimeter drainage system works as follows:
- Break up the concrete perimeter. Use a demolition hammer to remove a strip of concrete roughly 300 to 400 mm wide along the inside of all affected walls.
- Excavate and lay gravel. Dig a shallow trench 150 to 200 mm deep, line the bottom with clean crushed stone, then lay a perforated 100 mm drainage pipe along the trench.
- Connect to a sump pit. The pipe routes to a sump pit, typically positioned in a low corner of the basement, where a submersible sump pump discharges water up and away from the property.
- Reinstate the concrete. Cover the pipe and gravel with fresh concrete, leaving a small expansion gap at the wall to allow water to enter the system freely.
- Test the system. Run water along the perimeter with a hose to confirm flow and check the pump activates at the correct float level.
Interior drain tile systems intercept water at the cove joint and route it to the sump pit, which makes them highly effective for persistent hydrostatic pressure. This is a proven, permanent solution rather than a patch. Read more about exterior basement waterproofing as a complementary layer of protection, particularly on properties where excavation is feasible.
- Use a pump rated to at least 30 litres per minute for a typical residential basement in high-rainfall areas such as the Western Cape or KwaZulu-Natal coast.
- Install a battery backup pump alongside the primary unit so your system continues operating during power outages.
- Clean inlet screens and test the float switch every six months.
Pro Tip: A two-pump system with an alarm for pump failure is a worthwhile investment in areas with heavy clay soils, which retain water and maintain pressure against basement walls long after rain stops.
Verifying sealing and waterproofing effectiveness
Finally, ensure your waterproofing efforts have succeeded by testing and monitoring after the work is complete.
After applying any sealant or membrane, allow the full manufacturer-recommended curing period before checking results. For most cementitious products, that means at least seven days. Then:
- Repeat the foil test on previously damp sections. No moisture behind the foil after a period of wet weather confirms active intrusion has been stopped.
- Check sump pump operation by pouring water into the pit and confirming the pump activates and discharges correctly.
- Inspect all repaired cracks and joints for any new staining, dampness, or efflorescence after heavy rain.
- Monitor walls for new cracking. If fresh cracks appear in areas that were previously sound, the structure may be moving and a professional assessment is needed.
Rigorous quality checks after waterproofing confirm whether your efforts are successful and flag any remaining moisture risk early. The aluminium foil moisture test is your simplest ongoing monitoring tool and costs nothing.
Visit our guide on how to prevent basement water damage for a full maintenance schedule you can follow season by season.
Pro Tip: Take dated photographs of every repaired section before and after treatment. If a problem reappears, photos give a contractor or assessor the clearest possible starting point and protect you if warranty work is ever disputed.
Why diagnosing leak causes trumps quick fixes
Here is a perspective most articles on this topic miss entirely. The waterproofing industry is full of homeowners who have sealed the same crack three times, each time with a different product, and each time with the same result: water back within a season. That is not bad luck. That is a diagnosis problem.
The most common and costly mistake is choosing the wrong repair method because the water-entry mechanism was never properly identified. A contractor who arrives, brushes on a waterproof coating, and leaves without asking where the water comes from during a prolonged downpour is not solving your problem. They are covering it up temporarily.
South African site conditions add specific complexity. Clay-rich soils, common in Gauteng and parts of the Western Cape, swell when wet and shrink when dry, creating cyclical pressure against basement walls that most standard sealants simply cannot withstand season after season. Properties built on sloped sites in Cape Town or Durban often have groundwater tables that rise dramatically after the first significant winter rains. Applying a surface coating without addressing the drainage conditions around the property is a short-term answer to a long-term problem.
The diagnostic-first mindset also matters for compliance. South African building regulations and NHBRC standards require that waterproofing be fit for purpose. Discovering years later that a coating was applied over a structurally compromised wall creates liability and expense that far exceeds the cost of getting it right the first time.
Treat the process the same way a good doctor treats symptoms: identify the cause before prescribing treatment. That approach, applied to your basement, is what separates a dry foundation from an ongoing money drain. Our overview of waterproofing solutions tailored for South African conditions reflects exactly this diagnostic-first philosophy.
Professional basement waterproofing services tailored for South African homes
Understanding how to seal a leaky basement is powerful, but knowing when to call in experts is equally important. Persistent water intrusion, structural cracking, or high hydrostatic pressure are situations where professional assessment protects your investment.

At Pro Waterproofing, we connect South African homeowners with certified contractors who understand local soil conditions, SANS compliance requirements, and NHBRC-aligned installation standards. Whether you need crack repairs, cementitious membrane application, or a full interior drainage system with sump pump installation, our network provides solutions backed by workmanship warranties. Get a no-obligation quote today and stop the cycle of repeated, temporary fixes that cost you more in the long run.
Frequently asked questions
How do I tell if my basement leak is from condensation or groundwater?
Perform an aluminium foil test on your basement walls: if moisture collects on the outer face of the foil, it is condensation, but if water seeps through the concrete behind the foil, it is groundwater intrusion requiring active waterproofing.
Can I seal small cracks myself to stop leaks permanently?
Sealing hairline cracks with hydraulic cement or caulk works well for minor leaks with no pressure behind them, but sealing is temporary when hydrostatic pressure is present and a proper drainage system is needed for lasting results.
What is the recommended curing time for waterproof coatings before exposure to water?
Waterproof membranes should cure for at least seven days before exposure to water pressure to ensure the coating has bonded fully and will perform as intended.
Is exterior waterproofing always required for leaking basements?
Interior waterproofing handles the majority of residential cases effectively, but exterior membrane work is strongly recommended where there is structural damage to the wall itself or where interior methods have failed repeatedly.