TL;DR:
- Interior basement waterproofing captures moisture after it enters and safely channels it away using interior drain tiles, sump pumps, and vapour barriers. It is a cost-effective, minimally disruptive solution suitable for most existing homes dealing with seepage and hydrostatic pressure, provided components are properly installed and maintained. Proper diagnosis, professional installation, and regular system maintenance ensure long-term protection and property value.
Interior basement waterproofing is defined as a water management system that captures moisture after it enters your basement and channels it safely away using interior drain tiles, sump pumps, and vapour barriers. Searching for interior basement waterproofing near me is the right first step when you notice damp floors, seepage at the base of your walls, or a persistent musty smell. Unlike exterior excavation, interior systems are cost-effective for existing homes and cause far less disruption to your property. Prowaterproofing connects South African homeowners with qualified local contractors who install these systems to industry standard, backed by long-term warranties.
What does interior basement waterproofing near me actually involve?
Interior waterproofing manages water after entry rather than blocking it at the source. The system redirects water that seeps through your foundation walls or floor to a sump pump, which then discharges it safely away from your home. Contractors categorise these systems as water management techniques, not full waterproofing in the traditional sense. That distinction matters because it sets realistic expectations about what the system will and will not do.
The three core components are an interior drain tile system, a sump pump, and a vapour barrier. Each plays a specific role. Together, they form a complete moisture control system that keeps your basement dry and your foundation structurally sound. Reputable contractors offer 25-year transferable warranties on these installations, which reflects genuine confidence in the system’s longevity.

Interior waterproofing suits most existing homes because it avoids the cost and disruption of digging up your garden and foundation walls. Exterior waterproofing is reserved for severe structural damage or new construction phases. For the majority of homeowners dealing with seepage and hydrostatic pressure, an interior system is the practical and affordable answer.
What are the essential components of an interior waterproofing system?
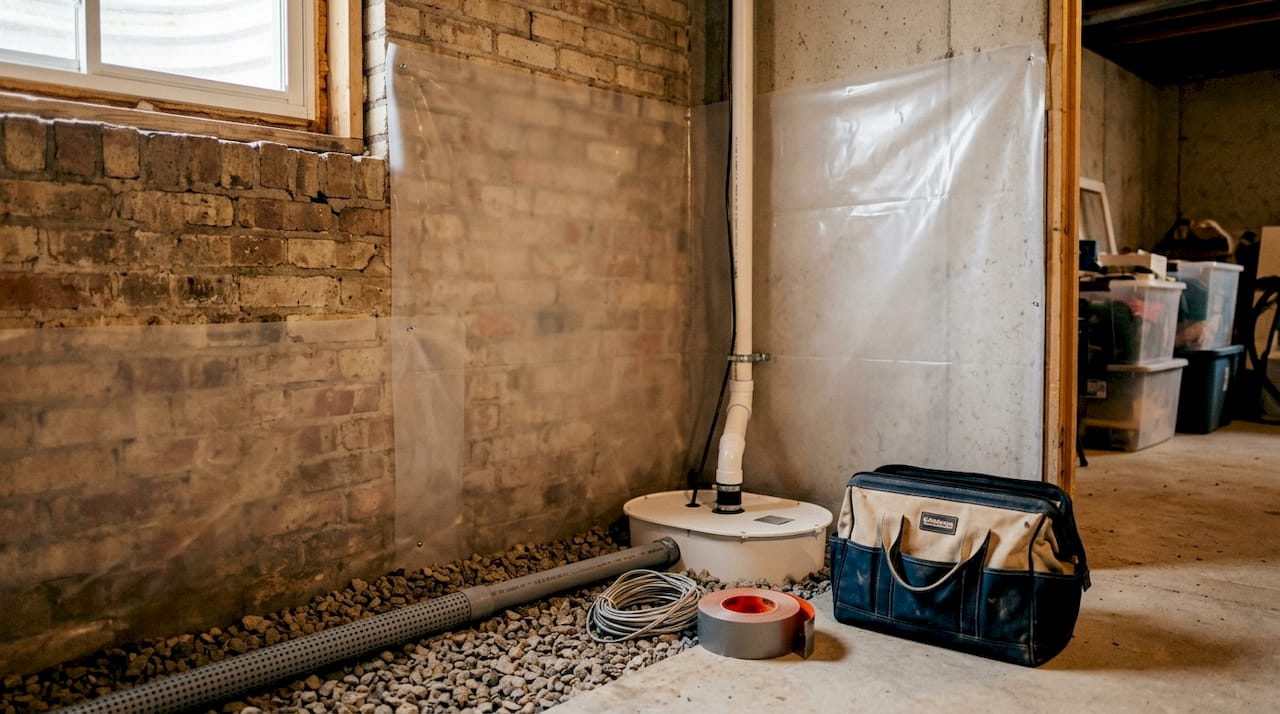
The drain tile system, also called a French drain, is a perforated pipe laid in a gravel bed along your basement perimeter. Water that seeps through the walls or floor collects in this pipe and flows by gravity toward the sump pit. The gravel bed prevents the pipe from silting up over time, which keeps the system running without constant maintenance.

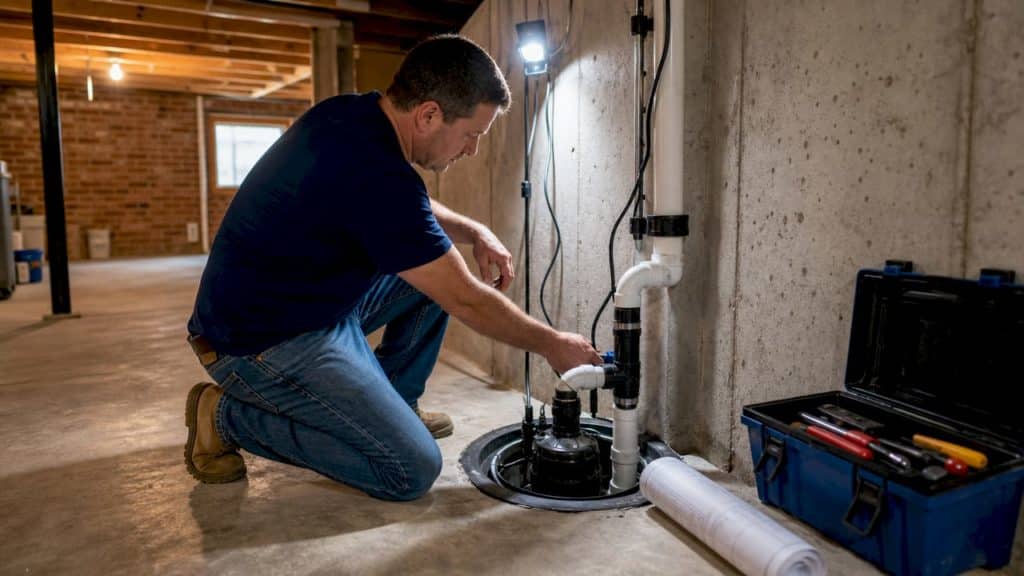
The sump pump is the engine of the entire system. Without a reliable, high-capacity pump, the collected water has nowhere to go. Most installations include a primary electric pump and a battery-powered backup unit. The backup matters because heavy rain events, which are exactly when you need the pump most, often coincide with power outages. A functional discharge line carries water well away from your foundation to prevent it from re-entering the system.
Vapour barriers are sheets of heavy-duty polyethylene fixed to your interior basement walls. They stop moisture from migrating through the concrete and into your living space. Barriers rated for below-grade use are thicker and more durable than standard plastic sheeting. They also direct any wall seepage downward into the drain tile rather than letting it pool on your floor.
| Component | Function |
|---|---|
| Interior drain tile (French drain) | Collects seeping water and channels it to the sump pit |
| Sump pump (primary) | Pumps collected water out through the discharge line |
| Battery backup sump pump | Maintains operation during power cuts |
| Vapour barrier | Stops wall moisture migration and directs seepage to drain |
| Gravel bed | Supports drain tile and prevents pipe blockage |
Pro Tip: Ask your contractor whether the vapour barrier is mechanically fastened or adhesive-fixed. Mechanically fastened barriers last longer in humid below-grade conditions and are far easier to inspect for tears.
How do you identify water problems that interior waterproofing can fix?
The source of water entry determines which waterproofing method is appropriate. Interior systems work best for three specific types of water intrusion: hydrostatic pressure pushing water through the floor slab or cove joint, lateral seepage through porous concrete walls, and condensation from warm humid air meeting cool surfaces. Each presents differently, and misdiagnosing the cause leads to wasted money.
Signs that point to interior waterproofing as the right solution include:
- Damp or wet patches on the basement floor, particularly near the walls
- Water seeping at the cove joint, where the floor meets the wall
- White chalky deposits (efflorescence) on concrete walls, indicating mineral-laden water movement
- Persistent musty odour even after cleaning
- Rust stains on metal fixtures or fittings near the floor
Condensation, by contrast, appears as droplets on cold pipes or walls during warm weather. It does not require a drainage system. A dehumidifier and improved ventilation resolve condensation. Sealants alone cannot solve problems caused by hydrostatic pressure. Sealants only address minor surface moisture and will crack or fail when water pressure builds behind the wall.
Interior waterproofing has limits. If your foundation walls show significant cracking, bowing, or structural movement, exterior intervention is necessary first. Interior systems manage water but do not repair structural damage. A qualified inspector will identify this distinction during an initial assessment.
Pro Tip: Walk your basement perimeter after a heavy rain event, not during dry weather. Water entry points are far easier to spot when the soil is saturated and pressure is at its peak.
Step-by-step guide to installing an interior basement waterproofing system
Professional installation follows a clear sequence. Understanding each step helps you ask the right questions and know what to expect when contractors are working in your home.
-
Site inspection and perimeter marking. The contractor inspects the full basement, identifies water entry points, and marks the perimeter where concrete will be removed. This step determines the scope and confirms the system layout.
-
Concrete removal. Workers remove 12–18 inches of concrete around the perimeter using jackhammers or concrete saws. The concrete is broken into manageable pieces and removed from the site.
-
Gravel bed preparation. A layer of clean gravel is laid in the trench. The gravel supports the drain tile pipe and allows water to flow freely without soil contamination blocking the pipe over time.
-
Drain tile installation. Perforated pipe is laid in the gravel bed, sloped toward the sump pit location. The slope is critical. Without it, water pools in the pipe rather than draining to the pump.
-
Sump pit excavation and pump installation. A pit is dug at the lowest point of the system. The sump basin is set in place, and the primary pump and backup unit are installed. The discharge line is routed through the wall to exit well away from the foundation.
-
Vapour barrier application. Heavy-duty polyethylene sheeting is fixed to the interior walls, overlapping into the drain tile trench. This directs any wall seepage into the drainage system rather than onto the floor.
-
Concrete restoration. New concrete is poured over the drain tile and gravel, restoring the basement floor. The sump pit remains accessible via a sealed lid.
-
Final inspection and testing. The contractor tests the pump by pouring water into the pit, confirms the discharge line is clear, and checks the vapour barrier for gaps.
Most installations take two to three days for an average-sized basement. Larger homes or complex layouts may require an additional day. Dust and noise are the main disruptions. Good contractors seal doorways and use extraction fans to manage dust during concrete work.
Pro Tip: Request that the contractor demonstrate the sump pump test before they leave. Pour a bucket of water into the pit yourself and confirm the pump activates, runs, and stops correctly.
What are the typical costs and warranty expectations?
Interior basement waterproofing costs vary based on basement size, the number of sump pumps required, and whether a vapour barrier is included. General project costs range from £3,000 to £8,000 for a standard residential basement. Larger basements or those requiring two sump pumps sit toward the upper end of that range. You can find a detailed breakdown in this interior waterproofing cost guide from Prowaterproofing.
Reputable contractors offer long-term transferable warranties, commonly 25 years, on interior systems. A transferable warranty adds value to your property because it passes to the next owner if you sell. Always request the warranty in writing and confirm it covers both parts and labour, not just materials.
| Cost component | Typical influence on price |
|---|---|
| Basement perimeter length | Longer perimeter means more drain tile and concrete work |
| Number of sump pumps | Each additional pump adds to material and labour costs |
| Vapour barrier inclusion | Adds cost but significantly improves moisture control |
| Site access difficulty | Narrow access or low ceilings increase labour time |
| Government rebate eligibility | Can reduce out-of-pocket costs by a meaningful amount |
Some local authorities and government programmes offer rebates for waterproofing work that prevents flooding damage. Ask your contractor whether your project qualifies. Savings of this kind can meaningfully reduce the total cost of the project.
- Confirm the warranty is transferable and covers both parts and labour
- Ask whether the contractor is registered and carries public liability insurance
- Request an itemised quote so you can compare like for like across contractors
- Check whether the quote includes concrete restoration or lists it as an extra
How do you find and select reliable local contractors?
The best companies that fix wet basements offer a free, no-obligation inspection before quoting. Professional inspections under 60 minutes with a detailed moisture assessment are standard practice among reputable firms. An inspection gives the contractor the information they need to quote accurately and gives you the opportunity to assess their knowledge and communication style.
Use this contractor assessment checklist from Prowaterproofing to structure your vetting process. Key questions to ask include:
- What method do you use to diagnose the water entry source?
- Is your warranty transferable, and what does it cover?
- How many years have you been installing interior drainage systems?
- Can you provide references from local projects completed in the past 12 months?
- What happens if the system fails within the warranty period?
Comparing quotes on price alone is a mistake. A lower quote that excludes concrete restoration, uses a single pump without a backup, or offers only a five-year warranty is not a better deal. Compare the scope of work, not just the bottom line. Prowaterproofing’s interior vs exterior comparison guide helps you understand what a complete system should include before you speak to any contractor.
Pro Tip: Schedule your inspection during or just after a rain event. Contractors can identify active seepage points far more accurately when the soil is wet, which leads to a more accurate diagnosis and a better-targeted solution.
Key takeaways
Interior basement waterproofing is the most practical and cost-effective solution for existing homes facing seepage, hydrostatic pressure, or persistent moisture, provided the correct system components are installed and maintained.
| Point | Details |
|---|---|
| Interior systems manage, not block, water | They redirect water to a sump pump rather than stopping it at the source. |
| Three components are non-negotiable | Drain tile, sump pump with backup, and vapour barrier form the complete system. |
| Diagnosis before installation | Identify whether water entry is seepage, hydrostatic pressure, or condensation before choosing a solution. |
| Warranties matter as much as price | A 25-year transferable warranty adds property value and protects your investment long term. |
| Vet contractors thoroughly | Compare scope of work, warranty terms, and experience, not price alone. |
What I’ve learned after years of watching homeowners get this wrong
The single most common mistake I see is homeowners applying a waterproof sealant to their basement walls and calling the job done. It feels like a solution. It looks like one for a few months. Then the hydrostatic pressure builds, the sealant cracks, and the water returns, often worse than before. Diagnosing the water entry mechanism before spending a single rand is the most valuable thing you can do.
The second mistake is neglecting the sump pump after installation. Regular maintenance of sump pumps, including testing the backup battery and clearing the discharge line, is what separates a system that lasts 25 years from one that fails during the first major storm. I have spoken to homeowners who invested in a full interior system and then never touched the pump again. When it failed, they blamed the system. The system was fine. The maintenance was not.
My honest recommendation is to treat interior waterproofing as infrastructure, not a one-off repair. Schedule an annual inspection, test your pump every six months, and address any new cracks or seepage points promptly. A well-maintained interior system genuinely does protect your home for decades. A neglected one gives you a false sense of security.
— Eben
Basement waterproofing services from Prowaterproofing
Prowaterproofing provides professional basement sealing services for residential properties across South Africa, with installations backed by a 25-year transferable warranty.

Every project begins with a free, no-obligation inspection and a detailed moisture assessment. Prowaterproofing’s team identifies your specific water entry points and recommends the right combination of drain tile, sump pump, and vapour barrier for your home. There are no generic solutions. Each system is sized and configured for the property. If you are ready to stop dealing with a damp basement and want a permanent, warranted solution, contact Prowaterproofing to book your inspection and get a clear, itemised quote.
FAQ
What is interior basement waterproofing?
Interior basement waterproofing is a water management system that collects water entering your basement and channels it to a sump pump for removal. It uses drain tiles, a sump pump, and a vapour barrier rather than blocking water at the exterior wall.
How long does interior waterproofing installation take?
Most standard residential installations take two to three days. Larger basements or those with complex layouts may require an additional day.
Does interior waterproofing stop water permanently?
Interior systems manage water entry effectively for decades when properly maintained. They do not prevent water from contacting foundation walls but reliably prevent it from accumulating in your basement.
How do I find reliable local basement waterproofing services?
Request free inspections from at least two or three local contractors, check for transferable warranties, verify public liability insurance, and use a structured vetting checklist to compare scope rather than price alone.
Can I waterproof my basement from the inside myself?
Basic vapour barrier application is within reach for confident DIY homeowners, but drain tile installation and sump pump fitting require professional tools and experience. Errors in pipe slope or pump sizing lead to system failure. Professional installation is strongly recommended for a complete interior drainage system.