

Stop the water first, work out where it’s coming from second, then apply the right repair, whether that’s regrading and gutters, an interior drainage system, or a properly injected crack. Get this sequence wrong, most homeowners patch the wrong problem and watch the damp return within a season.
Right now, if there’s standing water or an active leak:
- Move furniture, boxes, and anything valuable away from the wet area immediately.
- Switch off electrics to affected circuits at the consumer unit before you touch anything wet.
- Pump or bucket out standing water, then run a dehumidifier once the bulk water is gone.
- Photograph everything: water lines on walls, damaged items, the time and date, for any insurance claim.
Once the space is safe, look for the pattern. Water appearing only after heavy rain usually points to surface runoff, blocked gutters, or poor grading. A damp patch that’s there constantly, rain or shine, often signals hydrostatic pressure pushing groundwater against the foundation. A stain near a pipe run suggests plumbing, not the ground at all.
Pro Tip: If you see a crack widening, a bulging wall, or any sign the foundation itself is moving, stop what you’re doing and call a structural engineer before attempting any repair. SANS 10021:2012 sets out the membrane and drainage combinations that hold up long term, and it’s worth knowing that standard exists before you buy a tub of sealant.
Key Takeaways
Fixing a wet basement permanently means containing the water immediately, diagnosing the true source with simple tests, then matching the repair (exterior drainage, interior cavity system, or crack injection) to that specific cause rather than guessing.
| Point | Details |
|---|---|
| Stop water first | Cut power, pump out standing water, and run a dehumidifier before diagnosing anything. |
| Diagnose before repairing | Use the foil, dye, and hose tests to separate condensation, plumbing leaks, and groundwater ingress. |
| Match repair to cause | Regrading and gutters fix surface runoff; cavity drains and sumps fix persistent hydrostatic pressure. |
| Treat patches as temporary | Hydraulic cement plugs a leak short term but usually fails under sustained water pressure. |
| Bring in Prowaterproofing for structural or persistent issues | A site visit delivers a photographic report, a written remedy, cost estimate, and warranty. |
Table of Contents
- What to do in the first 24 to 72 hours of a flooded basement
- How do you find out where the water is coming from?
- Which exterior fixes stop water before it reaches the wall?
- Can interior drainage systems fix a wet basement without digging up the garden?
- How do you repair a foundation crack or floor-to-wall joint properly?
- Is it condensation or is water actually getting in?
- What should you actually do for your specific basement problem?
- When should you do it yourself, and when do you call a professional?
- What professionals see that homeowners usually miss
- Want a professional to inspect it and put a fix in writing?
- Frequently asked questions
- Sources
What to do in the first 24 to 72 hours of a flooded basement
The first three days decide how much this costs you. Act in this order:
- Cut power to the area. Water and live circuits don’t mix. If your consumer unit is anywhere near the wet zone, switch off the relevant breakers before you step further in.
- Protect what you can save. Lift furniture onto blocks, move boxes and electronics to dry ground, and bag anything porous that’s already soaked (it will grow mould within 24 to 48 hours if left).
- Remove the water. A submersible pump handles anything past ankle depth; a wet/dry vacuum mops up the rest. Buckets work in a pinch but they’re slow.
- Ventilate and dehumidify. Open what windows you have, then run a heavy-duty dehumidifier continuously until the humidity readings drop and stay down.
- Sanitise contact surfaces if the water came from a drain backup or sat for more than a day, since standing water breeds bacteria fast.
Useful kit for this stage: a submersible or sump pump, a wet/dry shop vacuum, an extension lead protected by an RCD (never run one unprotected near water), a contractor-grade dehumidifier, and basic PPE, gloves and rubber boots at minimum.
For an active but small leak, hydraulic cement can plug the gap within minutes as a stopgap. It expands as it cures and can hold back a modest trickle. It’s not a fix for a wall under genuine hydrostatic pressure, though, and RadonSeal’s guidance on wet basements is blunt about it: patched cracks tend to fail again once groundwater pressure builds, because the cement is sealing a symptom, not the cause.
Pro Tip: Never wade through standing water if you’re unsure the power is off. If the water is more than a few centimetres deep, contaminated, or the structure looks unstable, get out and call an emergency electrician or the fire service rather than risk it yourself.
How do you find out where the water is coming from?
Work the room like a detective before you buy a single product. Start with the outside of the house, then work your way in.
- Check gutters and downpipes for blockages or disconnected joints, especially after autumn leaf fall.
- Walk the perimeter and check the grading. Ground that slopes toward the foundation instead of away from it is one of the most common culprits.
- Look at the floor to wall joint, the seam where the slab meets the foundation wall, for gaps or fresh staining.
- Inspect any visible cracks for width, direction, and whether they’re wet or just discoloured.
- Check nearby plumbing runs, waste pipes, and any sump pit for signs of a slow leak rather than groundwater.
Three quick tests settle most arguments about cause:
The foil test. Tape a square of aluminium foil to the damp wall and leave it for 24 hours. Moisture on the outer face means condensation from room air; moisture trapped underneath the foil against the wall means the water is coming through the masonry itself.
The dye test. A few drops of food colouring in an upstairs drain or toilet cistern, flushed through, will show up quickly in a basement stain if a leaking pipe is the actual source rather than the ground.
The hose test. Run a garden hose against a specific section of foundation for 15 to 20 minutes while someone watches inside. If water appears exactly where you’re spraying, you’ve found a surface runoff pathway rather than a general hydrostatic problem. PnB Consulting Engineers notes that a diagnosis like this frequently reveals a drainage or grading design flaw rather than a failed waterproofing job, which changes the whole repair conversation.
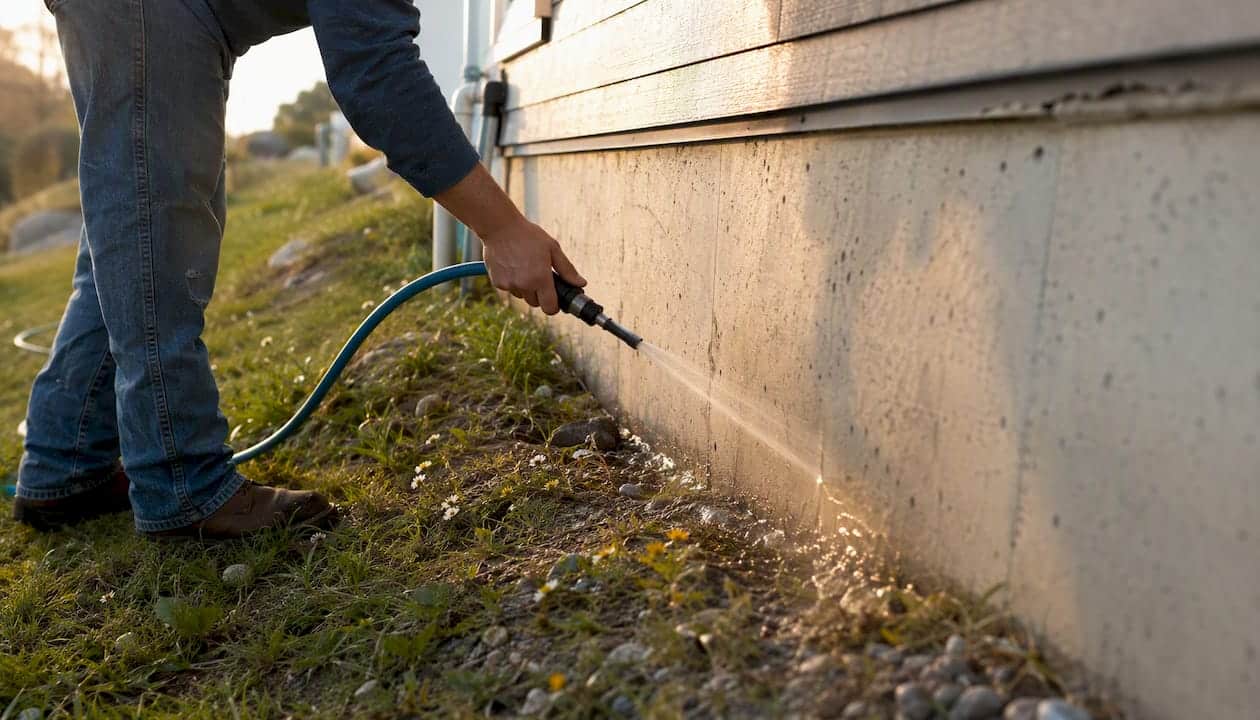
A few patterns are reliable enough to trust on sight. Dampness that shows up near the ceiling, especially in a straight line, usually traces back to a pipe overhead. Uniform, all-over wetness across a wall points toward groundwater pressure rather than a single point source. Water that only appears within a day of heavy rain, and dries out between storms, is almost always surface runoff or blocked drainage rather than a structural failure.
Pro Tip: Log every finding with a photo, the date, and that day’s weather. If you end up hiring a professional or filing an insurance claim, this record turns a vague complaint into evidence they can act on immediately.
Which exterior fixes stop water before it reaches the wall?
Exterior work is more disruptive and costs more upfront, but it addresses the water before it ever touches the structure, which is why it tends to outlast interior patches.
Start with the cheap wins:
- Regrade the soil so it falls away from the foundation for roughly 3 metres. This single change resolves a surprising share of “mystery” basement leaks.
- Fix the gutters and downpipes. Extend downpipe discharge well clear of the foundation, clean blockages, and repair any disconnected sections.
- Install a cut off trench or French drain along the problem wall to intercept water laterally before it reaches the foundation and route it to a safe discharge point.
- Consider full exterior tanking for basements with serious or persistent hydrostatic pressure, which involves excavating to the footing and applying a membrane to the outside face of the wall.
SANS 10021:2012 lists the membrane types recognised for this job: polyolefin sheet membranes, bitumen-based membranes, mastic asphalt, and cementitious coatings, and it’s explicit that a membrane alone rarely holds without drainage measures working alongside it. A protection board over the membrane during backfilling stops the compacted soil from puncturing it, a detail that gets skipped more often than you’d expect on cut-rate jobs.
Weigh the trade offs honestly:
- Effectiveness: exterior tanking and French drains are the most durable option because they stop water before it reaches the wall at all.
- Disruption: excavation means digging up flower beds, patios, or paths, and can take days rather than hours.
- Cost drivers: depth of excavation, soil type, site access, and whether structural repairs are needed alongside the waterproofing all move the price.
- Durability: a properly specified exterior membrane paired with drainage should outlast an interior-only fix by a wide margin.
Timeline depends heavily on access. A straightforward regrade and gutter fix might take a weekend. Excavation for tanking or a French drain around one wall commonly runs several days to over a week once you account for digging, membrane installation, drainage pipe laying, and backfilling. ServiceLink SA’s guide to basement waterproofing points out that site specific factors, soil type, water table depth, and rainfall patterns, determine which method actually suits a property, which is exactly why a geotechnical or structural engineer should be brought in before any major excavation on a site with a history of movement or a high water table. For a fuller walkthrough of the excavation and membrane process, this guide on waterproofing a basement from the outside covers the sequence step by step.
Pro Tip: Get quotes that specify the exact membrane type and drainage pairing, not just “waterproofing coating applied.” A coating with no drainage behind it is treating the symptom, not the pressure causing it.
Can interior drainage systems fix a wet basement without digging up the garden?
Yes, and for existing basements where excavation is impractical, expensive, or blocked by a driveway or neighbouring structure, interior systems are often the more realistic route.
A cavity drain membrane works by creating a deliberately drained gap between the foundation wall and your interior finish. Water that gets through the wall runs down inside that cavity instead of soaking into your plaster, and gets channelled into a perimeter drain at floor level. That drain then carries the water to a sump pit, where a pump lifts it out and discharges it safely away from the house. ServiceLink SA describes this cavity drain plus perimeter drain plus sump combination as the standard retrofit for basements already showing active leaks, largely because it manages incoming water rather than trying to stop it outright, which suits a finished basement you don’t want to tear open from outside.
The sump pump is not optional in this system, it’s the whole point. A few things matter here:
- Choose a pump sized for your expected water volume, not the cheapest one on the shelf.
- Fit a battery backup. Power cuts during storms are exactly when you need the pump running most, and a reliable backup paired with the drainage system is what separates a system that works from one that fails at the worst moment.
- Test the pump every few months, not just when it rains.
Where the problem is minor and localised rather than a full wet wall, cementitious coatings, crystalline waterproofing systems, or injection grouts can help. Crystalline products react chemically with moisture to block capillary pathways in the concrete itself, while injection grouts push sealant directly into an active crack under pressure. Both have real limits under sustained hydrostatic pressure, and neither substitutes for drainage where groundwater is genuinely pushing against the wall.
Maintenance for interior systems is ongoing rather than one and done: check the sump pit for debris, test the pump, and inspect the perimeter drain outlet for blockages once or twice a year. Compared with exterior tanking, interior drainage is faster to install and cheaper upfront, but it manages water rather than stopping it at the source, so it depends on mechanical equipment continuing to work.
Pro Tip: If you’re weighing interior versus exterior, ask what happens during a multi-day power outage in a storm. If the honest answer is “the basement floods,” you need that battery backup sorted before anything else.
How do you repair a foundation crack or floor-to-wall joint properly?
A hairline crack that’s dry and stable is often cosmetic. A crack that’s actively weeping water needs a real repair method, not just a smear of filler.
Epoxy injection works for structural cracks that aren’t actively leaking, bonding the concrete back together. Polyurethane injection is the better choice for a crack that’s actively wet, since it expands on contact with water and forms a flexible seal rather than a rigid one. Hydraulic cement is fine as a fast, short-term patch, but as noted earlier, it tends to fail once real hydrostatic pressure builds behind it.
The floor-to-wall joint deserves its own attention, since it’s one of the most common entry points in older basements. Proper tooling means routing out the joint to a consistent depth, then filling it with a flexible sealant or a water stop product designed to move with minor seasonal expansion rather than crack again next winter.
Call a structural engineer, not a waterproofer, if you see:
- A crack wider than about 5mm, or one that’s visibly grown since you first noticed it.
- Multiple cracks lining up in a pattern rather than a single isolated one.
- Any sign the wall is bowing, stepping, or the floor is uneven near the crack.
A repair’s holding up if the area stays dry through the next few heavy rains, the crack width hasn’t moved, and there’s no fresh staining reappearing where you patched it.
Pro Tip: Take a photo with a tape measure across any crack before you repair it. If it’s wider three months later, that’s your evidence a professional needs to look at it, not just reseal it.
Is it condensation or is water actually getting in?
Condensation gets misdiagnosed as seepage more often than you’d think, and treating one like the other wastes money.
Signs pointing to condensation rather than groundwater: the wall “sweats” visibly in humid weather, the dampness tracks with indoor humidity rather than rainfall, and your foil test from earlier showed moisture on the room-facing side of the foil, not trapped behind it.
The fix here is entirely different from waterproofing. Run a correctly sized dehumidifier for the room’s volume, improve ventilation or fit an extract fan, and insulate cold surfaces like exposed pipework or an uninsulated wall so warm, moist air stops condensing on contact.
Don’t seal the room up tighter without adding ventilation, that traps moisture rather than removing it. And don’t assume it’s “just condensation” without running the foil test first; treating a genuine structural leak as a humidity problem just buys time for the real damage to spread.
What should you actually do for your specific basement problem?
Match your situation to one of these and follow the sequence.
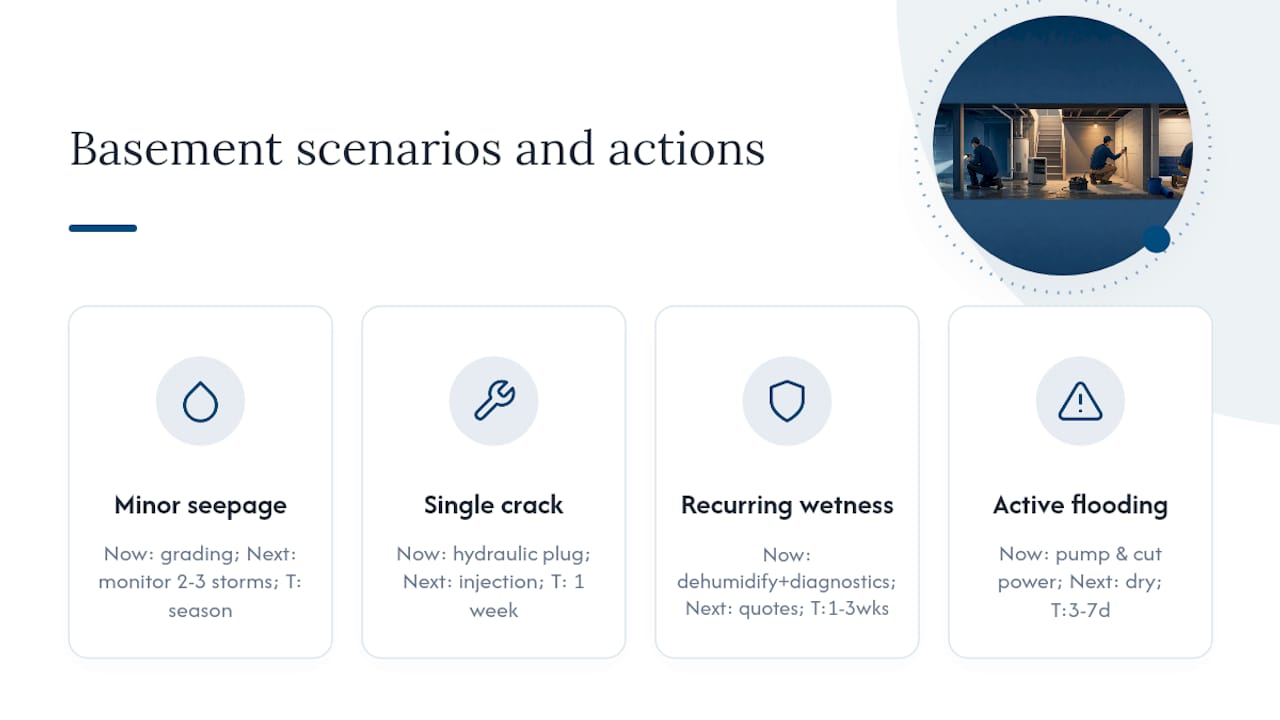
A. Minor seepage after rain. Do now: improve grading and clear the gutters. Do next: monitor through the following two or three rainstorms. Call a pro: only if damp persists after drainage fixes are done.
B. A single active crack. Do now: apply hydraulic cement as a temporary plug. Do next: book a professional injection sealing appointment within the next couple of weeks. Call a pro: as soon as the temporary patch is in, since this repair genuinely needs polyurethane or epoxy injection to last.
C. Recurring wetness with no obvious single source. Do now: run a dehumidifier and start the diagnostic tests above. Do next: get quotes for an interior cavity drain plus sump, or exterior tanking if excavation is feasible. Call a pro: for the system design itself, this isn’t a weekend DIY job.
D. Active flooding. Do now: pump out standing water and cut power to the area. Do next: dry thoroughly with a dehumidifier and wet/dry vacuum over several days. Call a pro: once dry, for a full diagnosis before you rebuild or refinish anything.
Realistic timescales: scenario A resolves within one wet season if the grading fix holds. Scenario B needs about a week from patch to permanent injection repair. Scenario C typically runs one to three weeks from quote to finished installation. Scenario D can take three to seven days just to dry out properly before any repair work starts. Practical drying and flood response steps are covered in more depth in this guide to basement flooding solutions.
When should you do it yourself, and when do you call a professional?
Clearing gutters, fixing a slope in a flower bed, or sealing a hairline cosmetic crack are all reasonable weekend jobs. Active leaks under real hydrostatic pressure, a full exterior tanking job, or any repair involving excavation near the foundation are not. That’s the line, and it’s worth respecting it, because a botched exterior membrane installation can trap water against the wall rather than keep it out.
A repair is only as good as the drainage behind it. SANS 10021:2012 is explicit that membrane systems and drainage measures work as a pair, not as alternatives to each other, and workmanship and correct specification are what separate a waterproofing job that lasts decades from one that fails within a year.
When you’re vetting a contractor, run through this before signing anything:
- Are they licensed or registered with a recognised trade body, and can they show proof?
- Do they carry insurance, and does the quote include a written warranty on the work?
- Can they provide references and before and after photos from comparable jobs?
- Does the written scope specify the exact membrane or drainage system, not vague terms like “waterproofing treatment”?
- If a sump pump is part of the design, does the quote include a battery backup and a maintenance plan?
Red flags that mean stop DIYing and call someone now: a crack that keeps widening, any visible movement in a wall or floor, pooling that returns despite your temporary fixes, or rising damp appearing after you thought the repair was finished. For more detail on the standards a contractor should be working to, see this guide on South African waterproofing standards.
What professionals see that homeowners usually miss
The mistake I see most often isn’t laziness, it’s sequencing. Homeowners patch the crack, feel good about it for a season, then get blindsided when the water finds a new path because nobody addressed the grading or the gutters feeding that wall in the first place. Sealant without drainage is a delay, not a repair.
Pro Tip: Diagnose properly before you spend a cent. A structured inspection, foil test, dye test, and a look at the grading, takes an afternoon and saves you from buying the wrong product twice.
Good workmanship and the right specification matter more than the brand name on the tub of sealant. A cheap membrane installed correctly with proper drainage will outlast an expensive one applied without it.
Want a professional to inspect it and put a fix in writing?
If you’ve worked through the diagnosis above and you’re still not confident which repair route fits your basement, that’s exactly the point to bring in a professional rather than guessing with a second product. Prowaterproofing arranges a site visit that ends with a photographic report and a written recommendation, so you get a clear answer instead of another trial-and-error patch.

Here’s what that visit typically covers: an inspection of the affected walls, floor-to-wall joints, and surrounding drainage, a photographic report documenting exactly what’s happening and where, a recommended remedy, whether that’s exterior tanking, an interior cavity drain and sump, or targeted crack injection, alongside a cost estimate and realistic timescale for the work. Repairs carry a written warranty, and aftercare guidance is included so you know what to check every few months once the job is done.
If you’d rather start with a quote than commit to anything, get in touch through Prowaterproofing for an inspection and a written scope before any work begins.
Frequently asked questions
Can I fix a wet basement myself, or do I always need a professional?
Minor issues like blocked gutters, poor grading, or a small cosmetic crack are reasonable DIY jobs. Active leaks under hydrostatic pressure, structural cracks, or full exterior tanking need a professional.
How long does it take to fix a wet basement?
A grading and gutter fix can take a weekend. Interior drainage installations often run one to three weeks, and exterior excavation work can take several days to over a week depending on access and depth.
Does insurance cover basement water damage?
Coverage typically depends on the cause; sudden pipe bursts are often covered, while gradual seepage or poor maintenance frequently is not. Check your specific policy wording and document the damage thoroughly before making a claim.
What’s the difference between waterproofing and damp proofing?
Damp proofing resists moisture vapour but not standing water or hydrostatic pressure; waterproofing systems, membranes plus drainage, are designed to hold back actual water under pressure.
Is a wet basement a health risk?
Yes. Persistent dampness encourages mould growth and can affect indoor air quality, which matters more if anyone in the household has respiratory sensitivities or allergies.
Sources
- The ultimate guide to basement waterproofing: costs, systems & solutions for SA homes | ServiceLink SA
- Basement water problem? – PnB Consulting Engineers
- Make your wet basement dry in a week — RadonSeal