TL;DR:
- Interior basement wall waterproofing involves sealing leaks and controlling moisture through sealants and coatings; it is most effective when paired with proper drainage and exterior water management. Before treatment, perform a foil test to diagnose whether issues stem from condensation or seepage, and thoroughly prepare surfaces for sealing. For persistent leaks or structural concerns, professional assessment and additional drainage solutions are recommended to ensure long-term protection.
Interior basement wall waterproofing is the process of applying sealants, hydraulic cement, and masonry coatings to the inner face of a foundation wall to block water intrusion and control moisture. This approach works well for minor seepage, hairline cracks, and condensation problems. For major structural leaks or significant hydrostatic pressure, professional intervention is the correct path. Tools like hydraulic cement, masonry waterproof paint, and a simple plastic foil test are the foundation of any effective DIY attempt. Get these right, and you can protect your basement without excavating the exterior.
How to waterproof a basement wall from the inside: what you need first
Before you apply a single drop of sealant, you need to know exactly what you are dealing with. Skipping this step is the single most common reason DIY waterproofing fails within a year.
Run the foil test first
The foil test is the most reliable starting point for any interior waterproofing project. Tape a 30 cm square of plastic foil flat against your basement wall and leave it for 24–48 hours. Moisture on the room side means you have a condensation problem. Moisture on the wall side means water is seeping through from outside. The treatment for each is completely different, so this test is not optional.
Condensation calls for better ventilation and a dehumidifier. Seepage calls for crack sealing and waterproof coatings. Treating condensation with masonry paint wastes money and solves nothing.
Tools and materials you will need
Gather everything before you start. Stopping mid-job to source materials allows moisture to re-enter freshly prepared surfaces.
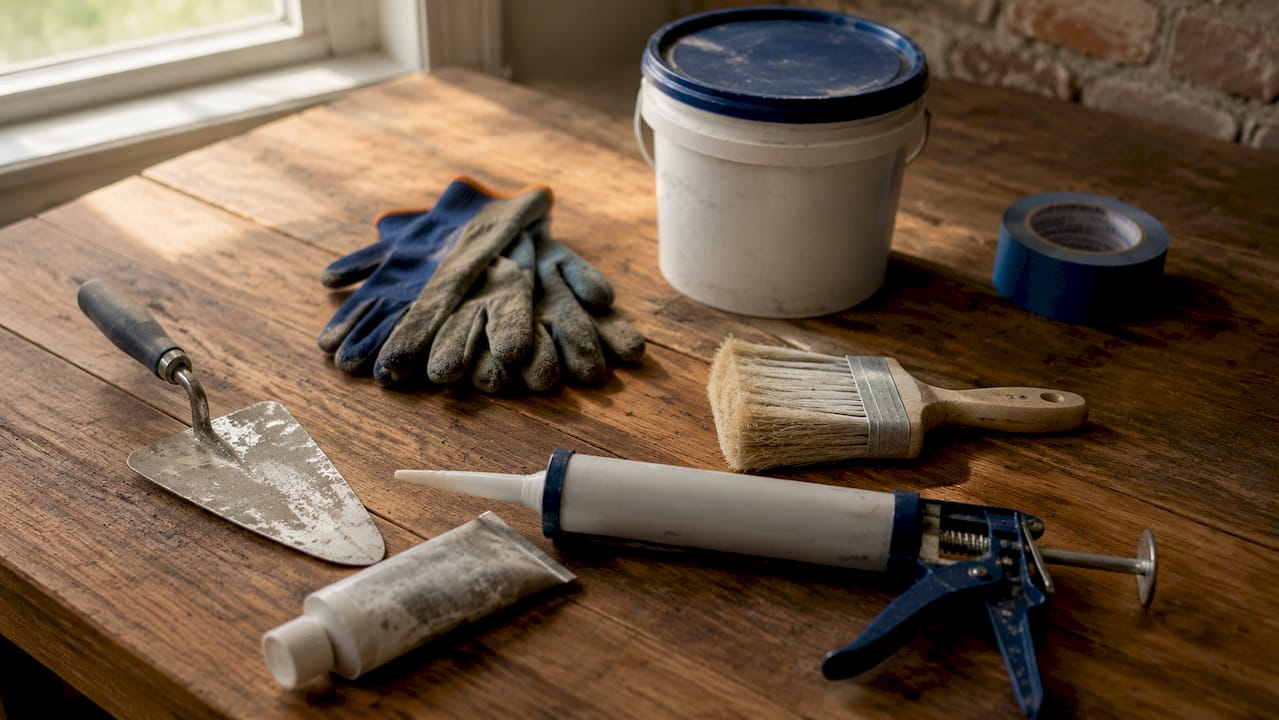
- Wire brush and vacuum: For scrubbing loose mortar, efflorescence, and debris from the wall surface
- Cold chisel and hammer: For widening cracks into a V shape to improve adhesion
- Hydraulic cement: For sealing active leaks and filling cracks
- Masonry waterproof paint or spray: Products such as Drylok Extreme or Xypex Concentrate are widely used for this application
- Bucket and mixing paddle: For preparing hydraulic cement in small batches
- Safety gear: Gloves, safety glasses, and a dust mask are non-negotiable when chiselling masonry
Pro Tip: Extend your downspouts 6–10 feet away from the foundation before starting any interior work. Downspout extensions are the most cost-effective surface water control method available, and they reduce the pressure your interior sealing has to resist.
Check that your soil grades away from the house at a slope of at least 6 inches over the first 10 feet. Interior waterproofing works far better when exterior water management is already doing its job. These two steps cost almost nothing and dramatically improve your results.
| Item | Purpose |
|---|---|
| Hydraulic cement | Seals active leaks and fills cracks rapidly |
| Masonry waterproof paint | Creates a continuous moisture barrier across the wall face |
| Wire brush | Removes loose material for better product adhesion |
| Plastic foil | Diagnoses moisture source before treatment |
| Dehumidifier | Controls residual humidity after sealing |
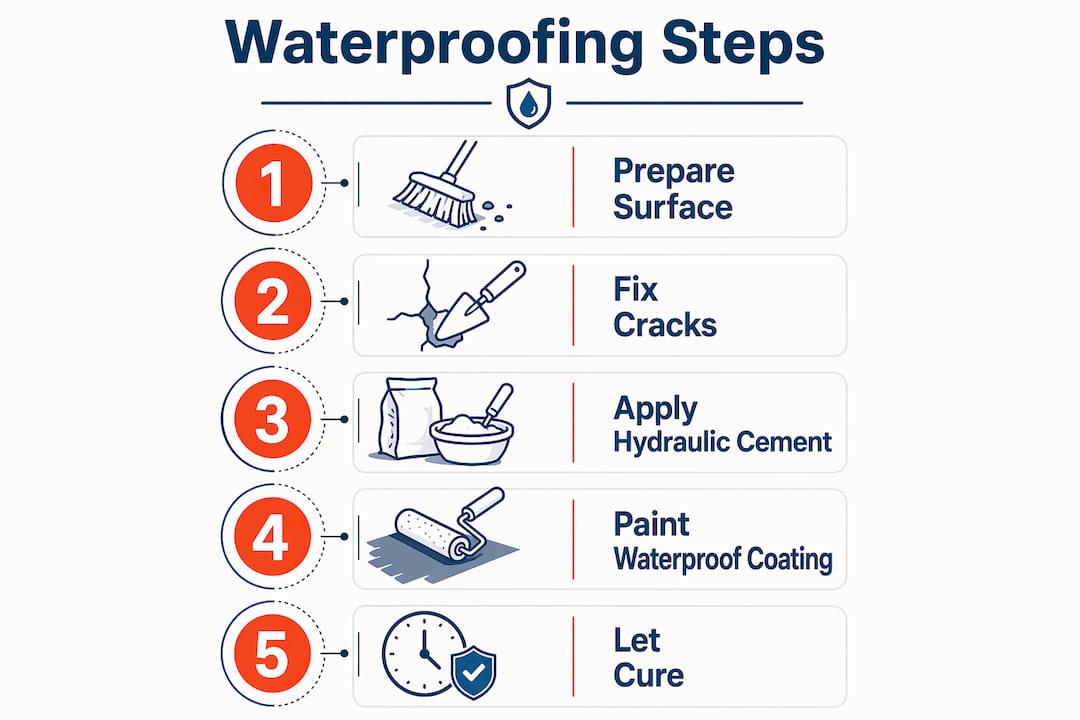
How do you seal basement walls step by step?
This is where the actual work happens. Follow these steps in order. Skipping or rushing any stage undermines the entire system.
-
Clean the wall thoroughly. Use a wire brush to scrub off all efflorescence, loose paint, and crumbling mortar. Vacuum the surface completely. Any debris left behind breaks the bond between the wall and your sealant.
-
Widen cracks with a cold chisel. Chisel each crack into a V shape, roughly 2.5 cm deep and 2.5 cm wide at the opening. This sounds counterproductive, but it gives the hydraulic cement a mechanical grip it cannot achieve in a hairline crack.
-
Mix and apply hydraulic cement. Hydraulic cement sets in 3–5 minutes, so mix only small batches at a time. Roll it into a cone shape with your gloved hand and press it firmly into the crack, holding it in place for three to five minutes until it hardens. For an active leak, hold the cement plug against the water flow until it sets completely.
-
Seal the cove joint. The joint where the wall meets the floor is one of the most common water entry points in any basement. Apply a generous fillet of hydraulic cement along this entire joint. Do not skip this step even if you see no visible crack there.
-
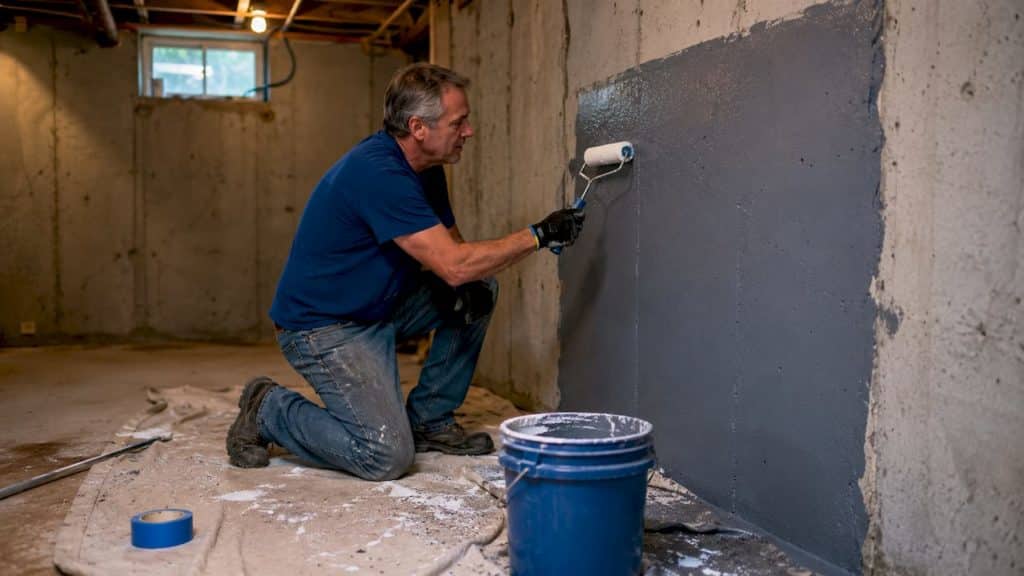
Apply the first coat of masonry waterproof paint. Use a stiff masonry brush and work the paint firmly into the surface with a scrubbing motion. Masonry waterproofers cover roughly 75–100 sq ft per gallon and require two coats for proper sealing. Apply the first coat horizontally.
-
Allow full curing time. Wait at least 12–24 hours between coats, following the manufacturer’s instructions precisely. Applying a second coat too soon traps moisture and causes the coating to fail.
-
Apply the second coat perpendicularly. Run your brush vertically for the second coat. Applying coats in opposite directions closes any pinholes left by the first pass and creates a genuinely continuous barrier.
Pro Tip: For polyurethane foam crack injection, which succeeds in over 90% of non-structural cracks, hire a specialist kit or a contractor rather than attempting it with generic foam. The pressure and nozzle placement matter enormously.
Allow the finished wall to cure for the full period stated on the product label before exposing it to moisture or humidity. Rushing this stage is the most common cause of early coating failure.
Does sealing alone solve all basement moisture problems?
Sealing interior basement walls addresses one part of the problem. Humidity and hydrostatic pressure require separate strategies.
Waterproofing vs. damp-proofing: know the difference
Damp-proofing only resists moisture vapour, whereas true waterproofing manages liquid water and pressure through a combination of gutters, grading, drainage, and waterproof barriers. Many homeowners apply a damp-proof coating and believe the job is done. It is not. Damp-proofing will not stop a seeping wall under sustained water pressure.
True waterproofing is a system, not a single product. The masonry paint you apply is one layer of that system.
Control humidity with a basement-rated dehumidifier
Even after sealing, residual moisture vapour passes through concrete. A basement-rated dehumidifier set to maintain 40–60% relative humidity prevents condensation from forming on walls, pipes, and stored items. Standard household dehumidifiers are not built for the cold, damp conditions typical of a basement. Use a unit specifically rated for low-temperature basement operation.
When interior drainage becomes necessary
Interior drainage systems like French drains relieve hydrostatic pressure more effectively than barrier methods that attempt to seal water out entirely. A French drain installed along the interior perimeter of the basement floor intercepts water at the point it enters and channels it to a sump pump, which then expels it away from the foundation.
Interior drainage works with physics rather than against it. Instead of trying to hold back water pressure with a coating, it gives the water a controlled path out. This is why drainage systems outlast sealants in high-pressure situations.
If your basement floods after heavy rain or your water table is consistently high, a sump pump and interior French drain are the correct long-term solution. Sealing alone will not hold under those conditions. You can read more about basement flooding solutions to understand where interior drainage fits within a broader protection plan.
What are the most common mistakes when sealing basement walls?
Interior waterproofing fails for predictable reasons. Knowing them in advance saves you from repeating the same expensive errors.
- Skipping the foil test. Applying masonry paint to a condensation problem does nothing. Diagnose first, treat second.
- Applying sealant to a wet or dirty wall. Adhesion fails immediately. The wall must be clean, sound, and as dry as conditions allow.
- Ignoring the cove joint. Water enters at the base of the wall constantly. Sealing only the visible wall face leaves the most vulnerable point untreated.
- Applying only one coat of masonry paint. One coat leaves pinholes. Two coats in perpendicular directions are the minimum for a reliable barrier.
- Expecting sealants to hold under severe hydrostatic pressure. Sealants often fail under negative hydrostatic pressure, bubbling and peeling as pressure pushes coatings away from the wall. Interior sealants are a stopgap, not a permanent fix for a high-pressure situation.
Signs that you need a professional rather than a DIY approach include horizontal cracks in block walls (which indicate structural movement), bowing or bulging walls, and water that returns within weeks of sealing. These are not DIY problems. For a broader view of what exterior solutions can add to your protection, see this guide on exterior basement waterproofing techniques.
Maintenance matters too. Inspect your sealed walls every six months. Look for new cracks, peeling paint, or damp patches. Catching a new crack early and filling it with hydraulic cement costs almost nothing. Ignoring it for a year can mean a flooded basement and damaged foundations.
Key takeaways
Interior basement wall waterproofing works reliably for minor seepage and hairline cracks when you diagnose the moisture source correctly, prepare the surface thoroughly, and apply hydraulic cement and masonry coatings in the right sequence.
| Point | Details |
|---|---|
| Diagnose before treating | Use the foil test to confirm seepage versus condensation before buying any product. |
| Prepare the surface properly | Clean, chisel, and vacuum the wall before applying hydraulic cement or masonry paint. |
| Seal cracks and the cove joint | Fill cracks with hydraulic cement and seal the wall-floor joint as a priority entry point. |
| Apply two perpendicular coats | One coat of masonry waterproof paint is insufficient; two coats in opposite directions close pinholes. |
| Add drainage for high pressure | Sealants fail under sustained hydrostatic pressure; a French drain and sump pump are the correct long-term fix. |
Why i think most DIY basement waterproofing goes wrong before it starts
After years of seeing basement waterproofing projects succeed and fail, the pattern is almost always the same. The work itself is not the problem. The diagnosis is.
Homeowners buy a tin of Drylok, paint it on a damp wall, and feel satisfied. Six months later the coating is bubbling and the wall is wet again. The product did not fail. The process failed. Nobody ran the foil test. Nobody widened the cracks. Nobody checked whether the downspouts were dumping water against the foundation.
Interior waterproofing is genuinely effective for the right problems. A hairline crack in a poured concrete wall, a slightly damp block wall, a basement that smells musty after rain. These are solvable with the methods described here. But if your walls show horizontal cracking, if water returns within days of heavy rain, or if you can see the wall bowing inward, no amount of masonry paint will help. That is a structural and drainage problem, and it needs a structural and drainage solution.
The other mistake I see constantly is treating interior waterproofing as a substitute for exterior work. It is not. It is a complement. Sorting your gutters, extending your downspouts, and grading your soil correctly will do more for a damp basement than any coating you can apply from the inside. Do both, and the interior sealing holds. Do only the interior work, and you are fighting a losing battle against physics.
Set realistic expectations, diagnose carefully, and do not skip the preparation. That is the difference between a project that lasts a decade and one that fails before winter.
— Eben
When to call Prowaterproofing for your basement

DIY interior waterproofing handles minor seepage well, but some basements need more than a brush and a tin of masonry paint. Prowaterproofing provides professional basement waterproofing services across South Africa, covering interior sealing, drainage system installation, and full exterior waterproofing solutions. Every project comes with a professional assessment to identify the actual moisture source, not just the visible symptoms. Prowaterproofing’s team works with both residential and commercial properties, offering solutions backed by warranties and long-term protection guarantees. If your basement has returned water after a previous DIY attempt, or if you are seeing structural warning signs, get a professional assessment before the problem compounds. Visit Prowaterproofing to request a quote and speak to a specialist who can recommend the right system for your specific situation.
FAQ
What is the best interior basement wall sealant?
Masonry waterproof paints such as Drylok Extreme and Xypex Concentrate are widely used for sealing inside basement walls. Two coats applied in perpendicular directions give the most reliable barrier for minor seepage.
How do you tell if basement moisture is seepage or condensation?
Tape a square of plastic foil to the wall for 24–48 hours. Moisture on the room side of the foil indicates condensation; moisture on the wall side confirms water is seeping through from outside.
Can interior waterproofing stop a major basement leak?
Interior sealants are not designed for major leaks or high hydrostatic pressure. Coatings fail under negative pressure, bubbling away from the wall over time. Significant leaks require drainage systems or exterior waterproofing.
How long does hydraulic cement take to set?
Hydraulic cement sets in 3–5 minutes, so mix only small batches and apply immediately. It is the correct product for active leaks because it expands as it cures and bonds even against running water.
How much masonry waterproof paint do i need?
One gallon covers approximately 75–100 sq ft of wall surface. Calculate your total wall area, plan for two full coats, and buy accordingly before starting the job.