
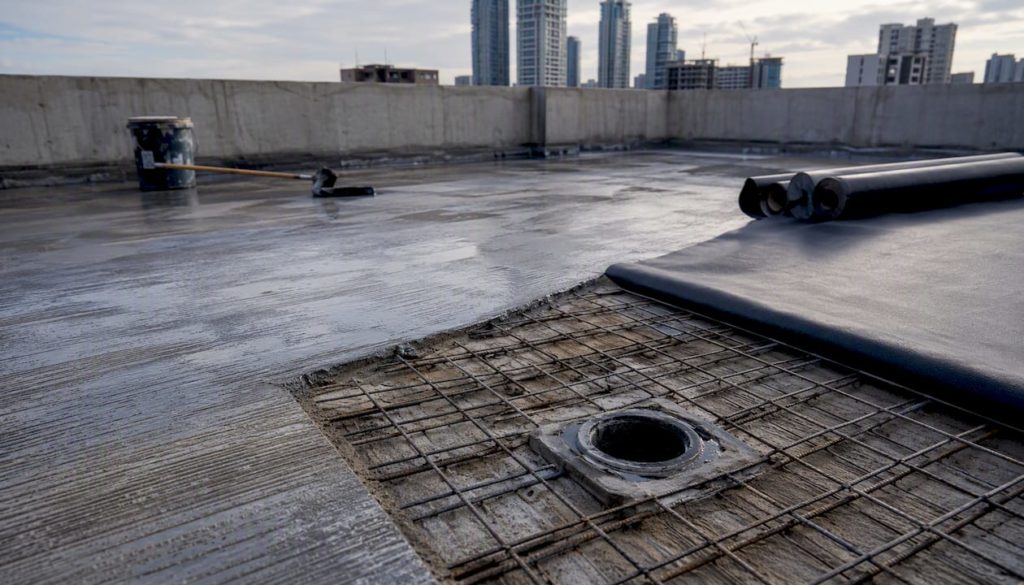
For most exposed concrete roof decks, a reinforced liquid membrane or a torch-on/RBM sheet system is the right call. Cementitious or crystalline treatments suit situations where the priority is stopping moisture migrating through the slab itself, such as basement soffits or internal tanking, rather than shedding rainwater off a trafficked surface. Before you specify anything, though, run three checks: falls (does water actually leave the deck?), outlet detail (are drains dressed correctly and set below screed level?), and substrate moisture (is the concrete dry enough to bond a membrane at all?). If any of those three fail, stop and remediate first. No coating fixes bad falls.
Quick system picks by deck type:
- Exposed flat roof deck: torch-on RBM or reinforced liquid membrane with UV-stable topcoat.
- Podium/planted deck: root-resistant sheet membrane under a protection board and drainage layer.
- Balcony or terrace: fibre-reinforced liquid membrane for seamless detailing around doors and railings.
- Parking deck: heavy-duty RBM or polyurethane/polyurea system rated for vehicle traffic.
Key Takeaways
Reliable concrete roof deck waterproofing depends on correct falls, verified substrate dryness, proper outlet detailing, and a flood test before any finish covers the membrane.
| Point | Details |
|---|---|
| Match system to deck type | Use sheet/RBM or reinforced liquid membranes for exposed decks, cementitious/crystalline for internal tanking. |
| Verify falls first | Falls must reach 1:80 minimum, or 1:50 where flow is interrupted, before specifying any system. |
| Confirm substrate is wood-floated and dry | Concrete moisture must sit at 7% or below, screeds at 10% or below, with laitance removed. |
| Detail outlets and corners carefully | Keep outlet flanges below screed level and build corner fillets to around 75mm. |
| Flood-test before handover | Hold water for 48 to 72 hours and keep the test records for warranty purposes. |
| Work with a proven specialist | Prowaterproofing builds substrate checks, correct detailing, and flood testing into every concrete deck project. |
Table of Contents
- Why concrete roof deck waterproofing actually matters
- What types of concrete decks need different waterproofing approaches?
- When should you waterproof a concrete roof deck?
- What standards govern substrate preparation for waterproofing?
- Which waterproofing system is right for your deck?
- What is the correct installation sequence for a waterproofed deck?
- Where do concrete deck waterproofing systems typically fail?
- How is a waterproofed deck tested and warranted?
- How do you choose a competent waterproofing contractor?
- Why do falls and outlet design matter so much?
- Get your concrete deck inspected and specified properly
- Sources
Why concrete roof deck waterproofing actually matters
A failed waterproofing system doesn’t just mean a damp patch on the ceiling below. Water that finds its way into a concrete deck attacks the reinforcing steel directly, and once rebar starts corroding, it expands, cracks the surrounding concrete, and accelerates its own decay. That process, often triggered by chloride ingress or repeated freeze-thaw cycling, is far more expensive to fix than to prevent.
There’s a blunt cost logic here that building managers learn the hard way: patching a leak after it’s tracked through three floors of finishes, ceiling boards, and electrical containment costs many times more than getting the waterproofing right the first time. SANS 10021 and related guidance set an expectation that a correctly installed roof should stay watertight for at least five years with only normal maintenance. Manufacturer warranties on properly specified systems commonly run 5 to 20 years depending on the product and installer accreditation.
- Reinforcement corrosion is largely preventable if water is kept out of the slab.
- Interior finishes, ceilings, and electrical systems are usually the most expensive casualties of a roof leak, not the roof itself.
- A five-year watertightness baseline is the industry reference point, not an aspiration.
What types of concrete decks need different waterproofing approaches?
Not every concrete deck behaves the same way, and the construction type dictates a lot about which system will actually hold up. A podium deck, buried under planting, soil, or paving, needs a membrane that resists root penetration and tolerates being permanently wet underneath finishes. A buried roof deck under insulation and ballast faces similar demands but usually carries less biological pressure. A balcony or cantilevered slab is smaller, more exposed to movement at the building interface, and often needs a system that copes with tight upstands and door thresholds. A parking deck takes vehicle loading, de-icing chemicals in colder climates, and constant abrasion, which rules out thin coatings entirely.
The deck’s build-up changes the calculation too. Insulation placed above the membrane (an inverted or “upside-down” roof) protects the waterproofing from UV and thermal shock, but it also means any leak takes longer to detect because water travels sideways under the insulation before showing up. A planter build-up over a podium demands a root barrier and a drainage layer, not just a membrane.
- Podium/planted decks: anti-root membrane, drainage board, minimum screed thickness before growing medium.
- Parking decks: thick RBM or polyurea system rated for wheel loads and chemical exposure.
- Balconies: liquid-applied systems that seal cleanly around door thresholds and railings.
- Buried roofs: membrane compatible with rigid insulation and ballast loading.
When should you waterproof a concrete roof deck?
Timing splits into two very different scenarios, and confusing them leads to expensive mistakes.
- New build: waterproofing gets designed in at the structural stage, not bolted on afterwards. Falls, upstand heights, and outlet positions need to be built into the formwork and screed, and the concrete finish must be confirmed as wood-floated before any membrane goes near it.
- Re-waterproofing or refurbishment: triggered by visible leaks, spalling concrete, persistent ponding, or finishes that have failed and are letting water track sideways under tiles or coatings.
Typical triggers for re-waterproofing include cracked or delaminating screed, rust staining bleeding through paint, and standing water that doesn’t clear within a few hours of rain stopping.
- New build sequence: design falls → cast and cure concrete → verify wood-floated finish and moisture content → prime → apply system.
- Refurbishment sequence: investigate leak source → strip failed finishes → assess substrate condition → repair cracks/spalling → re-waterproof.
What standards govern substrate preparation for waterproofing?
This is where most waterproofing failures actually start, long before a membrane is even mentioned. SANS 10400‑L sets out the core technical requirements for flat roofs in South Africa, and it’s worth quoting the specific numbers because they get glossed over constantly on site.
Falls must be a minimum slope that ensures proper drainage, steeper where water flow is interrupted by structural elements. The concrete or screed surface must be wood-floated, not power-floated — a power-floated finish is too dense and smooth for a membrane or liquid coating to key into properly. Laitance, the weak cement-rich layer that rises to the surface during placement, has to be removed entirely before any waterproofing touches the slab.
Moisture limits matter just as much as finish. The standard requires that concrete and screeds have sufficiently low moisture content before waterproofing can proceed. Rushing this step is one of the most common causes of blistering and delamination within the first year. Afrisam’s technical notes recommend a 20mm sand-cement screed over lightweight screeds specifically to give the waterproofing a stable, uniform base to bond to.
Detailing dimensions are prescribed too: upstand beams need to be at least 170mm high, and corner fillets around 75mm, to stop water pooling at junctions and to reduce stress concentration on the membrane at internal corners.
- Falls: 1:80 minimum, 1:50 where flow is interrupted.
- Finish: wood-floated only; laitance and contaminants removed.
- Moisture: concrete ≤7% by weight, screeds ≤10%.
- Upstands ≥170mm, corner fillets ≈75mm.
- Pre-installation checks: cracks, movement joints, outlet flange condition, primer compatibility.
Public Works specification PW371A reinforces the same principle from a procurement angle: substrates must be free of protrusions and contaminants before materials are approved for use, and the specification ties approved materials directly to correct surface preparation.
Which waterproofing system is right for your deck?
Sheet membranes, commonly torch-on bituminous (RBM) or self-adhesive APP/SBS systems, remain the workhorse for trafficable decks and heavy UV exposure. They’re applied in continuous rolls with heat-welded or self-adhesive laps, typically 75mm on the sides and 100mm at the ends, and their thickness gives genuine puncture resistance under paving or ballast. Derbigum’s specification for cast-in-place parking decks sets out these lap dimensions clearly, along with primer and protection layer requirements.
Self-adhesive polyolefin membranes suit situations where an open flame on site is a genuine risk, refurbishment work near occupied units, for instance, and they cold-bond reliably onto a properly primed, dry substrate.
Reinforced liquid membranes (fibre-reinforced elastomeric coatings, often shortened to RLM) are where balconies and terraces tend to land. Because they’re applied wet and cure seamlessly, they wrap around door thresholds, railings, and awkward penetrations without the cutting and dressing a sheet membrane needs. Prowaterproofing’s guide to fibre-reinforced elastomeric liquid membranes covers this in more technical depth.
Cementitious and crystalline treatments work differently: they’re not a surface membrane at all but a treatment that densifies the concrete matrix, which suits tanking and internal moisture control far better than an exposed trafficked deck. They cope poorly with dynamic cracking, so avoid them where the slab is likely to move.
Polyurethane, polyurea, and epoxy systems cure fast and can double as a wearing surface, which is why they turn up on parking decks and industrial floors. An industry comparison of parking deck systems notes that these spray-applied alternatives can remove the need for a separate wearing course altogether, but they are unforgiving of mixing errors and need specialist spray equipment and trained applicators to perform as promised.
- Sheet/RBM: best for trafficable decks, strong UV resistance, proven lap detailing.
- Self-adhesive sheet: best where hot works aren’t permitted.
- Reinforced liquid membrane: best for balconies, terraces, complex detailing.
- Cementitious/crystalline: best for tanking and internal moisture, weak on dynamic cracks.
- Polyurethane/polyurea/epoxy: best for parking decks needing a wearing finish, but demands tight application control.
Pro Tip: Never choose a system on cost per square metre alone. A cheaper sheet membrane with poor lap detailing at outlets will cost more in year two than a slightly pricier system installed correctly the first time.
What is the correct installation sequence for a waterproofed deck?
Getting the order right matters as much as picking the right material. Skip a step here and even a premium membrane will underperform.
- Assess the existing substrate (or newly cast slab) for cracks, contamination, and moisture content.
- Carry out substrate repairs: fill cracks, remove laitance, correct any low points affecting falls.
- Apply primer matched to both the substrate and the chosen membrane system.
- Apply the membrane or liquid coating in the specified number of coats or layers.
- Add reinforcement fabric or a second coat where the system calls for it, particularly at corners and joints.
- Install a protection or separation layer to guard the membrane during subsequent trades.
- Lay the screed, paving, or wearing finish appropriate to the deck’s end use.
Concrete protection layers vary by application: a parking deck might get a trafficable coating or paving pads on pedestals, while a planted podium needs a drainage board and filter fabric before growing medium goes down.
The installer’s control points determine whether that sequence actually works on site. Ambient and substrate temperature both affect cure times, and applying a liquid membrane too cold or too hot changes its film thickness and bond. Primer needs to be given its full flash-off time before membrane application, and drying verification, not just a visual check, should confirm the substrate has reached the moisture threshold before work proceeds.
- Never apply membrane over primer that hasn’t fully flashed off.
- Always verify substrate moisture with a proper meter, not a guess.
- Protection layers go down before any follow-on trade sets foot on the deck.
Where do concrete deck waterproofing systems typically fail?
Outlets, movement joints, and penetrations cause the overwhelming majority of leaks, not the flat field of membrane itself. That’s because every pipe, drain, or expansion joint is a place where the waterproofing has to change direction or terminate, and that’s exactly where workmanship shortcuts show up first.
Turn-ups at upstands need to run high enough to stay above expected water levels, with counter-flashing dressed over the top to shed water back onto the membrane rather than behind it. Pipe penetrations need proper clamping rings, not just a bead of sealant. Corner fillets, typically around 75mm, reduce the stress concentration that would otherwise crack a membrane at a sharp internal angle.
Common failure causes on real sites include: substrate that wasn’t properly prepared, moisture trapped beneath the membrane because drying wasn’t verified, falls that were never checked before the pour, outlet dressings rushed at the end of a job, and protection layers skipped or damaged by a following trade.
- Set outlet flanges below screed level to stop water pooling around the drain.
- Build corner fillets to at least 75mm to reduce membrane stress at internal angles.
- Flood-test before covering the membrane with screed or paving, not after.
Pro Tip: Photograph every outlet and upstand detail before the protection layer goes down. It’s the cheapest insurance you’ll ever buy against a warranty dispute two years later.
How is a waterproofed deck tested and warranted?
Before any finish goes over a new or repaired system, flood testing is non-negotiable for horizontal surfaces. The standard practice is a 48 to 72 hour flood test, as set out in Derbigum’s parking deck specification, holding water at a measured depth and checking below for any sign of penetration. Vacuum or spark testing applies to specific membrane types where a physical seam or weld needs electronic verification rather than a simple water test.
Warranties typically split into two layers: a manufacturer’s material warranty and a separate installer’s workmanship guarantee, together commonly spanning 5 to 20 years depending on the system and accreditation level. These rarely cover damage from later trades puncturing the membrane or from ponding caused by falls that were never corrected.
- Flood test for 48 to 72 hours before covering any new membrane.
- Record test results, photos, and material batch numbers at handover.
- Schedule an annual inspection, particularly of outlets and upstands, to catch minor issues early.
How do you choose a competent waterproofing contractor?
A solid specification protects you as much as the membrane does. It should include substrate preparation criteria, the moisture limits the installer must verify before starting, required upstand and fillet dimensions, the testing protocol expected at completion, and the protection layer to be used.
When vetting contractors, ask direct questions rather than accepting a glossy brochure:
- Are your applicators trained and approved by the membrane manufacturer specifically, not just generally experienced with waterproofing?
- Can you show flood test records and inspection photos from a similar deck you’ve completed recently?
- What warranty do you offer, and does it cover workmanship as well as materials?
- Ask for manufacturer accreditation certificates, not verbal assurances.
- Request references from a similar deck type, podium, balcony, or parking deck specifically.
- Confirm in writing what protection measures follow-on trades must respect.
At handover, collect installation records, batch numbers, flood test certificates, the written warranty document, and a direct contact for post-installation support. Without this paper trail, a warranty claim two years later becomes a lot harder to prove.
Why do falls and outlet design matter so much?
Falls are the single most underrated element of the entire system, because a membrane can be installed flawlessly and still fail if water simply never drains away. SANS 10400‑L sets the minimum fall for flat roofs at 1:80, rising to 1:50 wherever flow is interrupted by an upstand, plinth, or item of plant. Ponding water doesn’t just look untidy: it adds sustained hydrostatic pressure on the membrane, accelerates UV breakdown in standing pools, and, in colder regions, sets up freeze-thaw stress that no coating is designed to absorb indefinitely.
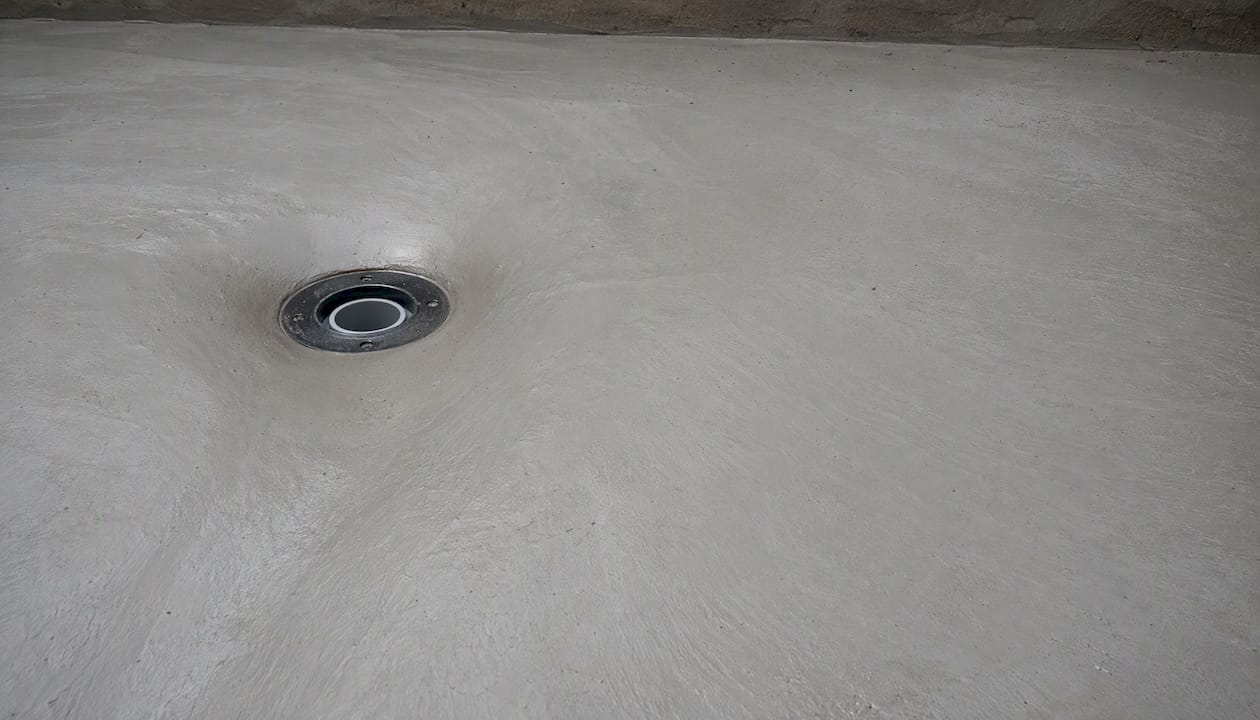
Outlet design deserves the same scrutiny as the membrane itself. The outlet flange needs to sit below the surrounding screed or finish level, so water is drawn towards the drain rather than pooling around it. Practical guidance on flat roof drainage from Paragon Roofing makes the same point from a different climate: cross-falls feeding into strategically placed outlets matter more than raw membrane quality once the basic waterproofing is sound.
On a larger deck, multiple outlets beat a single central drain almost every time, because a blocked leaf-strainer on one outlet shouldn’t mean the whole deck floods. Overflow provisions, a scupper or secondary outlet set slightly higher than the primary drain, catch the failure of a blocked or undersized outlet before water backs up over an upstand. Get the falls and outlets right at design stage, and half the common failure modes covered earlier simply never arise.
An experienced installer’s field note
The single biggest predictor of a job lasting is whether the crew actually checked substrate dryness before priming, not whether they used a premium membrane. On handover, I always tell owners: keep the flood test photos and the batch certificates somewhere safe. That paperwork is what saves you when a warranty claim comes up years later.
Get your concrete deck inspected and specified properly
Prowaterproofing works directly with property owners, building managers, and contractors who need a concrete roof deck specified, installed, or tested to the standards covered above, without the guesswork that turns a five-year warranty into a two-year repair bill. Where a generic contractor might skip the flood test or dress an outlet in five minutes flat, Prowaterproofing builds substrate verification, correct upstand and fillet detailing, and a proper 48 to 72 hour flood test into every project from the start.

If you’re planning new construction, refurbishing a failed deck, or simply want a second opinion before signing off on someone else’s spec, get in touch through Pro Waterproofing to arrange a substrate inspection or request a specification pack tailored to your deck type. A flood test on completion is part of the process, not an optional extra.
Sources
- SANS 10400 PART L: Roofs (excerpts)
- PW371A General Specification (Public Works) — waterproofing guidance and materials
- Waterproofing concrete slabs — Afrisam technical notes
- Derbigum specification for cast‑in‑place concrete parking decks
- Waterproofing of parking decks – The old and new systems (a.b.e.)