TL;DR:
- Basement foundation construction involves designing and building below-ground structures that support buildings and enclose usable space. Proper execution of excavation, wall material selection, waterproofing, drainage, and slab placement is essential to ensure long-term structural and moisture stability. Integrating these elements according to regional codes and site conditions prevents costly failures and maintains basement usability.
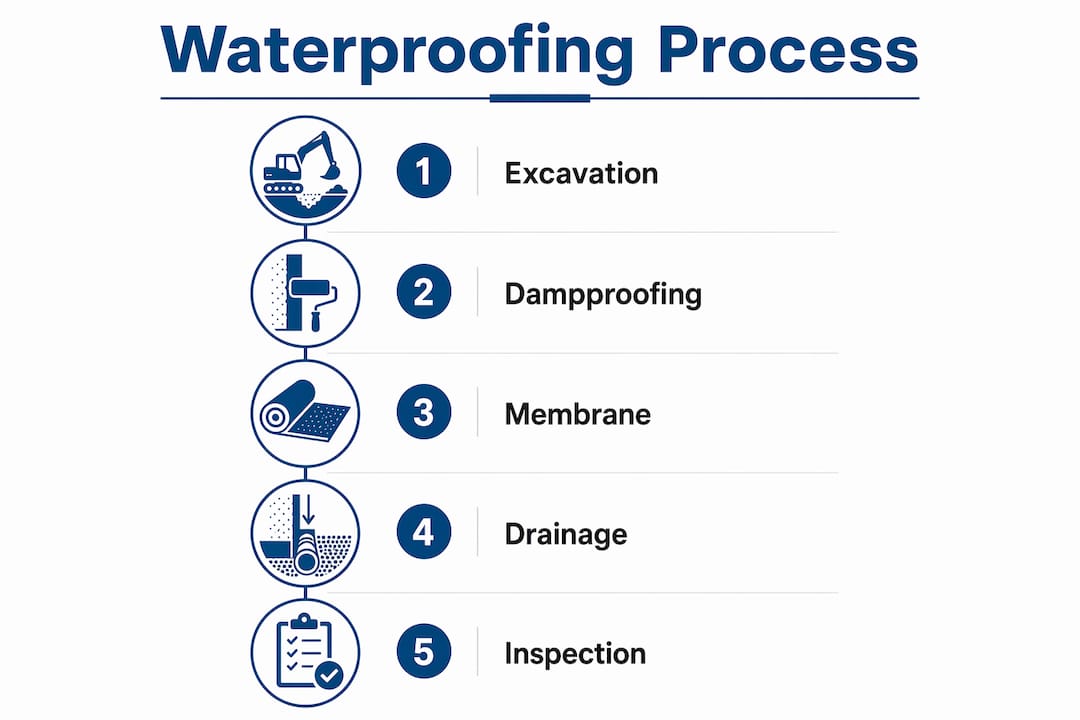
Basement foundation construction refers to the design and building of a below-ground structural system that supports a building’s loads while enclosing habitable or usable space. The process spans excavation below frost depth, selection of wall materials such as cast-in-place concrete, concrete masonry units (CMU), or insulated concrete forms (ICF), through to waterproofing, drainage, and floor slab installation. In South Africa and internationally, residential basement foundations are governed by codes such as the IRC Chapter 4 and IBC, with IRC governing one- and two-family dwellings up to three storeys. Getting each phase right determines whether a basement stays dry and structurally sound for decades.
What are the main basement foundation types and wall materials?
The three dominant wall systems used in basement foundation construction are cast-in-place concrete, CMU, and ICF. Each carries distinct trade-offs across durability, thermal performance, cost, and construction complexity.
Cast-in-place concrete is the most widely used system for residential basements. Formwork is erected, reinforcement steel is placed to ACI 318 schedules, and concrete is poured in a single continuous operation. An 8-inch concrete wall can support up to 7 feet 4 inches of unbalanced fill height under IRC R404.1 tables, making it the default choice for deeper excavations. The result is a monolithic wall with no mortar joints, which reduces potential water entry points.
CMU walls suit projects where ready-mix concrete delivery is impractical or where phased construction is preferred. The critical quality factor is proper bed-joint thickness, which must fall between 1/4 and 3/4 inch, combined with full grout coverage around reinforcement bars. Inadequate grout clearance is one of the most common causes of CMU wall failures under lateral soil pressure.
ICF walls pour concrete inside interlocking foam forms that remain in place permanently. ICF basement walls deliver high thermal performance and reduce condensation risk, but they require careful attention to drainage system integration and backfill pressure management during construction.
| Wall type | Durability | Thermal performance | Relative cost | Key risk |
|---|---|---|---|---|
| Cast-in-place concrete | Very high | Moderate | Medium | Formwork cost and lead time |
| CMU | High | Low | Lower | Grout and joint quality |
| ICF | Very high | High | Higher | Drainage detailing at foam interface |
Pro Tip: Specify the wall system before excavation begins. Switching from CMU to cast-in-place mid-project adds significant cost and delays, because footing dimensions and reinforcement layouts differ between systems.
How do frost depth and soil conditions affect foundation design?
Frost depth is the single most variable factor in basement foundation design across different regions. Frost depth requirements range from zero inches in South Florida to over 72 inches in northern US states, and IRC Table R301.2(1) sets the regional minimums that footings must satisfy. In South Africa, frost is rarely a design driver, but soil bearing capacity and seasonal moisture variation are equally consequential.
Footings must extend below the local frost line and, at minimum, 12 inches below undisturbed ground surface per IRC R403.1.4. This rule exists because soil above the frost line expands when it freezes, generating uplift forces that crack footings and walls. A footing that sits even slightly above the frost line can heave enough to compromise the entire superstructure above it.
Soil bearing capacity assessment is the second critical variable. Clay-heavy soils expand when wet and contract when dry, creating cyclical lateral pressure against basement walls. Sandy or gravelly soils drain freely but may have lower bearing capacity. Before finalising footing dimensions, a geotechnical assessment or at minimum a visual soil classification should inform the design. Where bearing capacity is marginal, wider spread footings or engineered pile solutions are required.
Frost-protected shallow foundations (FPSF) offer an alternative where excavation depth is constrained. FPSF systems use insulation panels around the perimeter to keep soil temperatures above freezing, allowing shallower footings. They are code-compliant under IRC Appendix F but require careful thermal modelling to confirm effectiveness in the specific climate zone.
- Confirm local frost depth from the authority having jurisdiction (AHJ) before designing footings.
- Commission a soil bearing capacity test or geotechnical report for sites with clay, fill, or unknown soil history.
- Set footing depth to exceed frost depth by at least 50 mm as a safety margin.
- Document all inspection hold points for footing depth and soil conditions before pouring concrete.
- Where FPSF is considered, obtain engineer sign-off and confirm AHJ acceptance before proceeding.
The boundary between prescriptive code design and engineered design depends on soil conditions, fill height, surcharge loading, and project scope. When any of these factors fall outside standard IRC tables, a professional engineer’s input becomes mandatory.
What are the best practices for waterproofing and drainage in basement foundations?
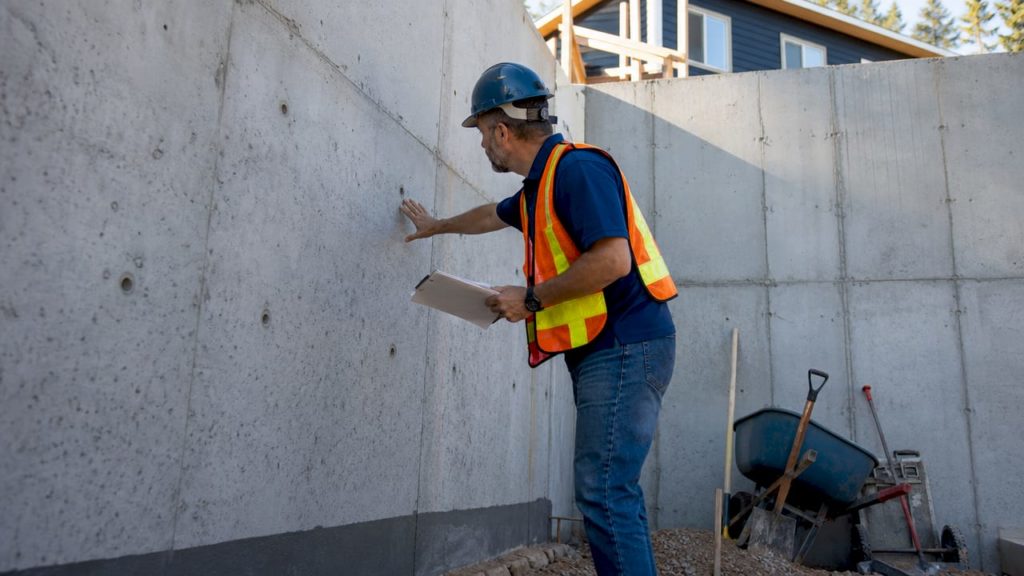
Waterproofing and drainage are not optional upgrades. They are structural requirements that determine whether a basement remains usable over its lifespan. The IRC draws a clear line between dampproofing and waterproofing: dampproofing suits low or no hydrostatic pressure conditions, while waterproofing membranes are required wherever hydrostatic head is present, because they resist both positive and negative pressure.
Dampproofing typically consists of a bituminous coating applied to the exterior wall face. It prevents moisture migration through capillary action but will not hold back standing water. Waterproofing membranes, by contrast, form a continuous barrier engineered to ASTM standards. Sheet-applied membranes such as modified bitumen or HDPE sheets are mechanically fastened or adhered to the wall before backfill. Fluid-applied membranes are sprayed or rolled on and cure to form a seamless coating that bridges minor cracks. For a detailed comparison of these approaches, the basement waterproofing techniques guide from Prowaterproofing covers membrane selection in depth.
Perimeter drainage systems are mandated by IRC R405.1 wherever foundation walls retain earth and enclose below-grade spaces. A standard installation uses perforated pipe placed at or below basement floor level, surrounded by clean gravel or a drainage board composite, discharging to daylight or a sump pump. This drainage path manages groundwater before it builds hydrostatic pressure against the membrane.
Sequencing matters as much as product selection. Exterior waterproofing membranes must be applied and inspected before backfill begins. Backfilling over an uninspected or damaged membrane is one of the most expensive mistakes in basement construction, because repair requires full re-excavation. Sealtek Cape’s foundation protection resources outline how membrane continuity at wall-to-footing transitions is the most common failure point.
Pro Tip: Install a drainage board or dimple mat over the waterproofing membrane before backfilling. This protects the membrane from stone puncture during compaction and provides a secondary drainage path even if the perimeter pipe becomes partially blocked.
Common pitfalls to avoid:
- Applying dampproofing where waterproofing is required because of a high water table.
- Omitting gravel or drainage board and relying solely on native backfill soil.
- Failing to seal membrane laps and penetrations, which are the most frequent leak origins.
- Backfilling before the membrane adhesive has fully cured.
For property owners wanting to understand how drainage and waterproofing solutions interact across the full foundation system, Prowaterproofing’s resource library is a practical starting point.
What construction techniques prevent basement wall failures?
Structural failures in basement walls rarely result from a single cause. They typically arise from a combination of premature backfilling, poor reinforcement placement, and inadequate curing. Understanding the correct sequence prevents the majority of these failures.
The most damaging error contractors make is backfilling walls too soon after construction. Lateral soil pressure against an unbraced or partially cured wall generates bending forces the wall cannot yet resist. The result is cracking that is often misdiagnosed as a waterproofing failure when it is actually structural damage. Walls must be braced or supported by first-floor framing before any backfill is placed.
For CMU walls, reinforcement effectiveness depends on full grout coverage with appropriate clearances around every bar. Grout must be consolidated by vibration or rodding to eliminate voids. A wall with poorly grouted cells has significantly lower lateral resistance than the design assumes, regardless of how carefully the reinforcement was placed.
Concrete mix strength for cast-in-place walls should meet a minimum of 25 MPa at 28 days for residential applications, with curing maintained for at least seven days using wet curing or curing compound. Stripping formwork before adequate strength is reached exposes the wall to soil pressure before it can carry the load.
- Install first-floor framing or temporary bracing before any backfill operation begins.
- Verify reinforcement placement and clearances at an inspection hold point before pouring or grouting.
- Confirm concrete mix design meets specified strength and document batch tickets.
- Maintain curing for a minimum of seven days before stripping forms.
- Conduct a post-backfill inspection to identify any cracking or movement before finishing work proceeds.
Pro Tip: Photograph reinforcement placement and formwork alignment before every pour. These images are your defence if a dispute arises during inspection or if cracking appears later.
How does the basement floor slab integrate with the foundation system?
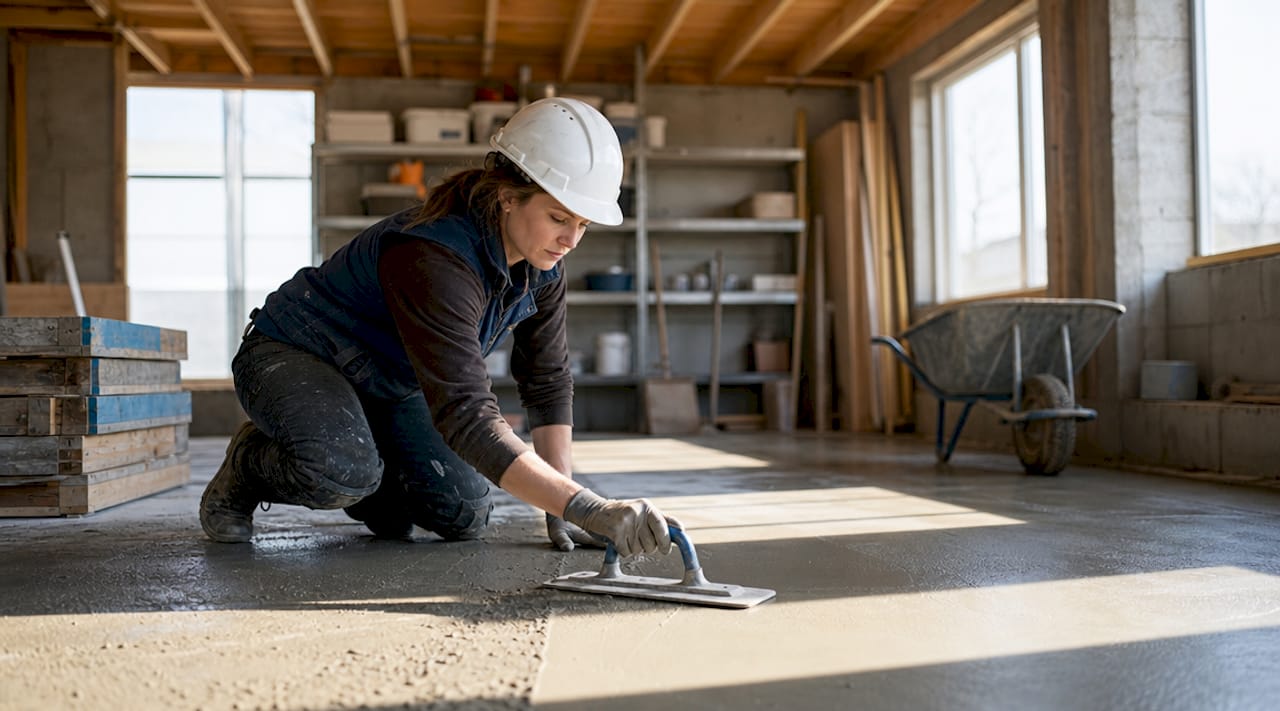
The basement floor slab is the final structural element that ties the foundation system together. Concrete basement slabs are typically poured at a minimum thickness of 3.5 inches per IRC provisions, with common practice favouring 4 inches for improved durability under foot traffic and point loads.
Substrate preparation beneath the slab is non-negotiable. A compacted granular base of at least 100 mm provides a stable, free-draining layer that prevents differential settlement and reduces capillary moisture rise. Placing concrete directly on clay or disturbed fill leads to cracking and heave.
A vapour barrier of minimum 0.15 mm polyethylene sheeting must be installed over the granular base before pouring. This barrier prevents ground moisture from migrating through the slab and causing dampness, mould, or adhesive failures in floor finishes. Laps should overlap by at least 300 mm and be taped at seams.
Key considerations for slab installation:
- Pour the slab only after wall waterproofing and perimeter drainage are complete and inspected.
- Tie slab reinforcement or mesh to the wall base where structural continuity is specified.
- Cure the slab for a minimum of seven days before applying any floor finishes or loading.
- Inspect for cracking at 28 days and address any shrinkage cracks before finishing.
Sequencing the slab pour after wall completion and waterproofing protects the membrane from construction traffic and prevents contamination of the granular base during wall work. TT Waterproofing’s basement slab moisture guidance provides additional detail on vapour control beneath slabs in high-moisture environments.
Key takeaways
Successful basement foundation construction requires coordinated execution across excavation, wall construction, waterproofing, drainage, and slab installation, with each phase inspected before the next begins.
| Point | Details |
|---|---|
| Wall material selection | Choose cast-in-place concrete, CMU, or ICF based on site conditions, depth, and thermal requirements before excavation. |
| Frost depth and soil assessment | Footings must extend below local frost depth and be sized for actual soil bearing capacity, not assumed values. |
| Waterproofing vs dampproofing | Use waterproofing membranes wherever hydrostatic pressure exists; dampproofing alone is insufficient for high water table sites. |
| Drainage system integration | Install perimeter drains per IRC R405.1 and protect membranes with drainage boards before backfilling. |
| Backfill sequencing | Never backfill until walls are braced or supported by first-floor framing to prevent structural cracking. |
What I have learned from years of basement foundation projects
The most persistent misconception I encounter is that waterproofing and drainage are separate concerns. Property owners and even some contractors treat the membrane as the waterproofing system and the drain as a backup. In practice, they are one system. A perfect membrane with a blocked or undersized drain will still fail under sustained hydrostatic pressure. A functioning drain with a compromised membrane will eventually allow water ingress at every lap and penetration. The two elements only work when they are designed and installed together.
I have also seen more wall failures caused by premature backfilling than by any other single error. The pressure to get backfill in and restore site access is real on every project. But a cracked CMU wall that looks like a waterproofing problem costs far more to fix than the day or two saved by rushing. Bracing or waiting for first-floor framing is not optional. It is the difference between a sound structure and an expensive repair.
Material selection deserves more attention than it typically receives at tender stage. ICF walls perform exceptionally well thermally and resist moisture migration effectively, but they require drainage detailing at the foam-to-footing interface that many contractors are not familiar with. CMU walls are economical and flexible, but only when grout consolidation is done properly. Choosing a wall system based on price alone, without considering the site’s soil and water conditions, is where most long-term problems originate.
My consistent advice: engage a waterproofing specialist at design stage, not after the walls are up. The cost of integrating drainage and membrane systems into the original design is a fraction of the cost of retrofitting them after moisture problems appear.
— Eben
Protect your basement foundation with expert waterproofing
Basement foundation construction demands more than structural competence. It requires a waterproofing and drainage strategy that is integrated from day one.

Prowaterproofing specialises in basement foundation waterproofing for residential, commercial, and industrial properties across South Africa. The team installs membrane systems, perimeter drainage, and sump solutions that meet code requirements and are tailored to your site’s specific soil and water conditions. Whether you are building a new basement or addressing moisture problems in an existing one, Prowaterproofing provides assessments, specifications, and installation by experienced contractors. Contact Prowaterproofing for a site-specific quote and avoid the costly mistakes that come from treating waterproofing as an afterthought.
FAQ
What is the minimum footing depth for a basement foundation?
Footings must extend below the local frost depth and at least 12 inches below undisturbed ground surface per IRC R403.1.4. The exact depth varies by region, from zero inches in warm climates to over 72 inches in cold northern zones.
What is the difference between dampproofing and waterproofing a basement?
Dampproofing prevents moisture migration under low-pressure conditions, while waterproofing membranes resist hydrostatic pressure from standing groundwater. Where a high water table exists, waterproofing membranes are required, not dampproofing.
How thick should a concrete basement wall be?
An 8-inch cast-in-place concrete wall is sufficient for up to 7 feet 4 inches of unbalanced fill height under IRC R404.1 tables. Greater fill heights or unusual soil conditions require thicker walls or engineered reinforcement schedules.
When should the basement floor slab be poured?
The slab should be poured after wall construction, waterproofing, and perimeter drainage are complete and have passed inspection. Pouring the slab before waterproofing is finished risks damaging the membrane and contaminating the granular base.
Do basement walls need drainage as well as waterproofing?
Yes. IRC R405.1 mandates perimeter drainage systems wherever foundation walls retain earth and enclose below-grade spaces. Drainage manages groundwater before it builds pressure against the membrane, and the two systems must function together for long-term performance.