TL;DR:
- Exterior basement waterproofing involves installing physical barriers and drainage systems outside the foundation to prevent water ingress at its source. Proper excavation, membrane application, and drainage system installation are essential for a durable long-term solution that stops moisture before it reaches the basement walls.
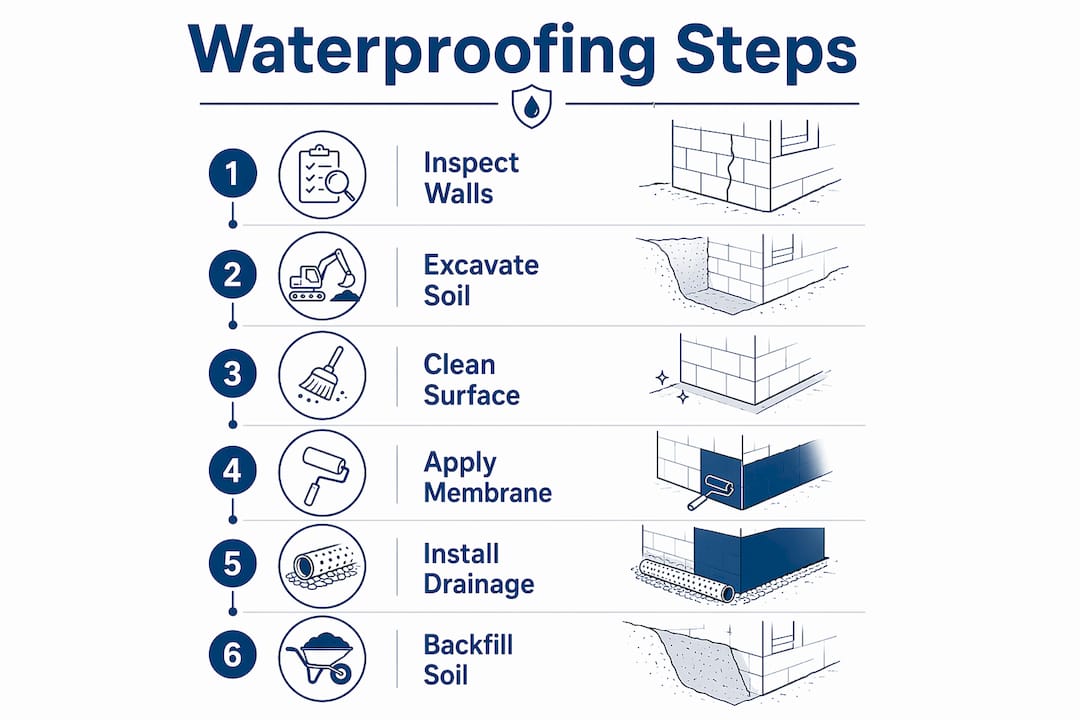
Exterior basement waterproofing is defined as the process of applying physical barriers, drainage systems, and grading corrections directly to the outside of your foundation walls to prevent water ingress at its source. Unlike interior methods that manage water after it enters, exterior waterproofing stops moisture before it ever reaches the wall. The process covers inspection, excavation, crack repair, waterproof membrane application, footing drain installation, and yard regrading. Materials include bituminous or polymer-modified membranes, polyurethane sealants, perforated PVC drainage pipe, and non-woven geotextile fabric. Done correctly, this approach is the most durable long-term basement waterproofing solution available to homeowners and property managers.
How to waterproof a basement from outside: preparation and materials
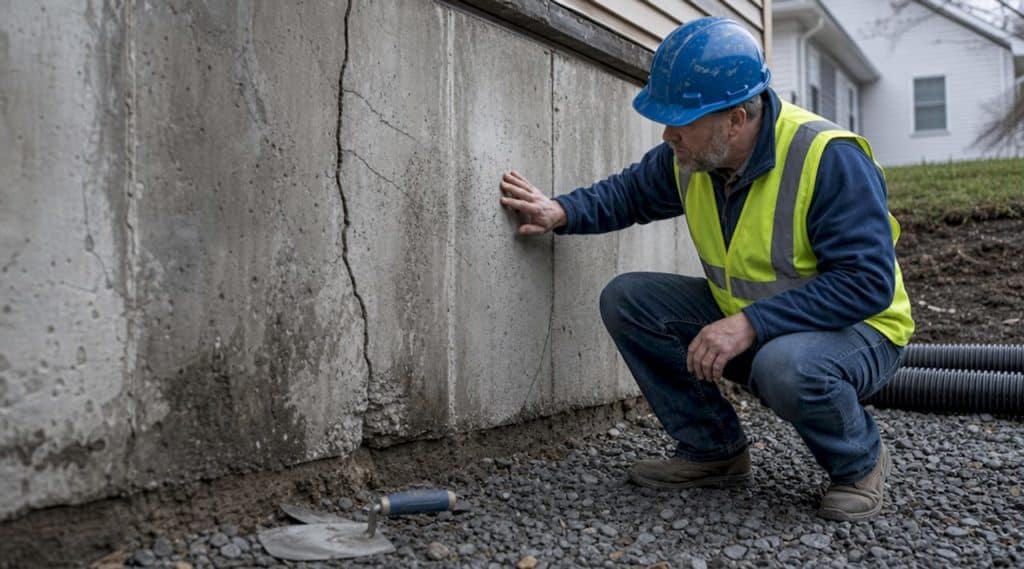
Before any excavation begins, a thorough inspection of your basement walls is non-negotiable. Look for visible cracks, efflorescence (white salt deposits), water stains, mould growth, and any signs of soil settlement around the foundation perimeter. These indicators tell you where water is entering and how severe the problem is.
The IRC 2024 code mandates full waterproofing rather than dampproofing when groundwater sits within 24 inches of finished grade or when saturated soil conditions cause standing water against foundations. This distinction matters because dampproofing alone will fail under sustained hydrostatic pressure.
Materials you will need:
- Excavation tools: shovels, pickaxes, and a hired backhoe for deeper foundations
- Waterproof membrane: bituminous sheet, fluid-applied polymer, or crystalline coating
- Polyurethane or cementitious crack sealant
- Perforated PVC drainage pipe (100mm diameter is standard)
- Non-woven geotextile filter fabric
- Clean drainage gravel (20mm aggregate)
- Dimple drainage board for membrane protection
Check local authority requirements before excavating. Many municipalities require a permit for excavations deeper than one metre, and working near boundary walls or trees adds further complexity. Contact your local building department before you lift a spade.
Pro Tip: Take photographs of every wall section before excavation. These images become your baseline reference for crack locations and help you verify that all defects have been addressed before the membrane goes on.
How to excavate and prepare exterior foundation walls
Excavation depth commonly reaches foundation footing level, which is typically between 1.8 and 2.4 metres below grade. This depth exposes the full height of the foundation wall so the membrane can be applied continuously from footing to surface. Partial excavation is one of the most common mistakes homeowners make, and it always results in water finding the unprotected section.
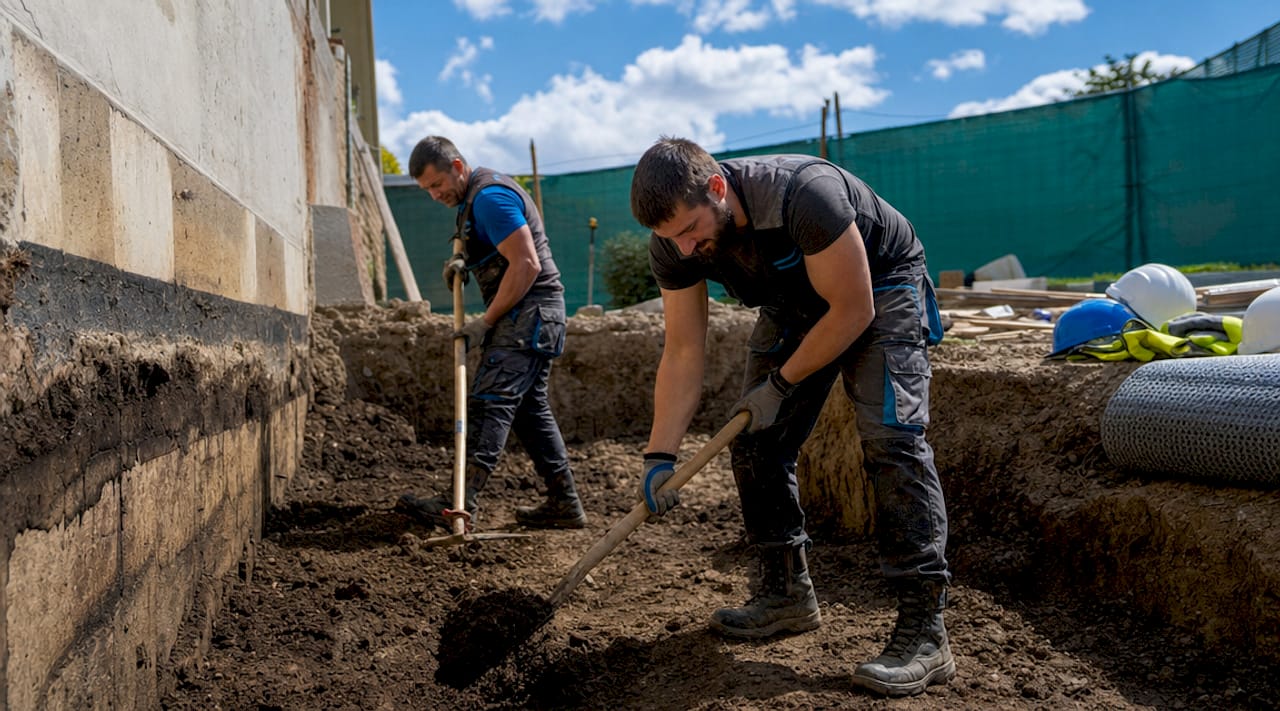
Work in manageable sections of roughly two metres at a time. This limits soil exposure and reduces the risk of wall collapse or undermining adjacent structures. If your foundation sits close to a driveway, retaining wall, or mature tree, consult a structural engineer before proceeding.
Once the wall is exposed, the preparation sequence is:
- Remove all loose soil, old coatings, and debris from the wall surface
- Use a wire brush or pressure washer to clean the concrete or masonry thoroughly
- Allow the surface to dry completely before applying any sealant or membrane
- Fill all cracks wider than 0.3mm with a flexible polyurethane sealant or hydraulic cement
- Apply a cementitious skim coat over the entire surface to create a smooth, even substrate
A smooth, clean, dry wall is the single most important factor in membrane adhesion. Any contamination, moisture, or surface irregularity creates a weak point where water will eventually find its way through.
Pro Tip: If you discover honeycombing (voids in the concrete) during excavation, fill these with a non-shrink grout before applying any membrane. Honeycombing is far more common in older foundations and will cause membrane delamination if left untreated.
For a detailed breakdown of exterior crack repair methods, Prowaterproofing covers the preparatory stages in full.
Which waterproof membranes work best on exterior basement walls?
The membrane is the primary defence layer, and choosing the right type for your soil conditions, climate, and budget determines how long the system lasts. The four main options each have distinct performance profiles.
| Membrane type | Best application | Key advantage | Key limitation |
|---|---|---|---|
| Bituminous sheet membrane | New construction, flat walls | High puncture resistance, proven track record | Requires primer, less flexible at cold temperatures |
| Fluid-applied polymer coating | Irregular surfaces, retrofit projects | Seamless application, bridges minor cracks | Requires multiple coats, sensitive to moisture during cure |
| Crystalline waterproofing | Concrete foundations specifically | Self-sealing if cracks develop later | Not suitable for masonry or block walls |
| Bentonite clay panels | High water table conditions | Swells to seal against water pressure | Can dry out and shrink in low-moisture soils |
Application follows a consistent sequence regardless of membrane type. Prime the wall surface according to the manufacturer’s specification. Apply the membrane from the footing upward, overlapping horizontal seams by a minimum of 75mm and vertical seams by 150mm. Pay particular attention to corners, pipe penetrations, and wall-to-footing junctions. These transitions are where installation errors at overlaps cause the majority of post-installation leaks.
Once the membrane is cured, install a dimple drainage board over the entire waterproofed surface before backfilling. This board serves two functions: it protects the membrane from backfill damage, and it channels any residual water downward toward the footing drain rather than allowing it to build pressure against the membrane.
Pro Tip: Never backfill directly against a freshly applied fluid membrane. Allow full cure time as stated on the product data sheet, which is typically 24 to 48 hours depending on temperature and humidity. Premature backfilling is the leading cause of membrane failure on DIY projects.
You can explore practical membrane application techniques further through Prowaterproofing’s dedicated guide.
How to install a drainage system alongside exterior waterproofing
A membrane alone is insufficient. Waterproofing barriers without drainage fail under hydrostatic pressure because water accumulates against the wall and eventually finds any weakness. The footing drain, also called a French drain, relieves this pressure by intercepting groundwater before it builds up.
Installation follows this sequence:
- Excavate a trench at footing level, wide enough to accommodate the drainage pipe and a 150mm gravel bed beneath it
- Lay a continuous sheet of non-woven geotextile fabric into the trench, with enough excess to wrap over the top of the gravel once filled
- Place 150mm of clean 20mm aggregate on the fabric base
- Position the perforated PVC pipe with the perforations facing downward, not upward
- Cover the pipe with a further 300mm of gravel
- Fold the geotextile fabric over the top of the gravel to form a complete envelope
This technique, known as the Burrito Method, wraps the entire gravel trench in fabric rather than just sleeving the pipe. Pre-wrapped sock pipes clog with silt within a few years. The fabric-wrapped trench approach extends drain life significantly by preventing fine soil particles from migrating into the gravel.
Slope is equally critical. Footing drains require a minimum slope of 0.5%, which equals roughly 25mm of drop for every 5 metres of pipe run. Without adequate slope, water sits in the pipe and the drain provides no relief.
| Drain specification | Recommended value | Reason |
|---|---|---|
| Pipe diameter | 100mm (4 inch) | Handles typical residential flow volumes |
| Minimum slope | 0.5% (25mm per 5m) | Gravity drainage without pumping |
| Gravel depth below pipe | 150mm | Prevents pipe from sitting in silt |
| Gravel cover above pipe | 300mm | Adequate filtration zone |
| Fabric overlap at top | 300mm minimum | Prevents soil contamination |
Route the outlet pipe to a storm drain, soak pit, or daylight discharge point well away from the foundation. Inspect and clear the outlet point annually. Clogged drainage outlets are the leading cause of waterproofing system failure even when the membrane itself is intact.
Pro Tip: Install a rodding eye (cleanout access point) at each corner of the drain run. This allows you to flush the pipe with a garden hose every few years without excavating.
Backfilling, regrading, and long-term maintenance
Backfilling is the stage where most DIY projects undo their own good work. Dropping large rocks or compacted clay directly against the membrane and drainage board causes punctures and displacement. Use clean granular fill (sand or fine gravel) for the first 300mm directly against the wall, then transition to native soil above that level.
Compact the backfill in layers of no more than 200mm using a hand tamper rather than mechanical compaction equipment near the wall. Mechanical compaction creates lateral pressure that can crack the membrane or shift the drainage pipe out of alignment.
Once backfilling is complete, regrade the soil surface to slope away from the foundation at approximately 5% over the first two metres. This means the ground drops roughly 100mm over two metres as it moves away from the wall. This surface grading is your first line of defence against surface water pooling at the foundation.
Ongoing maintenance checklist:
- Inspect gutters and downspouts twice yearly and clear any blockages
- Check that downspout extensions discharge at least 1.5 metres from the foundation
- Verify the soil grade has not settled back toward the wall after heavy rain
- Inspect drainage outlet points annually and flush if flow appears restricted
- Check basement walls internally for any new moisture staining after heavy rainfall
Maintaining gutters and gutter guards is often overlooked in basement waterproofing discussions, but a blocked gutter that overflows at the foundation line can overwhelm even a well-installed exterior system. Also review the essential waterproofing steps annually to confirm your system remains complete and functional.
Pro Tip: Photograph the finished grade profile at multiple points around the foundation immediately after completion. Compare these photos each spring to identify any settlement that needs correcting before the rainy season.
Key takeaways
Exterior basement waterproofing works only when membrane continuity, drainage slope, and surface grading function together as a coordinated system.
| Point | Details |
|---|---|
| Inspect before excavating | Identify cracks, mould, and grading issues to plan the correct repair scope. |
| Membrane choice matters | Match membrane type to wall material and soil conditions for lasting adhesion. |
| Drainage is non-negotiable | A footing drain with correct slope relieves hydrostatic pressure and protects the membrane. |
| Use the Burrito Method | Wrap the entire gravel trench in geotextile fabric to prevent silt clogging over time. |
| Maintain the system annually | Clear drainage outlets, check grades, and inspect gutters to prevent long-term failure. |
Why most exterior waterproofing projects fail before they start
After working on and reviewing dozens of exterior waterproofing projects across South Africa, the pattern of failure is almost always the same. It is not the membrane that fails first. It is the drainage.
Homeowners invest in quality bituminous or polymer membranes, follow application instructions carefully, and then install a drainage pipe with almost no slope because the trench is already dug and adjusting it feels like too much extra work. Six months later, water backs up in the pipe, pressure builds against the membrane, and a seam gives way. The membrane gets blamed. The drain was the problem.
The second most common failure I see is premature backfilling. A fluid-applied membrane that has not fully cured looks dry on the surface but remains soft underneath. Backfill pressure causes delamination, and the homeowner does not discover it until water appears inside the basement two rainy seasons later.
The uncomfortable truth about exterior waterproofing is that it rewards patience and punishes shortcuts. The excavation is expensive, the preparation is tedious, and the temptation to rush the backfilling stage is real. But every hour spent on correct slope, proper fabric wrapping, and full membrane cure time is worth more than any premium product you could specify.
My honest recommendation: if your foundation has more than three active cracks, or if the excavation depth exceeds two metres, bring in a professional for at least the inspection and membrane stages. The cost of getting it wrong is always higher than the cost of getting it right the first time.
— Eben
Get expert exterior waterproofing from Prowaterproofing
Exterior basement waterproofing is a high-stakes project where the quality of execution determines whether your foundation stays dry for decades or develops problems within a few years.

Prowaterproofing provides professional exterior basement waterproofing services across South Africa, covering full excavation, membrane application, footing drain installation, and post-project grading. Every project includes a detailed site inspection before work begins and a workmanship warranty on completion. If you are dealing with persistent damp, visible cracks, or a high water table, contact Prowaterproofing for a professional assessment and quote tailored to your property.
FAQ
What is the difference between dampproofing and waterproofing?
Dampproofing resists moisture vapour but cannot withstand sustained water pressure. Full waterproofing, using membranes and drainage systems, is required when groundwater sits within 24 inches of finished grade or when saturated soil conditions exist.
How deep does excavation need to go for exterior waterproofing?
Excavation typically reaches foundation footing level, which is between 1.8 and 2.4 metres below grade. This depth allows the membrane to be applied continuously across the full wall height without gaps.
Can I waterproof a basement exterior wall myself?
DIY exterior waterproofing is feasible for shallow foundations with minor cracking, but projects involving deep excavation, structural cracks, or high water table conditions carry significant risk and are best handled by a qualified contractor.
How long does an exterior waterproofing system last?
A correctly installed system using a quality membrane, properly sloped footing drain, and geotextile-wrapped gravel trench can last 20 to 30 years with annual maintenance of drainage outlets and surface grading.
Why is the Burrito Method better for French drains?
Wrapping the entire gravel trench in non-woven geotextile fabric prevents fine soil particles from migrating into the aggregate over time. Pre-wrapped sock pipes clog significantly faster, reducing drain effectiveness within a few years of installation.