
TL;DR:
- Effective waterproofing involves a continuous, multi-layer membrane system designed to prevent water ingress at the structural level rather than relying on surface treatments. Visual indicators vary depending on the system type and location, with proper installations including drainage boards, sealed seams, and documented quality assurance; deficiencies are often revealed by thin coatings, unsealed joints, or lack of protective layers. Assessing waterproofing quality requires inspecting junctions, performing water tests, and demanding comprehensive documentation to avoid costly future damage.
Waterproofing is defined as a continuous, impermeable barrier system applied to a building’s structure to prevent water penetration at the substrate level, not merely at the surface. Unlike decorative finishes such as tiles, paint, or grout, true waterproofing works beneath what you can see, forming a sealed membrane between the building material and any moisture source. Common waterproofing materials include liquid-applied membranes, torch-on sheet membranes, crystalline treatments, and integral concrete admixtures. Knowing what does waterproofing look like in practice helps property owners and buyers distinguish genuine protection from cosmetic surface treatments that fail under sustained water pressure.
What does waterproofing look like across different system types?
The visual appearance of waterproofing depends entirely on which system has been installed, and each type looks quite different during and after application.
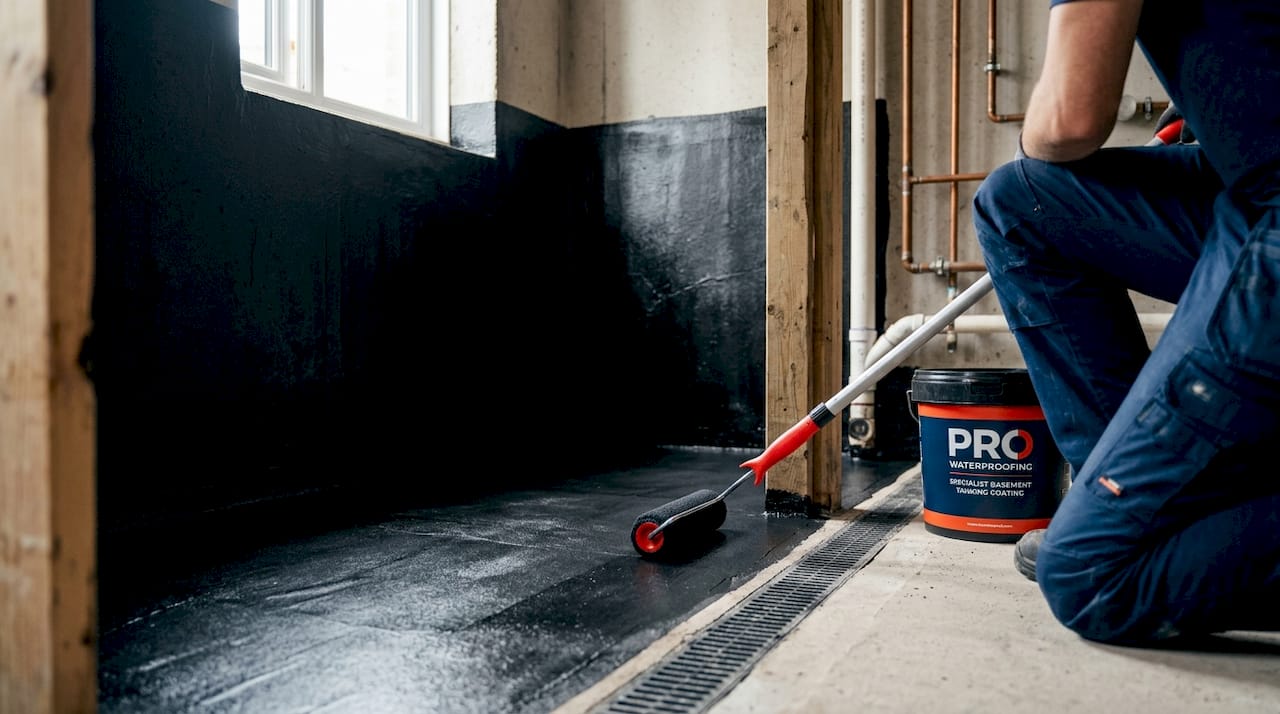
Liquid-applied membranes are the most recognisable. Applied by brush, roller, or spray, they cure into a seamless, flexible film that covers the entire substrate without joints. Colours are typically black, dark grey, or occasionally grey-green depending on the product. Polyurea membranes achieve elongation values exceeding 1000%, forming a monolithic film 60 to 80 mils thick. That thickness and elasticity is what separates them visually and functionally from a thin paint coat.
Sheet membranes look like rolls of heavy-duty material, either self-adhesive or torch-on bituminous sheets. During installation, you will see overlapping laps at seams, heat-welded or pressed joins, and a textured or granulated surface. After installation, they present a uniform dark surface, often protected by a drainage board before backfill covers them.
Crystalline waterproofing is largely invisible once applied. It is either mixed into concrete as an admixture or brushed on as a grey slurry coat. The active chemistry reacts with free lime in the concrete to fill capillary pores and cracks up to 0.4 mm wide. Once cured, the surface looks like ordinary concrete with a slightly denser finish.
Integral admixtures produce no visible surface change at all. The waterproofing exists within the concrete mass itself, which is why documentation and specification sheets are the only way to confirm their presence.
- Liquid membranes: seamless, flexible, black or grey film, 1.5 to 3 mm thick
- Sheet membranes: visible seams and laps during installation, granulated dark surface
- Crystalline slurry: matte grey coat, often indistinguishable from concrete once dry
- Integral admixtures: no visible surface change, confirmed by specification only
Pro Tip: Ask your contractor to photograph the membrane before any drainage board or backfill covers it. This is the only visual record you will have of what was actually installed.
How does waterproofing look in basements, bathrooms, and foundations?
The appearance of waterproofing changes significantly depending on where in the building it is applied. Understanding each zone helps you know what to look for during an inspection or renovation.
Basement and foundation waterproofing
Exterior basement waterproofing is applied to the outside face of the foundation wall before the soil is backfilled. During construction, you would see a thick, continuous black or dark grey membrane coating the entire wall from the footing upward. Drainage boards or protection mats are then fixed over the membrane to prevent punctures during backfill and to channel water away from the wall. These boards are typically dimpled plastic sheets, and their presence is a reliable visual indicator that proper exterior waterproofing was carried out.
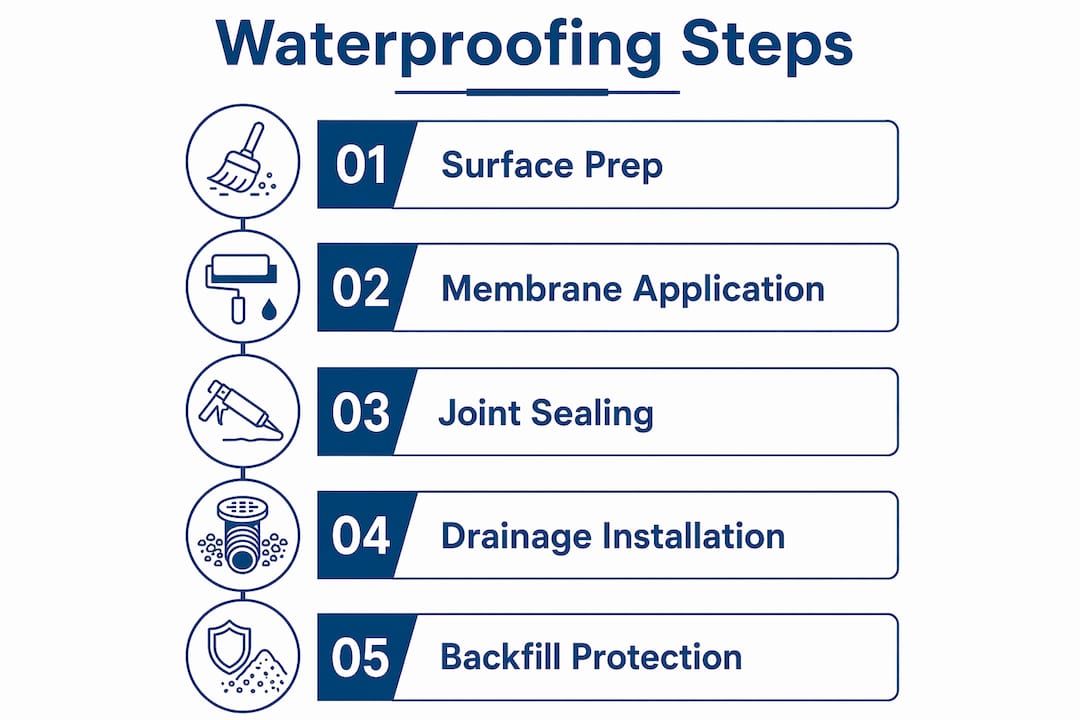
At the footing-to-wall junction, a quality installation includes a coved fillet or sealant bead to prevent water from pooling at the cold joint. Exterior membranes are the only reliable long-term protection against wet basements because they intercept water before it contacts the structure. Interior coatings manage symptoms but do not stop water entry. This distinction matters enormously when you are assessing a property.
Bathroom and wet area waterproofing
Bathroom waterproofing is almost entirely hidden beneath tiles and finishes, which is precisely why so many people mistake grout and silicone for the waterproofing layer. A properly waterproofed shower or bathroom area includes sealed seams and reinforced corners underneath the tiles, not just surface grout. The visible components during installation include moisture-resistant backer boards fixed to the wall framing, a liquid membrane or sheet membrane applied over the boards, and fabric reinforcement tape pressed into wet membrane at all corners and seams.
| Zone | What waterproofing looks like | Key visual indicator |
|---|---|---|
| Exterior foundation | Thick black or grey membrane, covered by dimpled drainage board | Drainage board visible before backfill |
| Basement interior | Crystalline slurry or cementitious coat on walls and floor | Uniform grey matte finish on concrete |
| Bathroom walls | Liquid membrane behind tiles, fabric tape at corners | Visible during renovation or tile removal |
| Shower floor | Sheet or liquid membrane in shower pan, sloped to drain | Confirmed by water hold test |
| Roof deck | Torch-on or liquid membrane, sometimes with reflective finish | Granulated or smooth dark surface |
What are the visual signs of poor or incomplete waterproofing?
Identifying inadequate waterproofing before you buy or renovate a property can save you from costly repairs. The most common errors are also the most visible, once you know what to look for.
-
Thin asphalt brush coats on foundations. Dampproofing appears as a thin, black brushed-on layer usually under 1 mm thick. It resists moisture vapour but cracks under hydrostatic pressure. If you see a thin black coat on a foundation with no drainage board over it, that is dampproofing, not waterproofing.
-
Unsealed seams and laps. Sheet membranes require fully bonded overlaps of at least 75 to 100 mm. Poorly installed membranes show lifted edges, bubbles, or gaps at seams. Water finds these gaps immediately under pressure.
-
Missing or incomplete detail work. Waterproofing failures most commonly occur at interfaces like pipe penetrations, corners, seams, and wall-footing junctions. A professional installation includes flashing, sealant beads, and reinforcement strips at every one of these points. If you see a membrane that simply stops at a pipe without any collar or sealant, the system is incomplete.
-
Relying on tiles and grout as waterproofing. Cement backer boards are moisture-resistant but absorb water over time. Grout is porous. Tiles crack. None of these constitute waterproofing. If a bathroom was tiled directly onto standard plasterboard or even cement board without a membrane layer, water will eventually reach the substrate.
-
Inconsistent membrane thickness. A liquid membrane applied too thinly in some areas will fail at those points first. Reputable contractors use wet film gauges during application to verify consistent coverage. Ask whether this step was carried out.
-
No drainage layer over exterior membranes. A membrane applied to a foundation wall without a protective drainage board is vulnerable to puncture during backfill and to root intrusion over time. The absence of this layer is a clear sign of a cost-cutting installation.
Pro Tip: When viewing a property, look for white salt deposits or efflorescence on basement walls. This crystalline residue is a reliable sign that water has been moving through the concrete, indicating absent or failed waterproofing.
For a detailed breakdown of errors that compromise entire systems, the common waterproofing mistakes contractors make are worth reviewing before you commission any work.
How to identify effective waterproofing during inspection or renovation
Assessing waterproofing quality requires a systematic approach. You cannot see most of it in a finished building, but there are reliable indicators that tell you whether the work was done properly.
During a property inspection, look for these physical signs:
- Dimpled drainage boards on exterior foundation walls, visible in any excavated or partially exposed section
- Uniform, unbroken membrane coverage with no visible gaps, bubbles, or lifted edges
- Fabric reinforcement tape at all internal corners in wet areas, visible if any tile has been removed
- Sealant beads or collars around all pipe penetrations through waterproofed surfaces
- Proper flashing details at roof-to-wall junctions, parapets, and any upstand
Testing methods that confirm waterproofing integrity:
A water hold test is the most reliable field test for shower pans and basement floors. The drain is plugged and the area is filled with water to a set depth for 24 hours. Any drop in water level indicates a breach. For exterior membranes, holiday testing uses an electrical detector to locate pinholes in the membrane before backfill. Ask your contractor whether either test was performed and request the results in writing.
Documentation to request:
Professional waterproofing installations should come with a specification sheet identifying the product used, the application rate, and the number of coats. Reputable contractors also provide a warranty, typically five to ten years for quality systems. If no documentation exists for a property you are considering buying, treat the waterproofing as unverified regardless of how it looks on the surface.
The liquid membrane guide from Prowaterproofing provides a useful reference for understanding what correctly specified and applied liquid systems should look like in 2026.
Key takeaways
Effective waterproofing is a multi-layer system of continuous membranes, sealed joints, and drainage protection that prevents water ingress at the structural level, not at the surface finish.
| Point | Details |
|---|---|
| Waterproofing vs dampproofing | Dampproofing is a thin coat under 1 mm; true waterproofing is a thick, multi-layer membrane system. |
| Liquid membranes look seamless | A correctly applied liquid membrane is black or grey, flexible, and free of joints or seams. |
| Bathroom waterproofing is hidden | The membrane sits behind tiles; grout and backer board alone do not constitute waterproofing. |
| Exterior foundation membranes | Drainage boards over the membrane are the visible indicator of a properly waterproofed foundation. |
| Inspect interfaces first | Corners, penetrations, and seams are where waterproofing fails most often; check these points first. |
What I have learned about spotting real waterproofing
Over years of assessing waterproofing installations across South African properties, the single most consistent finding is this: the majority of so-called waterproofed buildings have dampproofing, not waterproofing. The two look similar to an untrained eye, particularly on a foundation wall. One is a thin brushed coat. The other is an engineered membrane system. The difference in performance under hydrostatic pressure is enormous.
The places where waterproofing fails are almost never the flat, open surfaces. They are always the transitions. The point where a pipe exits a wall. The internal corner where a floor meets a wall in a shower. The cold joint between a footing and a wall. These are the details that separate a competent installation from one that will leak within three years. When I inspect a property, I spend more time looking at those junctions than at any broad surface.
My honest advice to any buyer or property owner is this: do not assume that because a building looks dry today, it is properly waterproofed. Moisture can travel laterally through concrete for months before appearing as a visible damp patch. The absence of visible water is not evidence of waterproofing. The presence of a documented, tested membrane system is. Invest in a professional assessment before you buy, and insist on documentation before you sign off on any waterproofing work. The cost of getting this wrong is always higher than the cost of getting it right the first time.
— Eben
Get expert waterproofing assessment from Prowaterproofing

Prowaterproofing provides professional waterproofing solutions for residential and commercial properties across South Africa, covering foundations, basements, bathrooms, and roof decks. Their installations use advanced liquid-applied membranes and torch-on sheet systems, with quality assurance steps including wet film gauge checks, holiday testing, and full detail sealing at all penetrations and junctions. If you are unsure whether your property has genuine waterproofing or simply a surface treatment, a professional assessment will give you a clear answer. Visit Prowaterproofing to request a consultation or quote, and get the documentation and warranty your property deserves.
FAQ
What does waterproofing look like on a foundation wall?
Exterior foundation waterproofing appears as a thick, continuous black or dark grey membrane coating the full height of the wall, covered by a dimpled plastic drainage board before backfill. If you see only a thin brushed black coat with no drainage board, that is dampproofing, not waterproofing.
Can you see waterproofing behind bathroom tiles?
Waterproofing behind tiles is not visible in a finished bathroom, but it should be present as a liquid or sheet membrane applied over the backer board, with fabric reinforcement tape at all corners and seams. Its presence can be confirmed by documentation, a water hold test, or by inspecting any area where tiles have been removed.
What is the difference between dampproofing and waterproofing visually?
Dampproofing is a thin black brushed coat under 1 mm thick, while true waterproofing is a multi-layer membrane system that is noticeably thicker, more flexible, and always accompanied by sealed joints and drainage protection.
How do I know if a shower has been properly waterproofed?
A properly waterproofed shower has a membrane layer beneath the tiles, reinforced corners, and sealed penetrations around the drain and any fixtures. A water hold test, where the drain is plugged and the floor is flooded for 24 hours, is the most reliable way to verify integrity without removing tiles.
What are the signs that waterproofing has failed?
Visible signs of waterproofing failure include white efflorescence on concrete walls, damp patches or peeling paint on interior surfaces, mould growth at wall-floor junctions, and lifting or hollow-sounding tiles in wet areas. These indicate that water has breached the membrane or that no proper membrane was ever installed.